/
Editing Lift and Shift Volume Flows
Editing Lift and Shift Volume Flows
SoftNAS' Lift and Shift functionality allows administrators to not only set up volume flows quickly and easily, but also to granularly control these flows, fine tuning the data that gets moved, when it gets moved, the bandwidth allotted, etc. The following options can be applied to a SoftNAS Lift and Shift flow:
| Continuous Synchronization Options | Filtering Options | Throughput Options | Retry Options |
|---|---|---|---|
|
|
|
|
|
|
| |
|
|
In order to edit a flow, the flow must be created and configured. Once the flow has been created, it can be tuned to your organizational needs.
- First, Continuous Synchronization can be toggled on or off via the checkbox on the flow.
- To edit the flow further, click the Edit (pencil) icon.
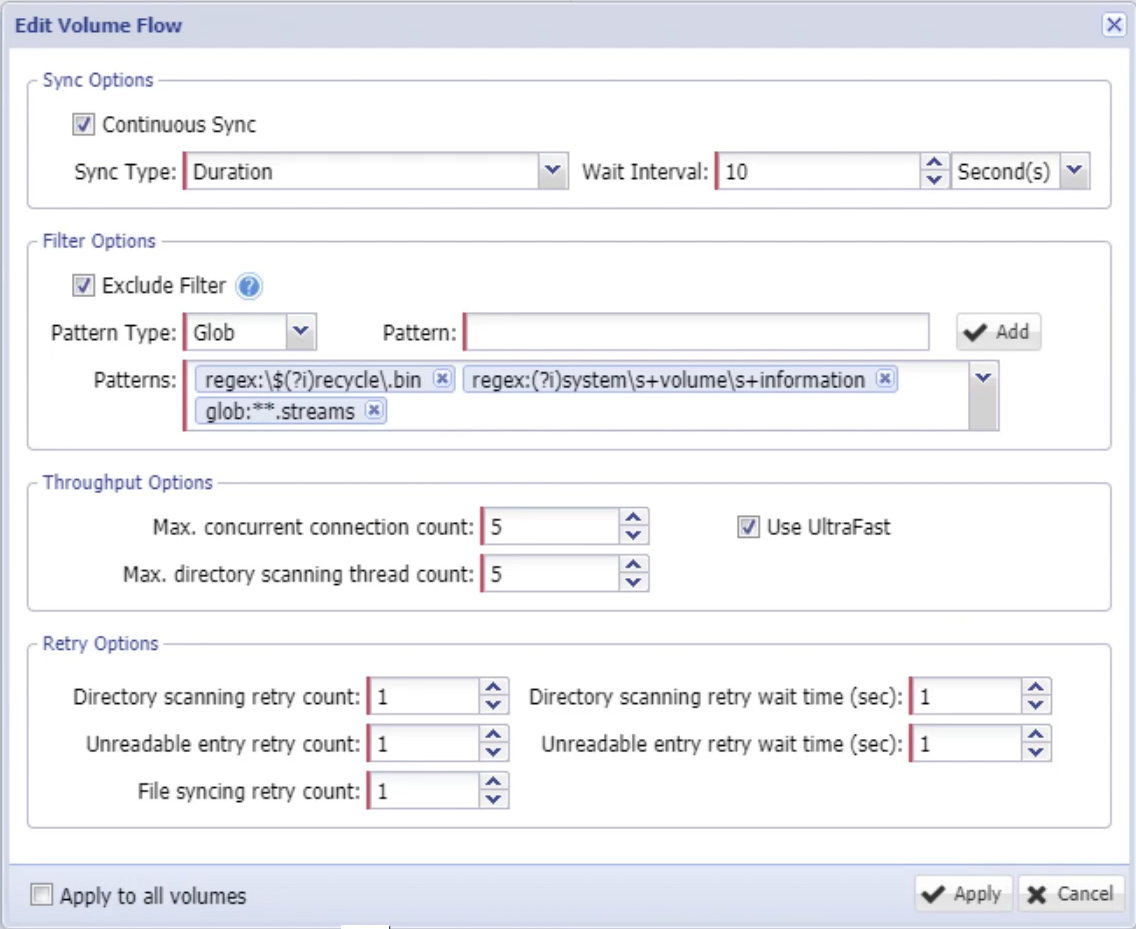
- This will open the Edit Volume Flow applet, presenting the options available to be changed.
- The first section deals with synchronization options. In this section you can again toggle continuous synchronization on or off, as well as to determine the characteristics it will use. If set to a duration, the system will perform a complete scan, then wait for the set duration (by default ten seconds) before synchronizing again.
- The interval is set using a numerical value, and the dropdown determining time increment.
- If set to the Schedule option, additional options are presented, allowing you to determine the days of the week and the time you wish to perform scheduled synchronizations.
- The next section is Filter Options, which allows you to exclude certain source content from being a part of the Lift and Shift volume flow.
- This filtration makes use of both Global and Regex (regular expression) values. A quick help is provided (click the question mark icon) which outlines some of the commonly used syntax to assist you, and provides an attached document providing further details.
- As an example, perhaps we want to exclude hidden files from our flow. Simply type the exclusion into the field provided, and click Add.
- Next, we can edit throughput options, limiting the number of simultaneous connections to improve throughput, and the maximum number of directory thread counts to prevent overtaxing the CPU.|
- Finally, you can determine the number of retries the system will allow before throwing an error. For Directory Scanning and Unreadable entries, you can also determine the interval between retries to provide the system an opportunity to recover from momentary issues.
For File syncing attempts, you can only set the number of retries.
- Lastly, you can select whether these changes will apply to only the currently selected flow, or all of the volumes on the system.
- Click Apply when you have the desired options selected and changed.
- After clicking apply, if the flows are currently running, they will be paused while the changes are applied. The flows will resume after the changes have been applied, allowing us to finalize our changes.
- Click Verify at the bottom right to test the flow or flows changed. Click Next once complete.
- Next we will need to validate the changes we just made. To do so, select Verify Config, once again at the bottom right.
- Once available, select Start Data Flow (from the same location).
All of the available changes can be applied to a flow whether currently running, at creation, or while paused. The flow will pause to apply the changes and resume after you have verified the flow and the configuration. Your edited flow is now configured.
Related content
Lift and Shift of a Volume from Source to Target
Lift and Shift of a Volume from Source to Target
More like this
SoftNAS® Interface Elements
SoftNAS® Interface Elements
More like this
Lift and Shift™ File Migration
Lift and Shift™ File Migration
More like this
SmartTiers™ Configuration
SmartTiers™ Configuration
More like this
Managing Schedules
Managing Schedules
More like this
Snapshots in StorageCenter
Snapshots in StorageCenter
More like this


