AWS Getting Started - Configuring your SoftNAS Instances
- Former user (Deleted)
- Sean Hastert
- Tom Sheffield (Unlicensed)
- Malika Jones (Unlicensed)
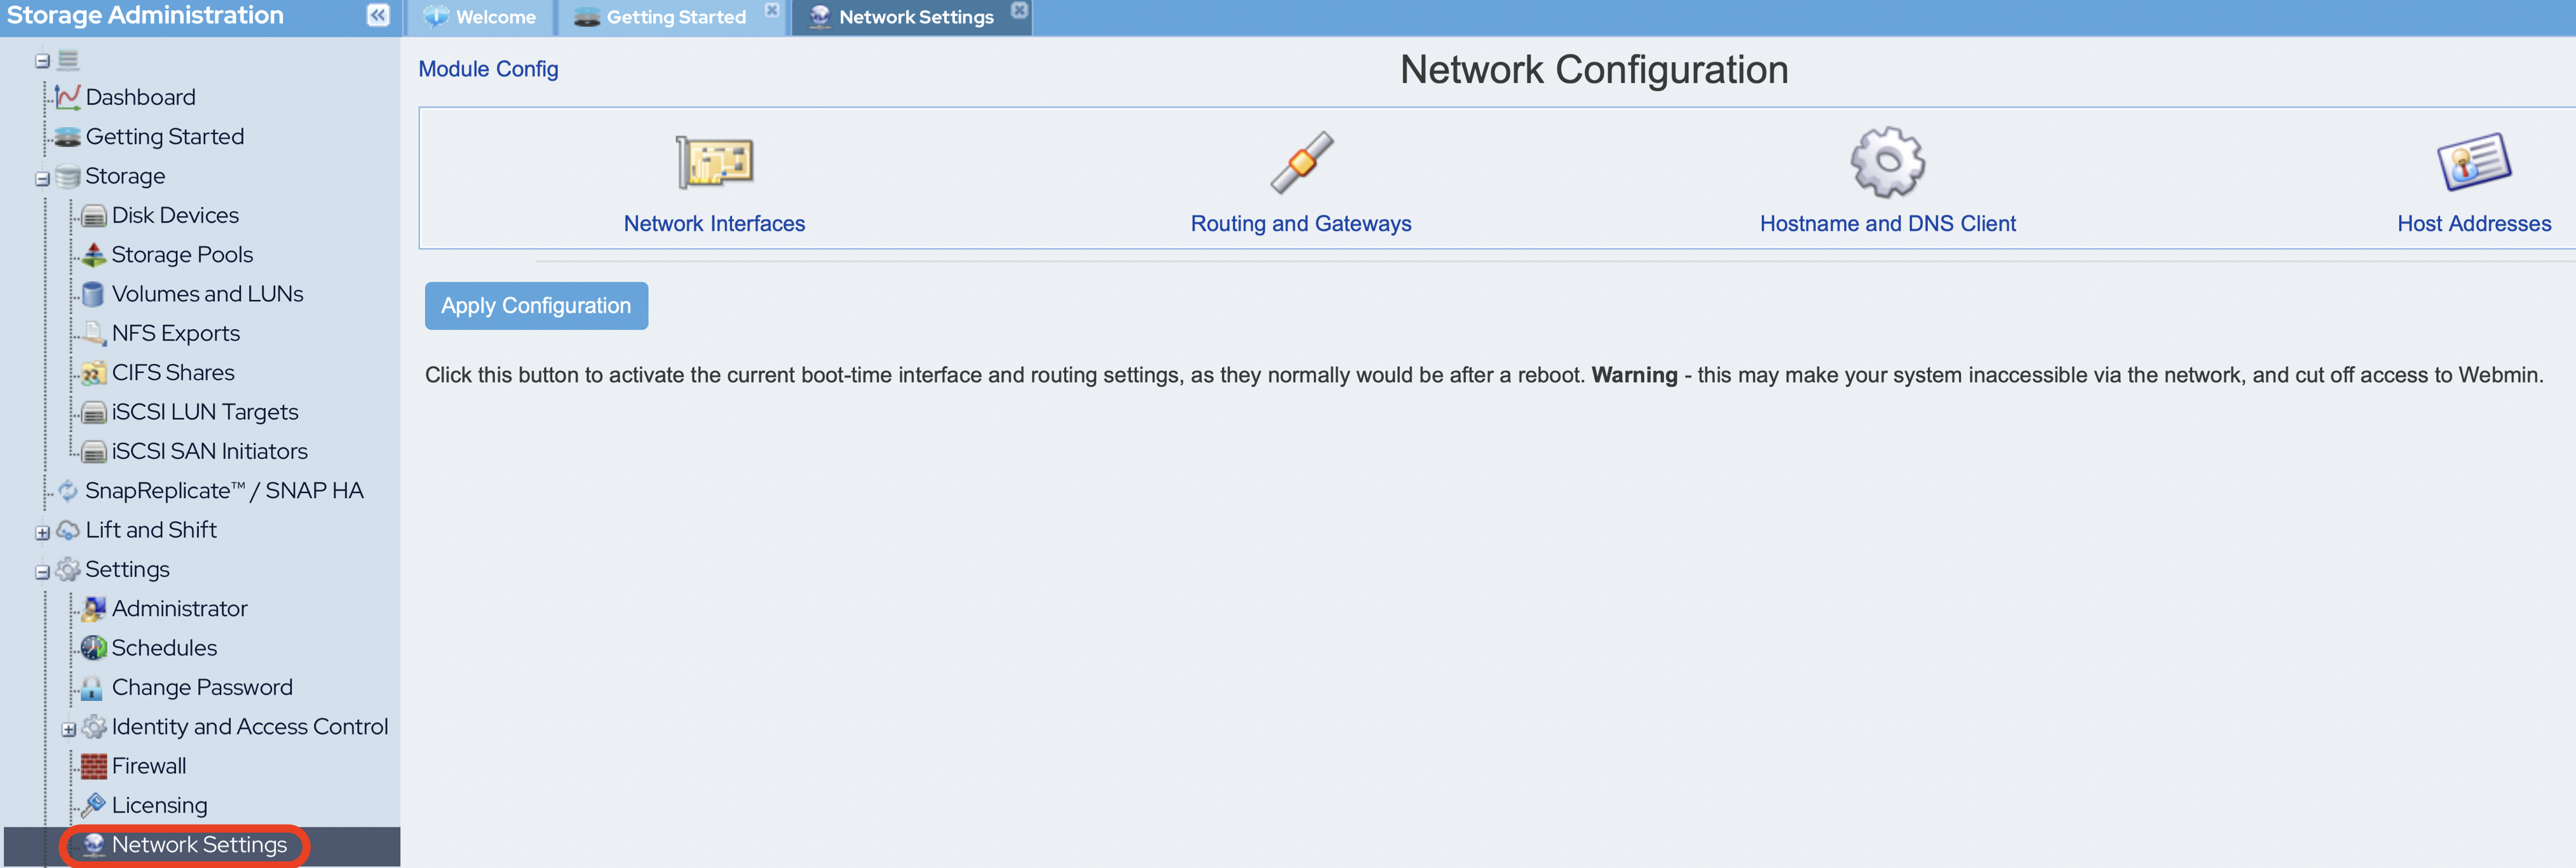
Configure Network Settings and Hostname
For your AWS instance, network settings are taken care of during creation of the instance. One network interface handles the everyday traffic connecting you to your SoftNAS on AWS instance. The second interface is leveraged automatically when configuring high availability through SnapReplicate™ and Snap HA™
If adding additional network interfaces, or changing IP addresses, routing and gateways, hostnames or host addresses, this can be done by navigating to Settings > Network Settings under the Storage Administration pane.
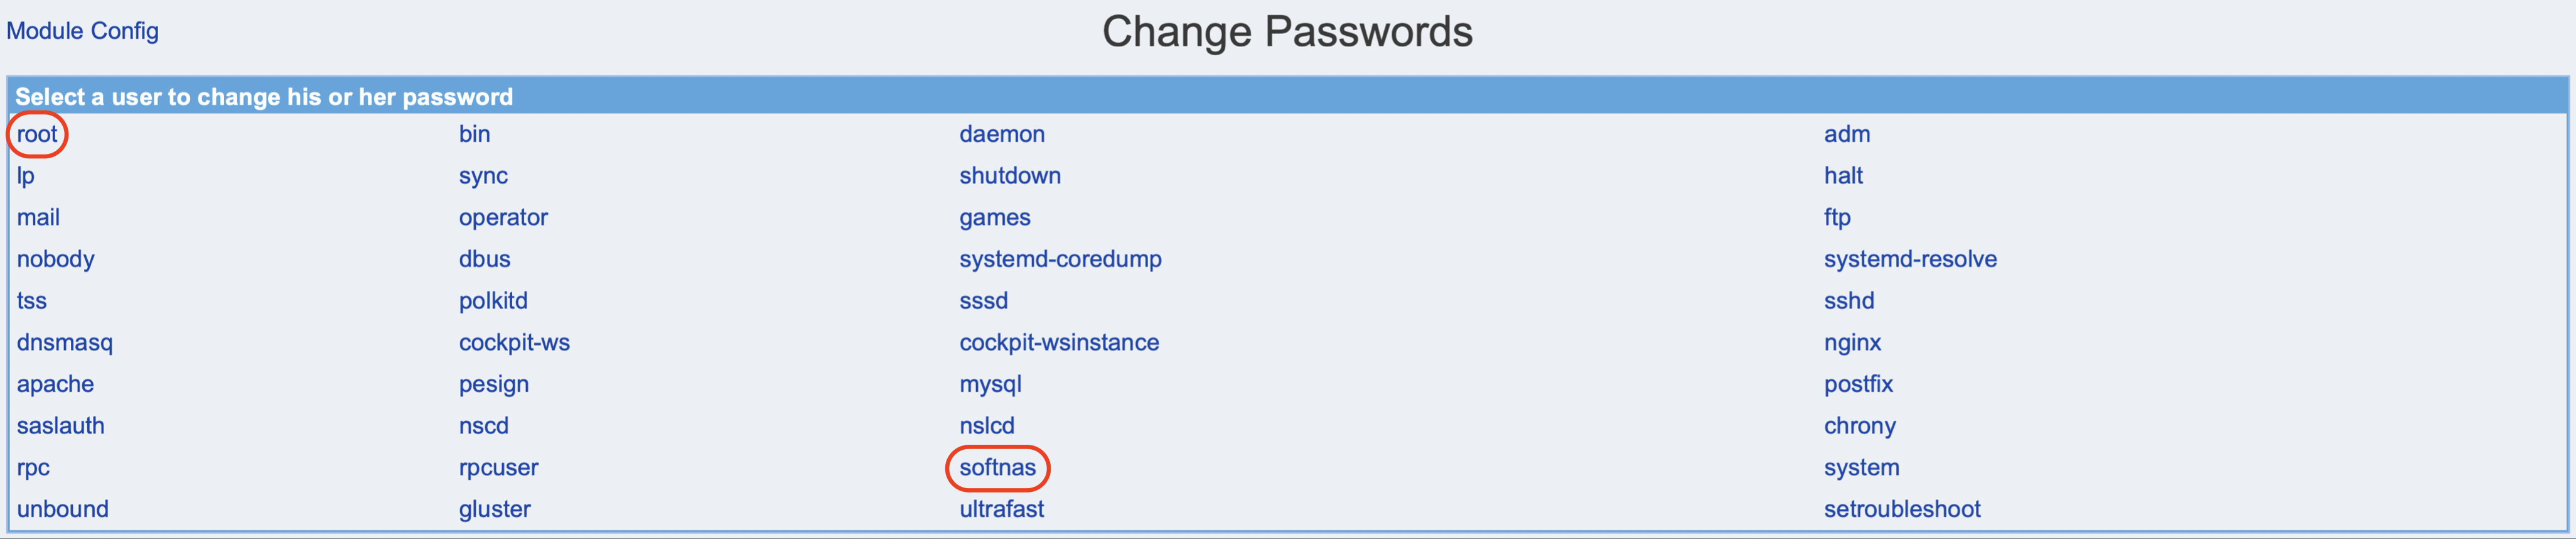
Set Administrator Passwords
The default password provided to your instance is the instance ID of your SoftNAS instance on AWS. This should be changed in a production environment, particularly if your AWS account is shared with co-workers. The instance ID is visible to anyone logged into the AWS account under which the instance is created. For this reason, you are prompted to change your password on initial login.
- Click the Change Password for 'softnas' user link from the prompt.
OR - From the Storage Administration pane, under Settings, select Change Passwords. This can be used to change passwords at anytime.
- If you use the initial prompt, you will automatically be taken to change the default SoftNAS account password.
- If you use Change Password under Settings, however, you will be prompted to select the account's you wish to change.
- Buurst recommends changing the default password for both the softnas and root users.
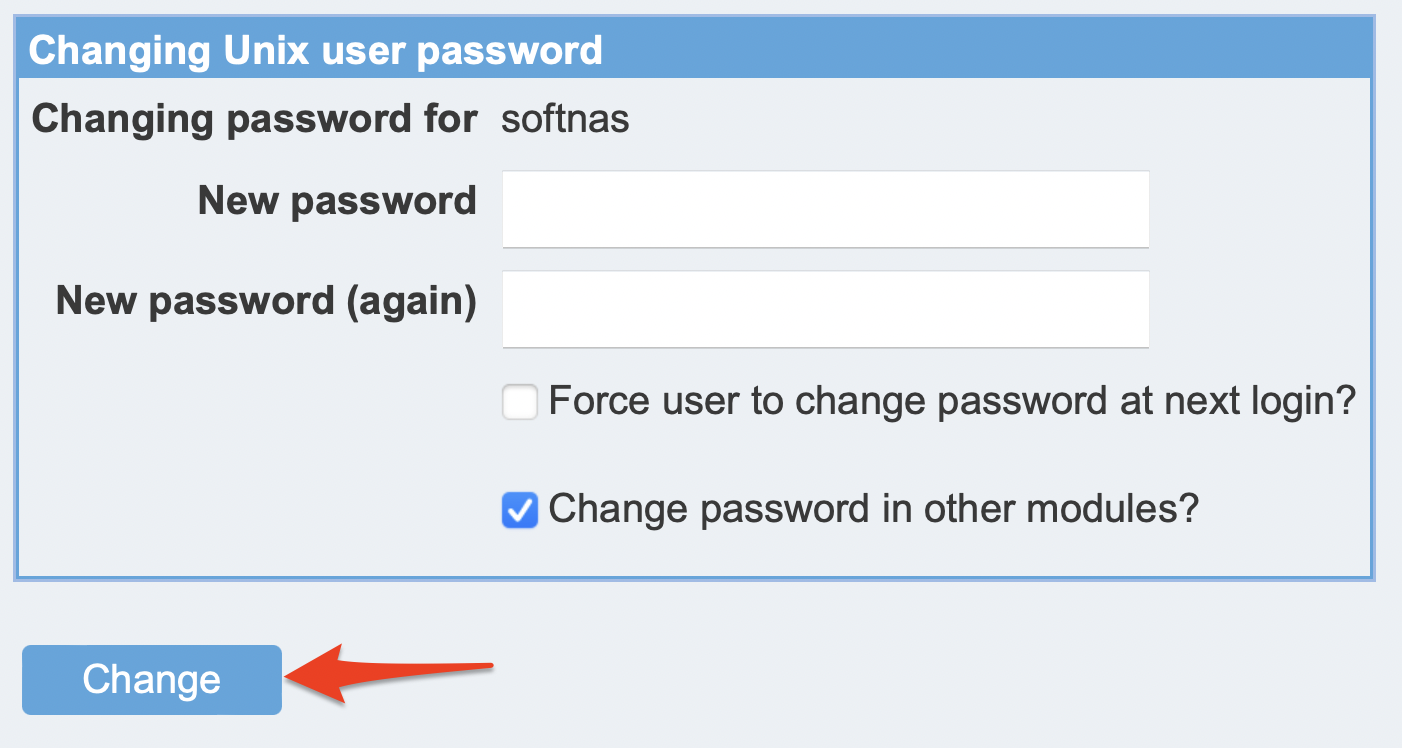
- Provide the new password.
- If handing the instance to a new administrator, check the box to Force user to change password at next login. This will allow the new SoftNAS admin to select his own password.
- Click Change.
Apply Software Updates
To update your SoftNAS Instance, navigate to Settings > Software Updates under the Storage Administration pane.
If an update is available, the latest version will be displayed in the Select version drop down.
Click Apply Update Now to begin the update. To ensure customers are aware that downtime may occur. A confirmation prompt will appear. Click Yes to begin the upgrade. Be sure not to shut down the Virtual Machine or interrupt the upgrade process.
Click Finish when prompted. This will trigger a reboot, requiring you to log back into your instance.
Buurst recommends reading the linked Release Notes. The Release Notes may contain information not only about the features and fixes, but also about whether the update will require downtime, allowing you to plan accordingly. This is not particularly relevant for a POC deployment, but important in a production scenario.
Updating your software to obtain the latest features, security improvements and bug fixes is always recommended. Buurst takes this recommendation a step further, and has tied the latest updates to their No Downtime Guarantee. This ensures our clients are receiving the best version of our product and support to match.

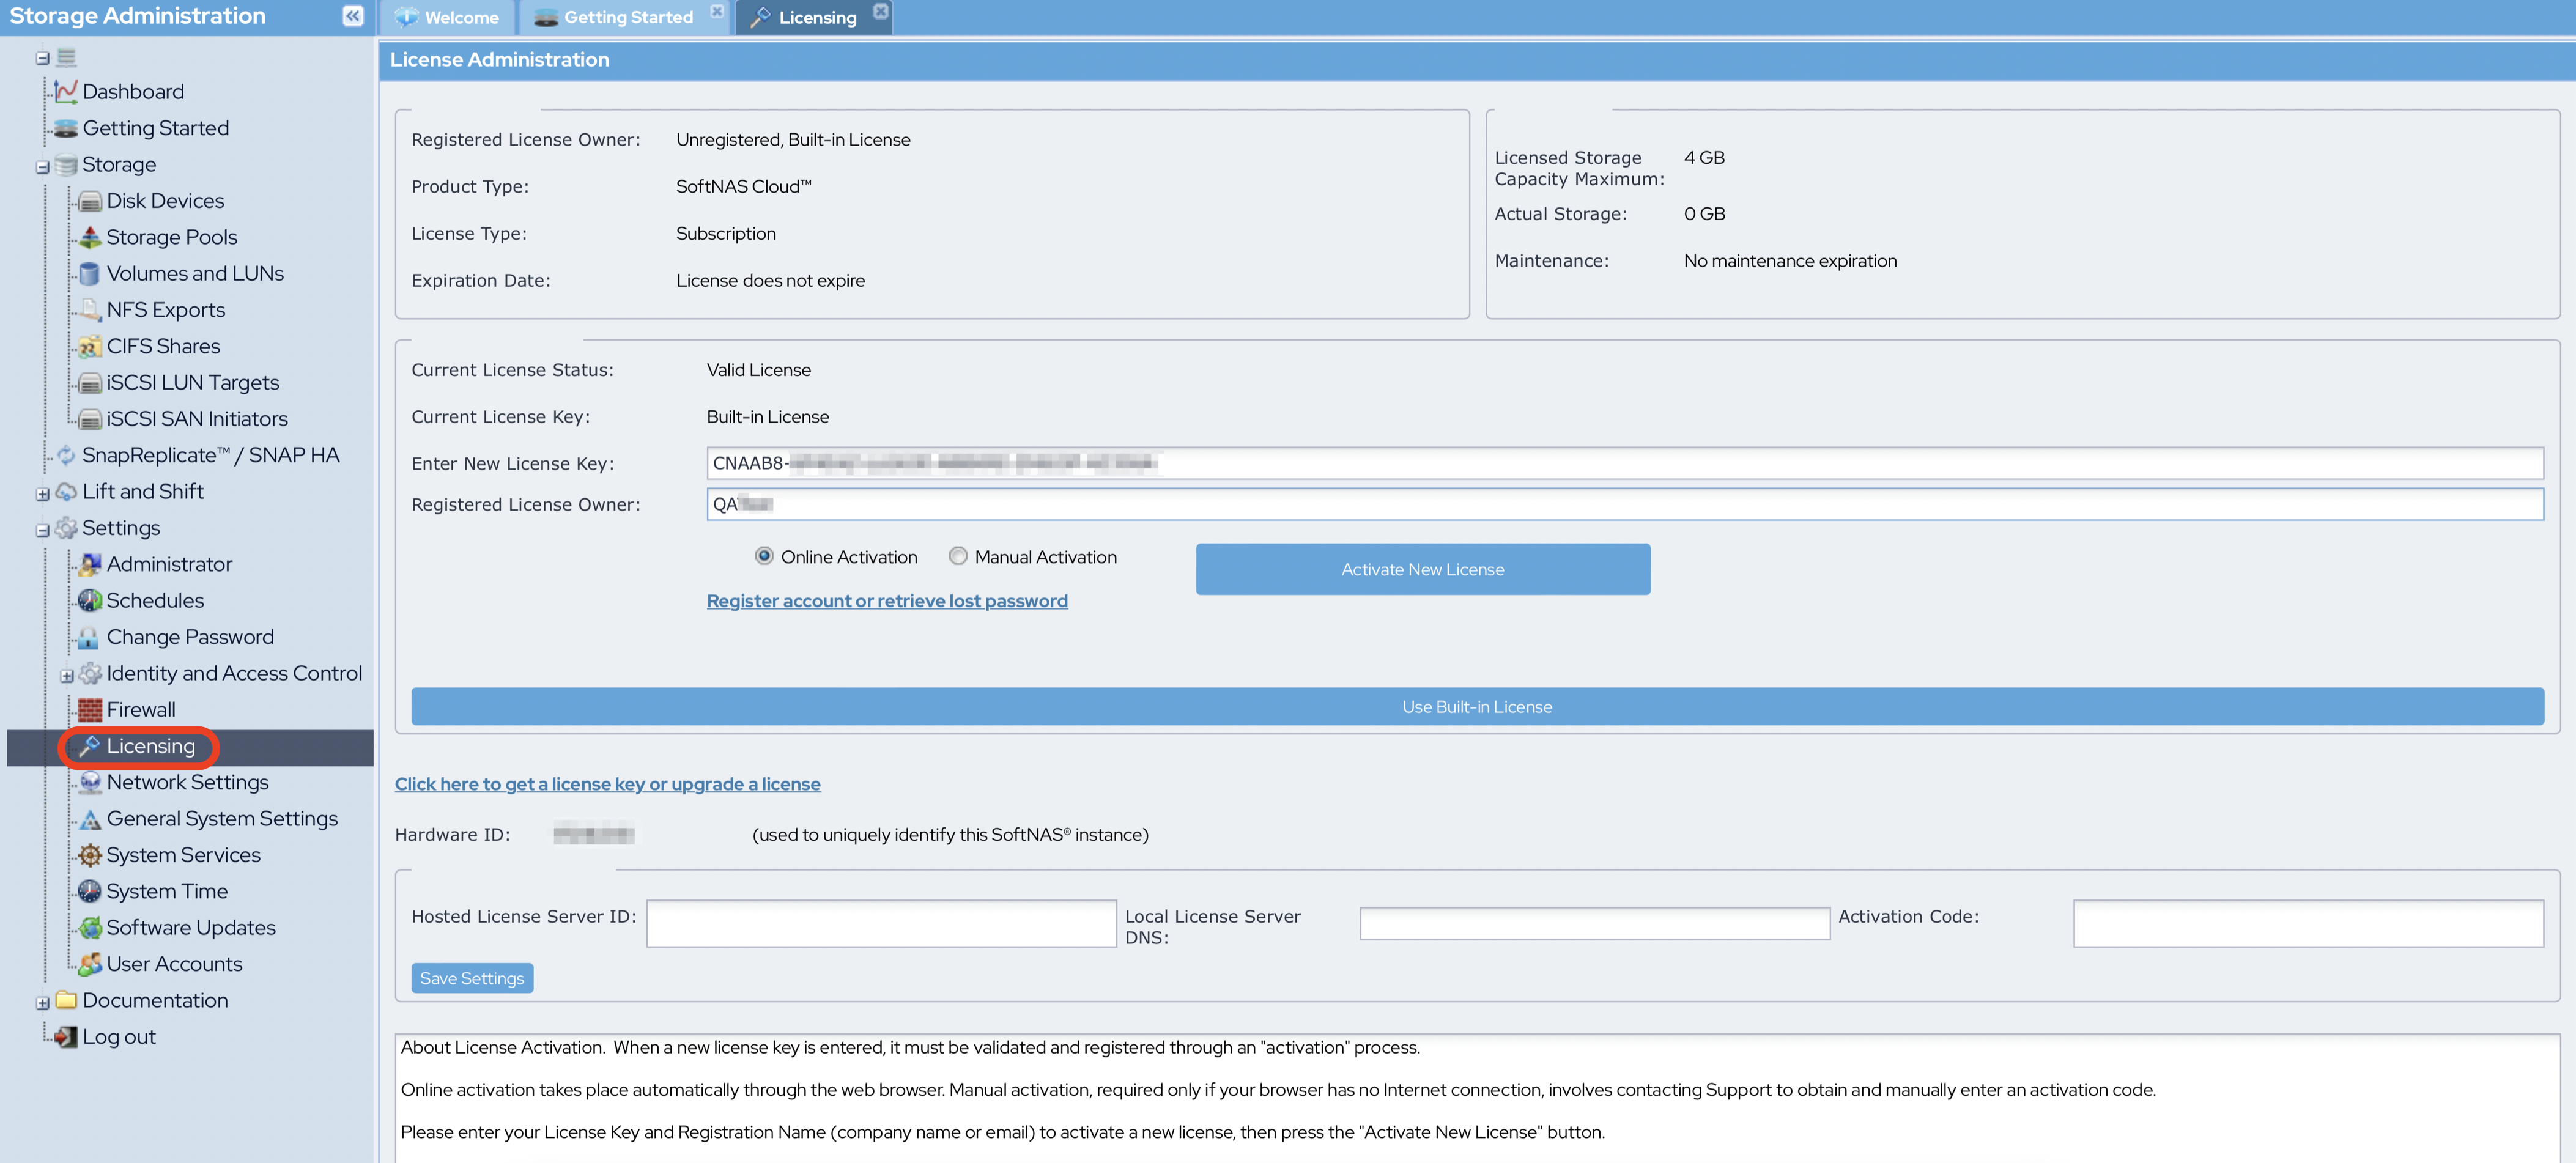
Activate License Key
- In AWS, your SoftNAS instance on AWS will be automatically licensed, unless you select a BYOL (Bring Your Own License) AMI.
- If you need to apply a license (you can obtain a license by registering here).
- To access the License Administration page, navigate to Settings > Licensing in the Storage Administration pane.
- Enter the license key in the Enter New License Key text box.
- Enter the license owner in the Registered License Owner text box.
Obtaining your License
Add Storage Devices
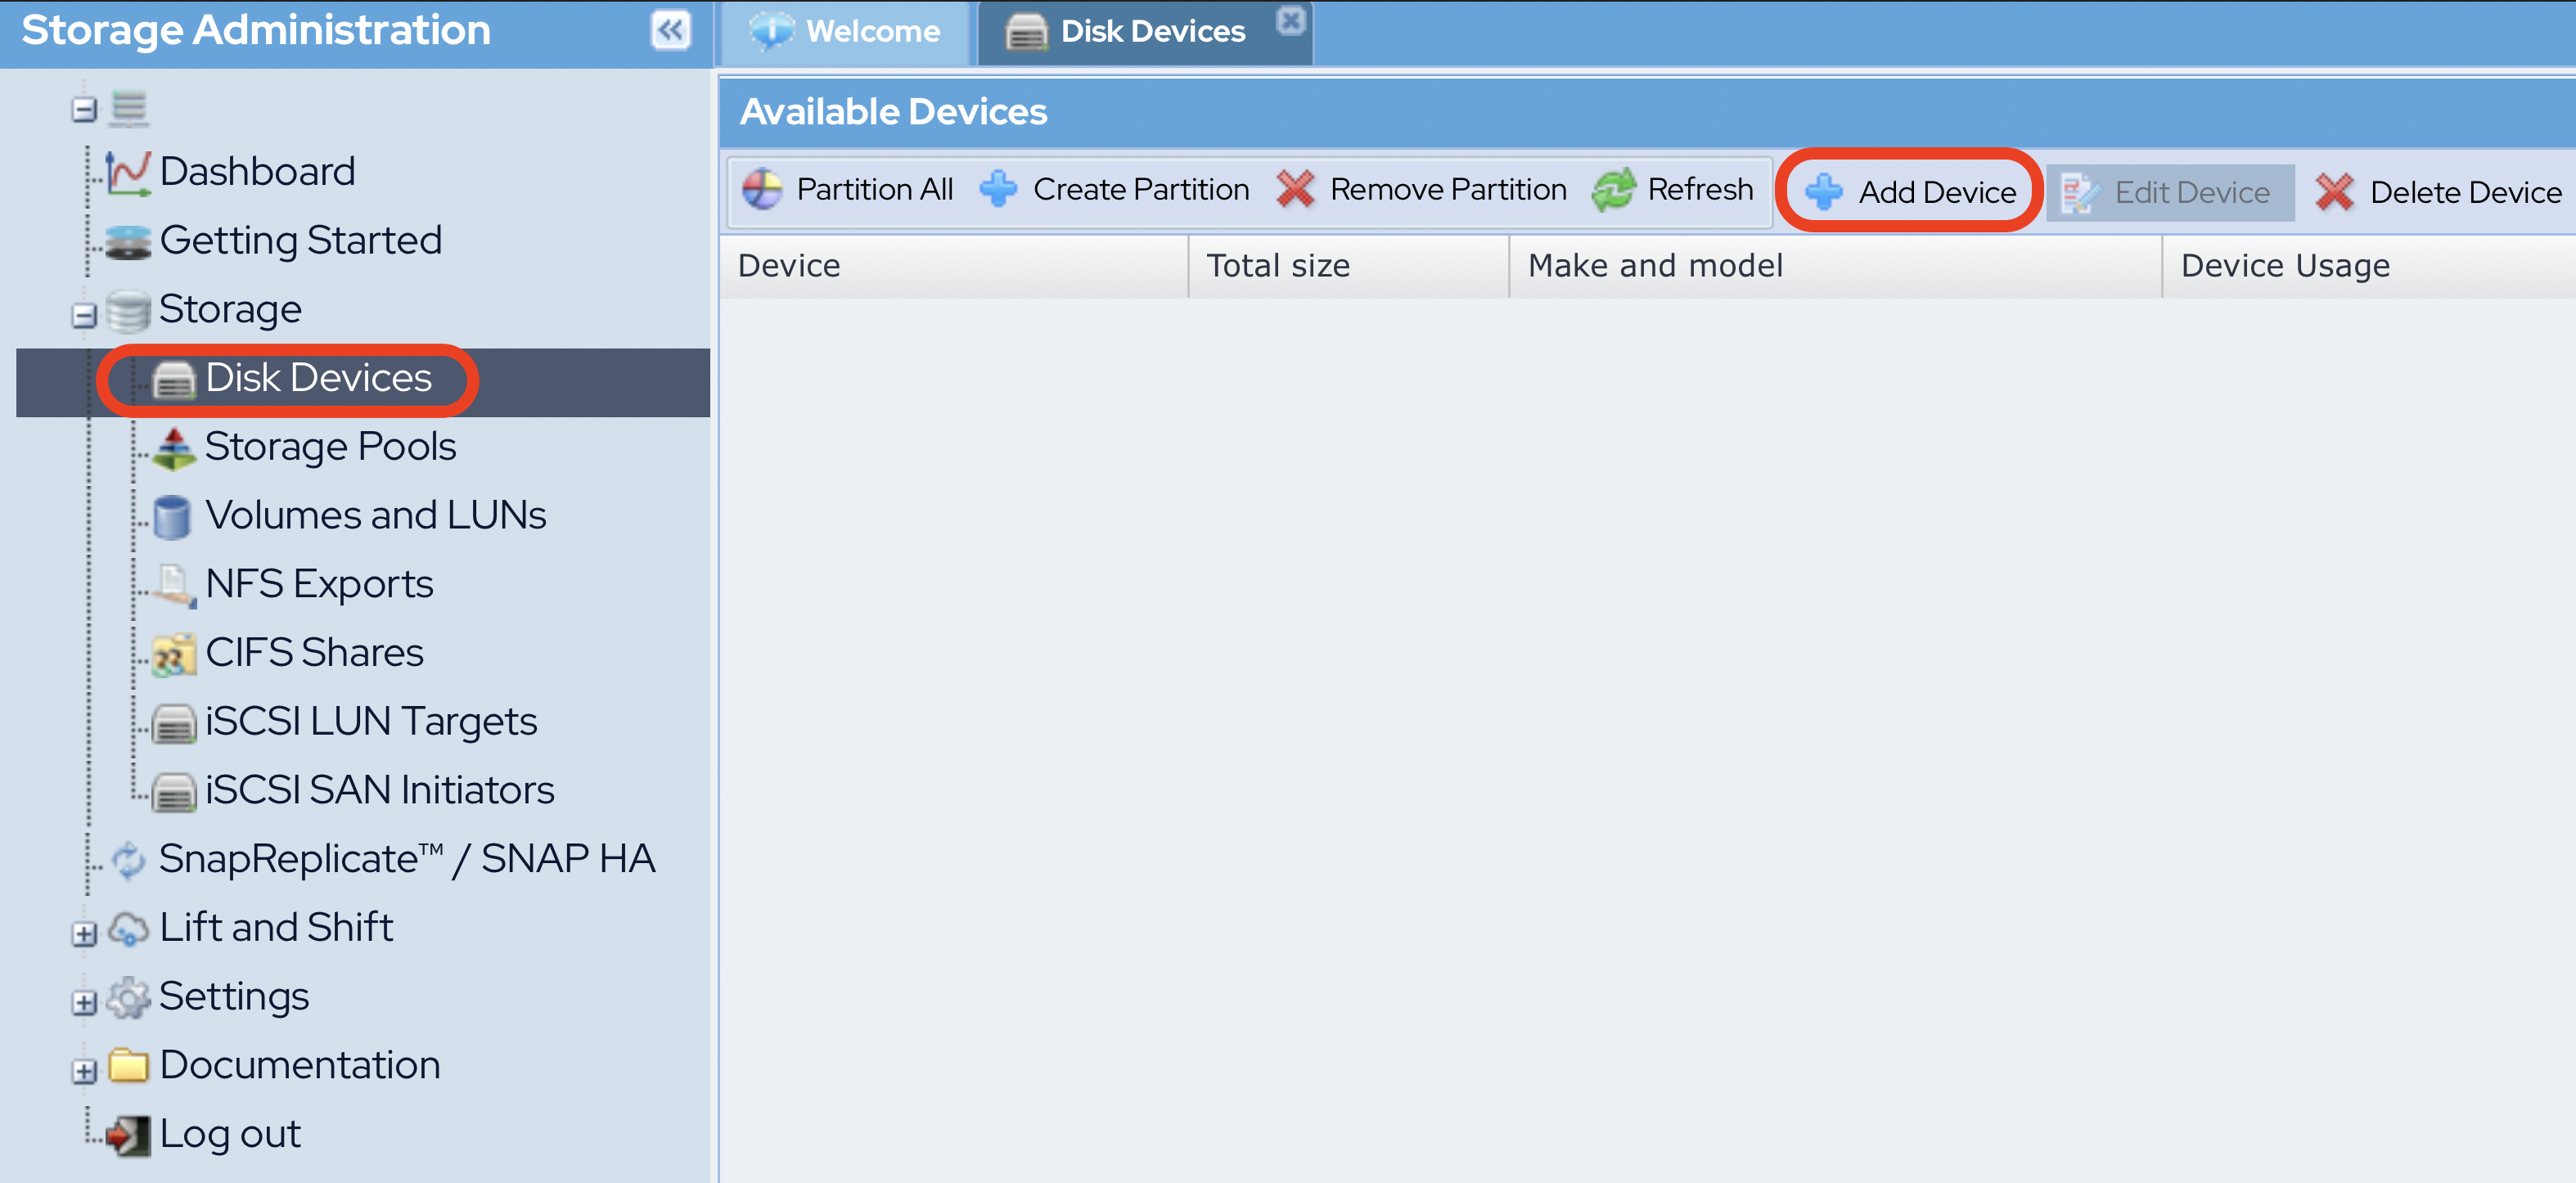
- Navigate to Storage > Disk Devices from the Storage Administration pane.
- Click Add Device.
If necessary, enter your AWS Access Key ID and Secret Access Key into the appropriate text boxes.
- If AWS account credentials are unavailable (grayed out), an Amazon IAM Role was specified at SoftNAS instance creation.
- Creating a SoftNAS IAM user from the Amazon Web Services Dashboard is the recommended approach for a more secure connection to AWS.
- Choose the size of the EBS disk you wish to provision in the Maximum Disk Size (GB) text box.
If you want your disk to be encrypted, check the box for Encrypted disk.
Additional processing power (vCPU) is recommended for disk encryption.
Select the volume Type using the drop-down menu.
Volume Types
- General Purpose: General purpose SSD volume that balances price and performance for a wide variety of transactional workloads.
- Provisioned IOPS: Highest-performance SSD volume designed for mission-critical applications. Provisioned IOPS is configurable, allowing you to set an IOPS performance benchmark, allowing AWS to promise single-digit millisecond latencies and to deliver the provisioned performance 99.9% of the time. Configure the Provisioned IOPS threshold with the dropdown that appears below the option once selected.
- Magnetic: Low-cost HDD volume can be used for workloads with smaller datasets where data is accessed infrequently or when performance consistency isn't of primary importance.
- Throughput Optimized HDD: Low-cost HDD volume designed for frequently accessed, throughput-intensive workloads.
- Cold HDD: Lowest cost HDD volume designed for less frequently accessed workloads.
- General Purpose: General purpose SSD volume that balances price and performance for a wide variety of transactional workloads.
- Enter your IOPS into the text box.
- Enter your Throughput into the text box.
If persistent data storage is not needed, select Delete disk on instance termination. This will ensure that storage is deleted immediately upon instance termination, preventing additional storage costs.
All data will be lost!
Select how many disks you want to create with the current configuration by entering the amount into the Number of EBS disks to make text box.
If planning on using RAID, the number of disks created must match the requirements of the RAID level. For example, RAID 0 or RAID 1 will require 2 disks. Raid 10 would require a minimum of 4 disks. See AWS Getting Started - Storage.
Be sure to make note of the selections made when creating your disks, as you will repeat this process on the second instance.
- Once configuration is complete, click the Create EBS Disk button.
Partition Storage Devices
- If creating disks from within SoftNAS’ user interface, partitioning the newly created disks will likely not be necessary. If provisioned at instance creation, however, partitioning disks is an important and necessary step. To be certain that disks have been partitioned, check the column labelled Device Usage in the Available Devices pane.
- If the entry under Device Usage reads Available to Assign, partitioning is not required.
- If the entry under Device Usage reads Needs Partition, click the Partition All button to quickly partition any unpartitioned disks.
- Alternatively, select the disk requiring a partition, and click Create Partition.

Create Storage Pool
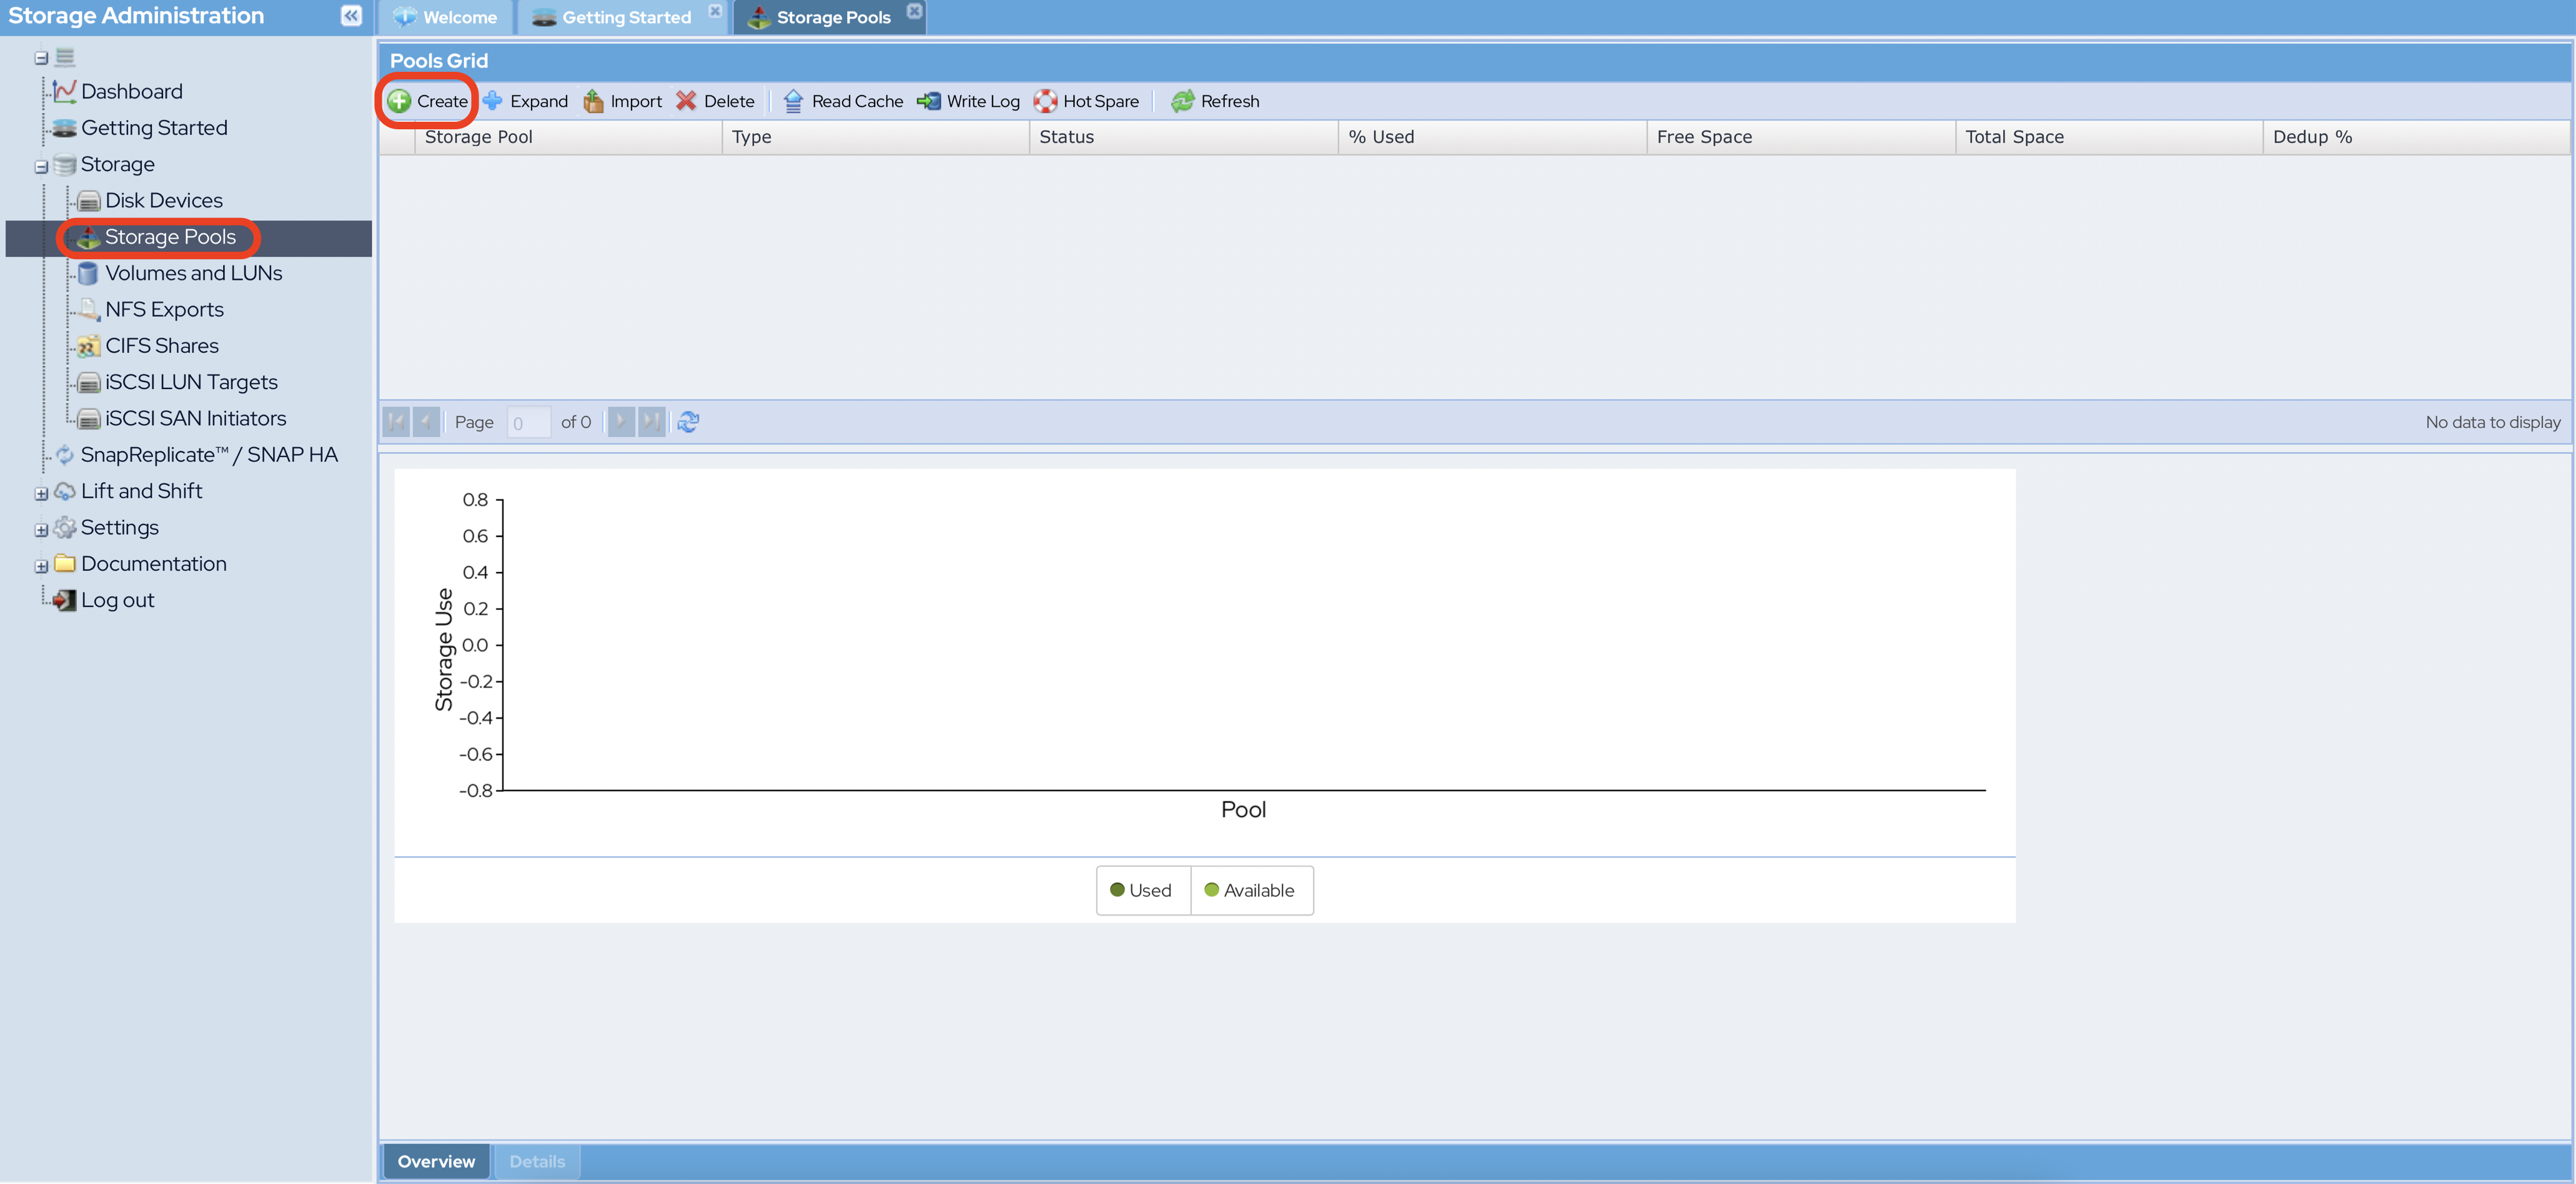
- Navigate to Storage > Storage Pools from the Storage Administration pane.
- Click Create.
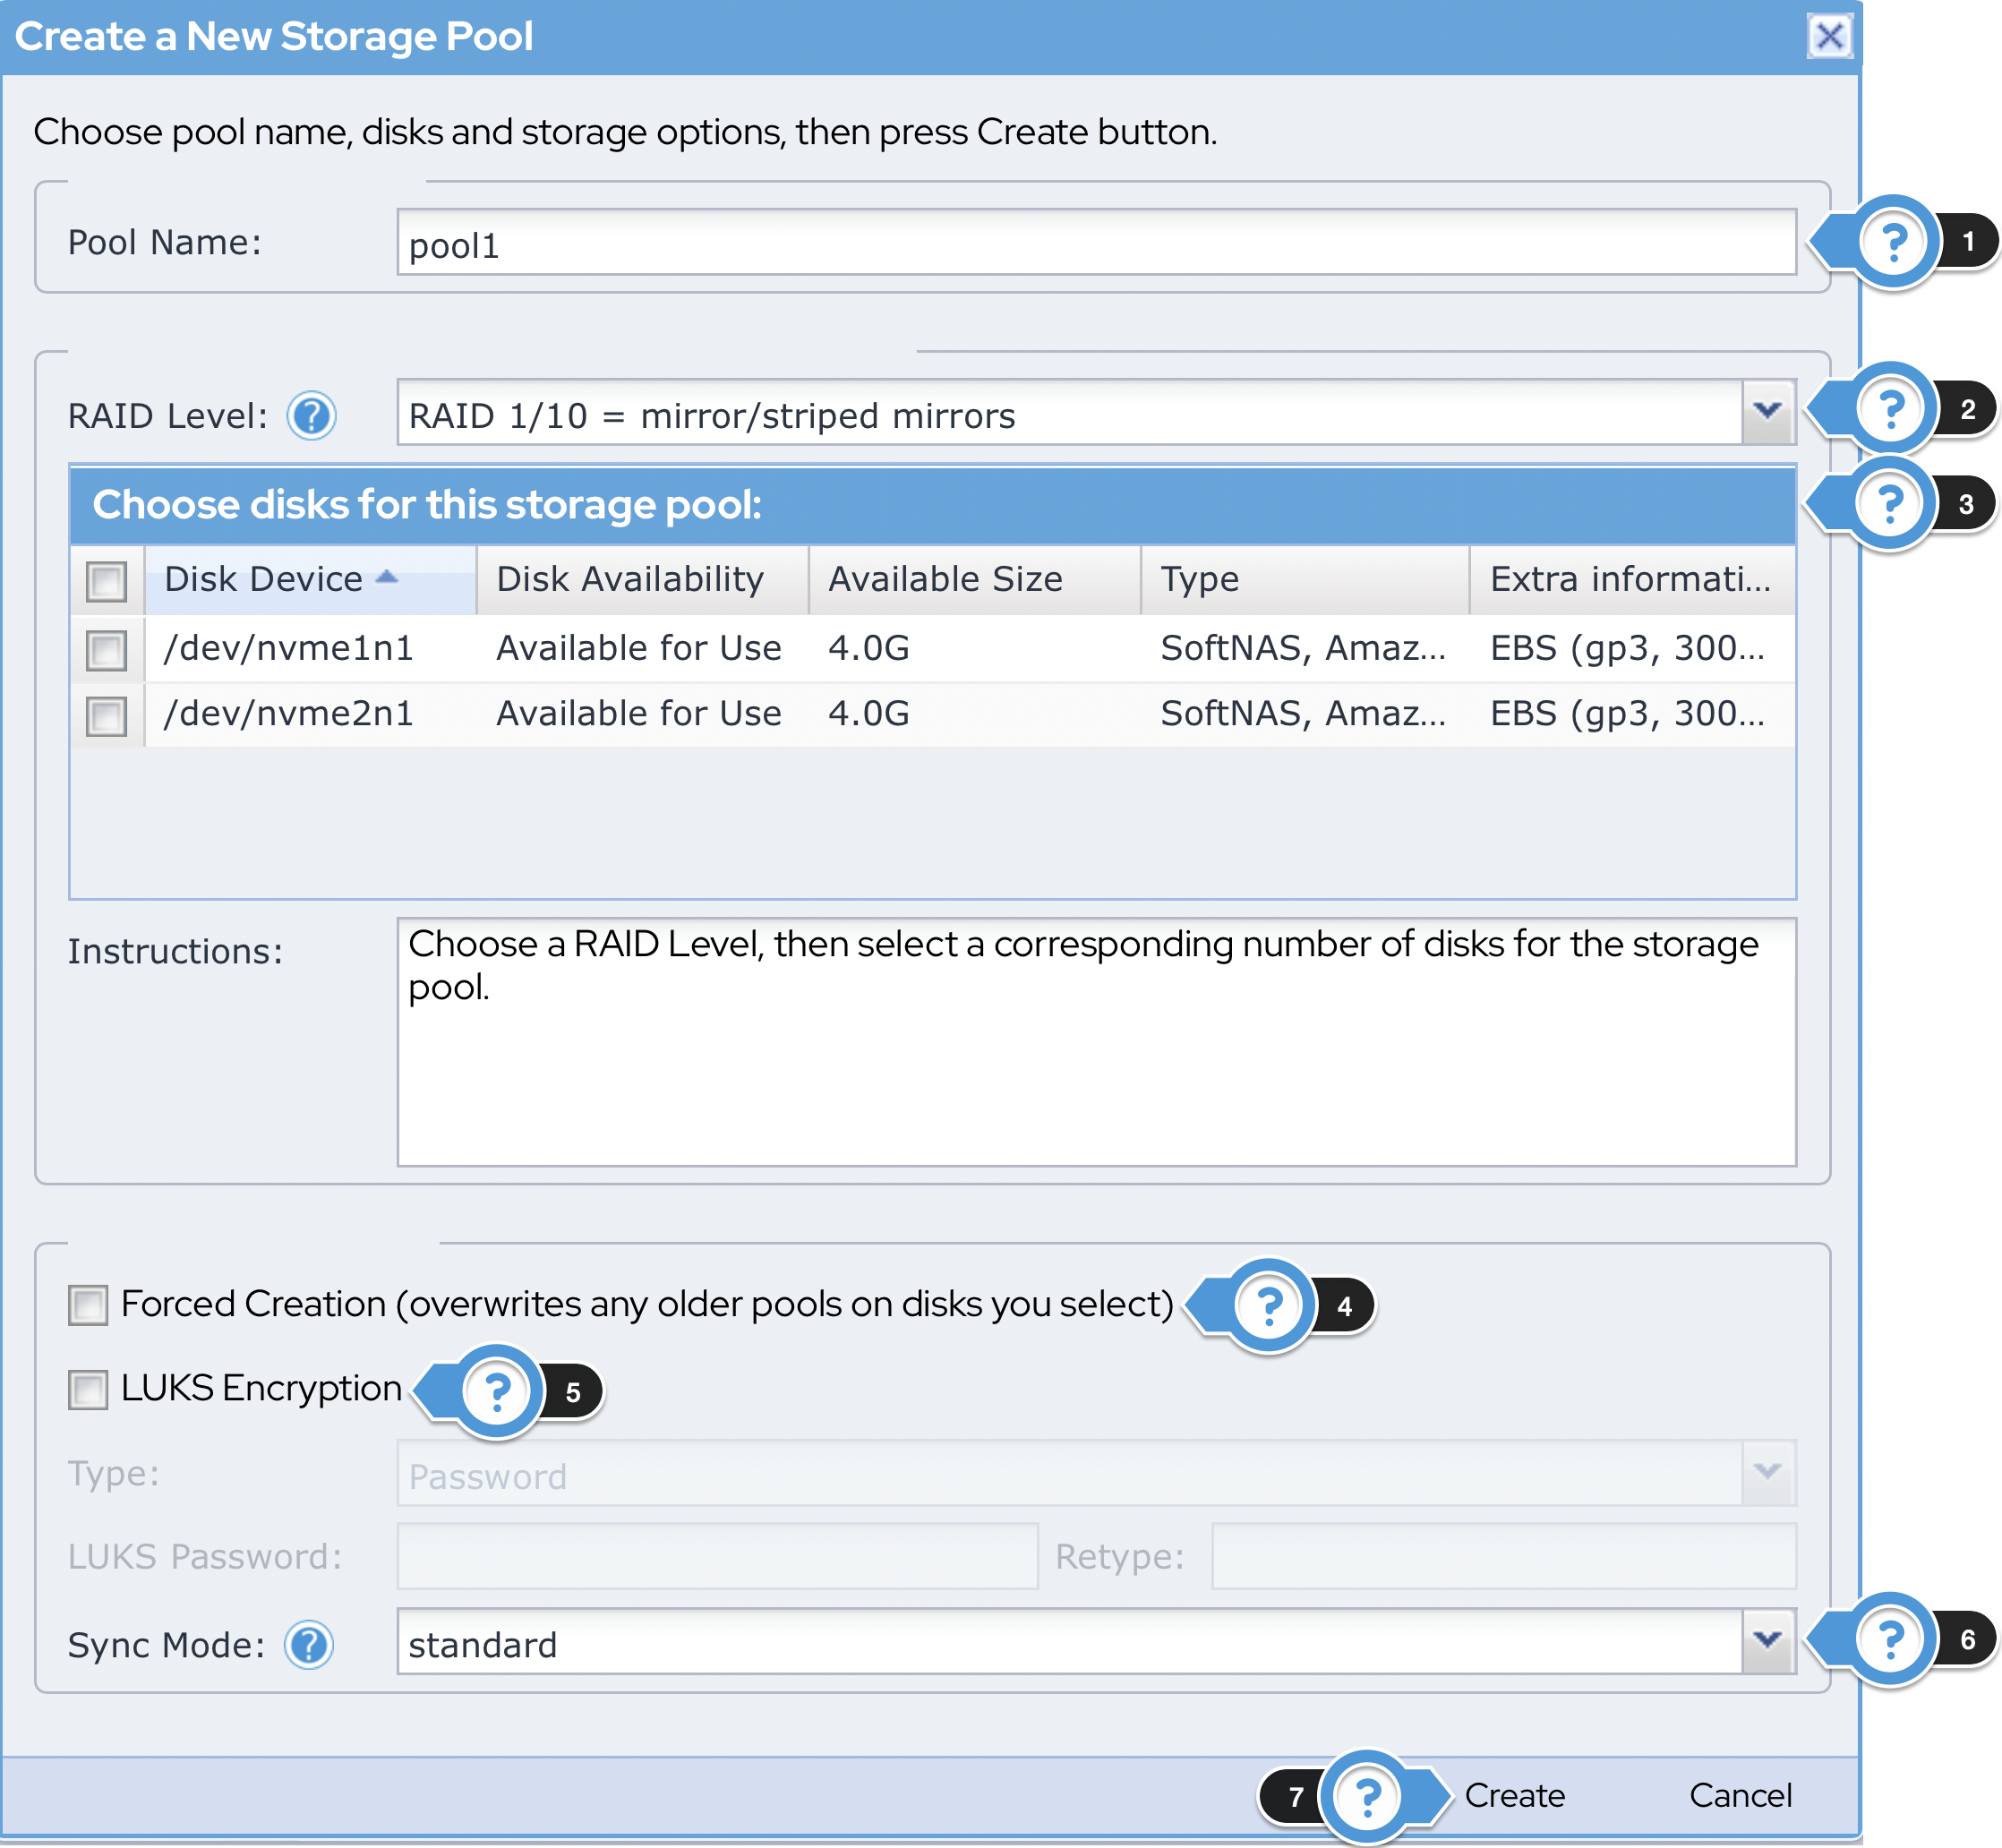
- Provide a name for the pool in the Pool Name text box.
- Select the RAID Level using the drop-down. If not using software RAID for your POC (or if this were a VMware deployment in which hardware RAID was being used) you would select No Raid, JBOD.
- Select the number of disks required for your RAID selection by selecting the checkbox next to the disks you wish to use.
- If you want to overwrite any pre-existing pools, select the Forced Creation (overwrites any older pools on disks you select) checkbox.
- If you want to apply LUKS encryption, select the LUKS Encryption checkbox and supply the necessary information.
If you wish to alter Sync Mode, select the appropriate option from the drop-down.
Altering the Sync Mode setting can affect performance. This is an advanced setting that should not be altered without a valid reason. See Working with Storage Pools for more information.
- Once configurations are complete, click the Create button.
Be sure to make note of the selections made when creating your storage pools, as you will repeat this process on the second instance.
Create Volumes and LUNs
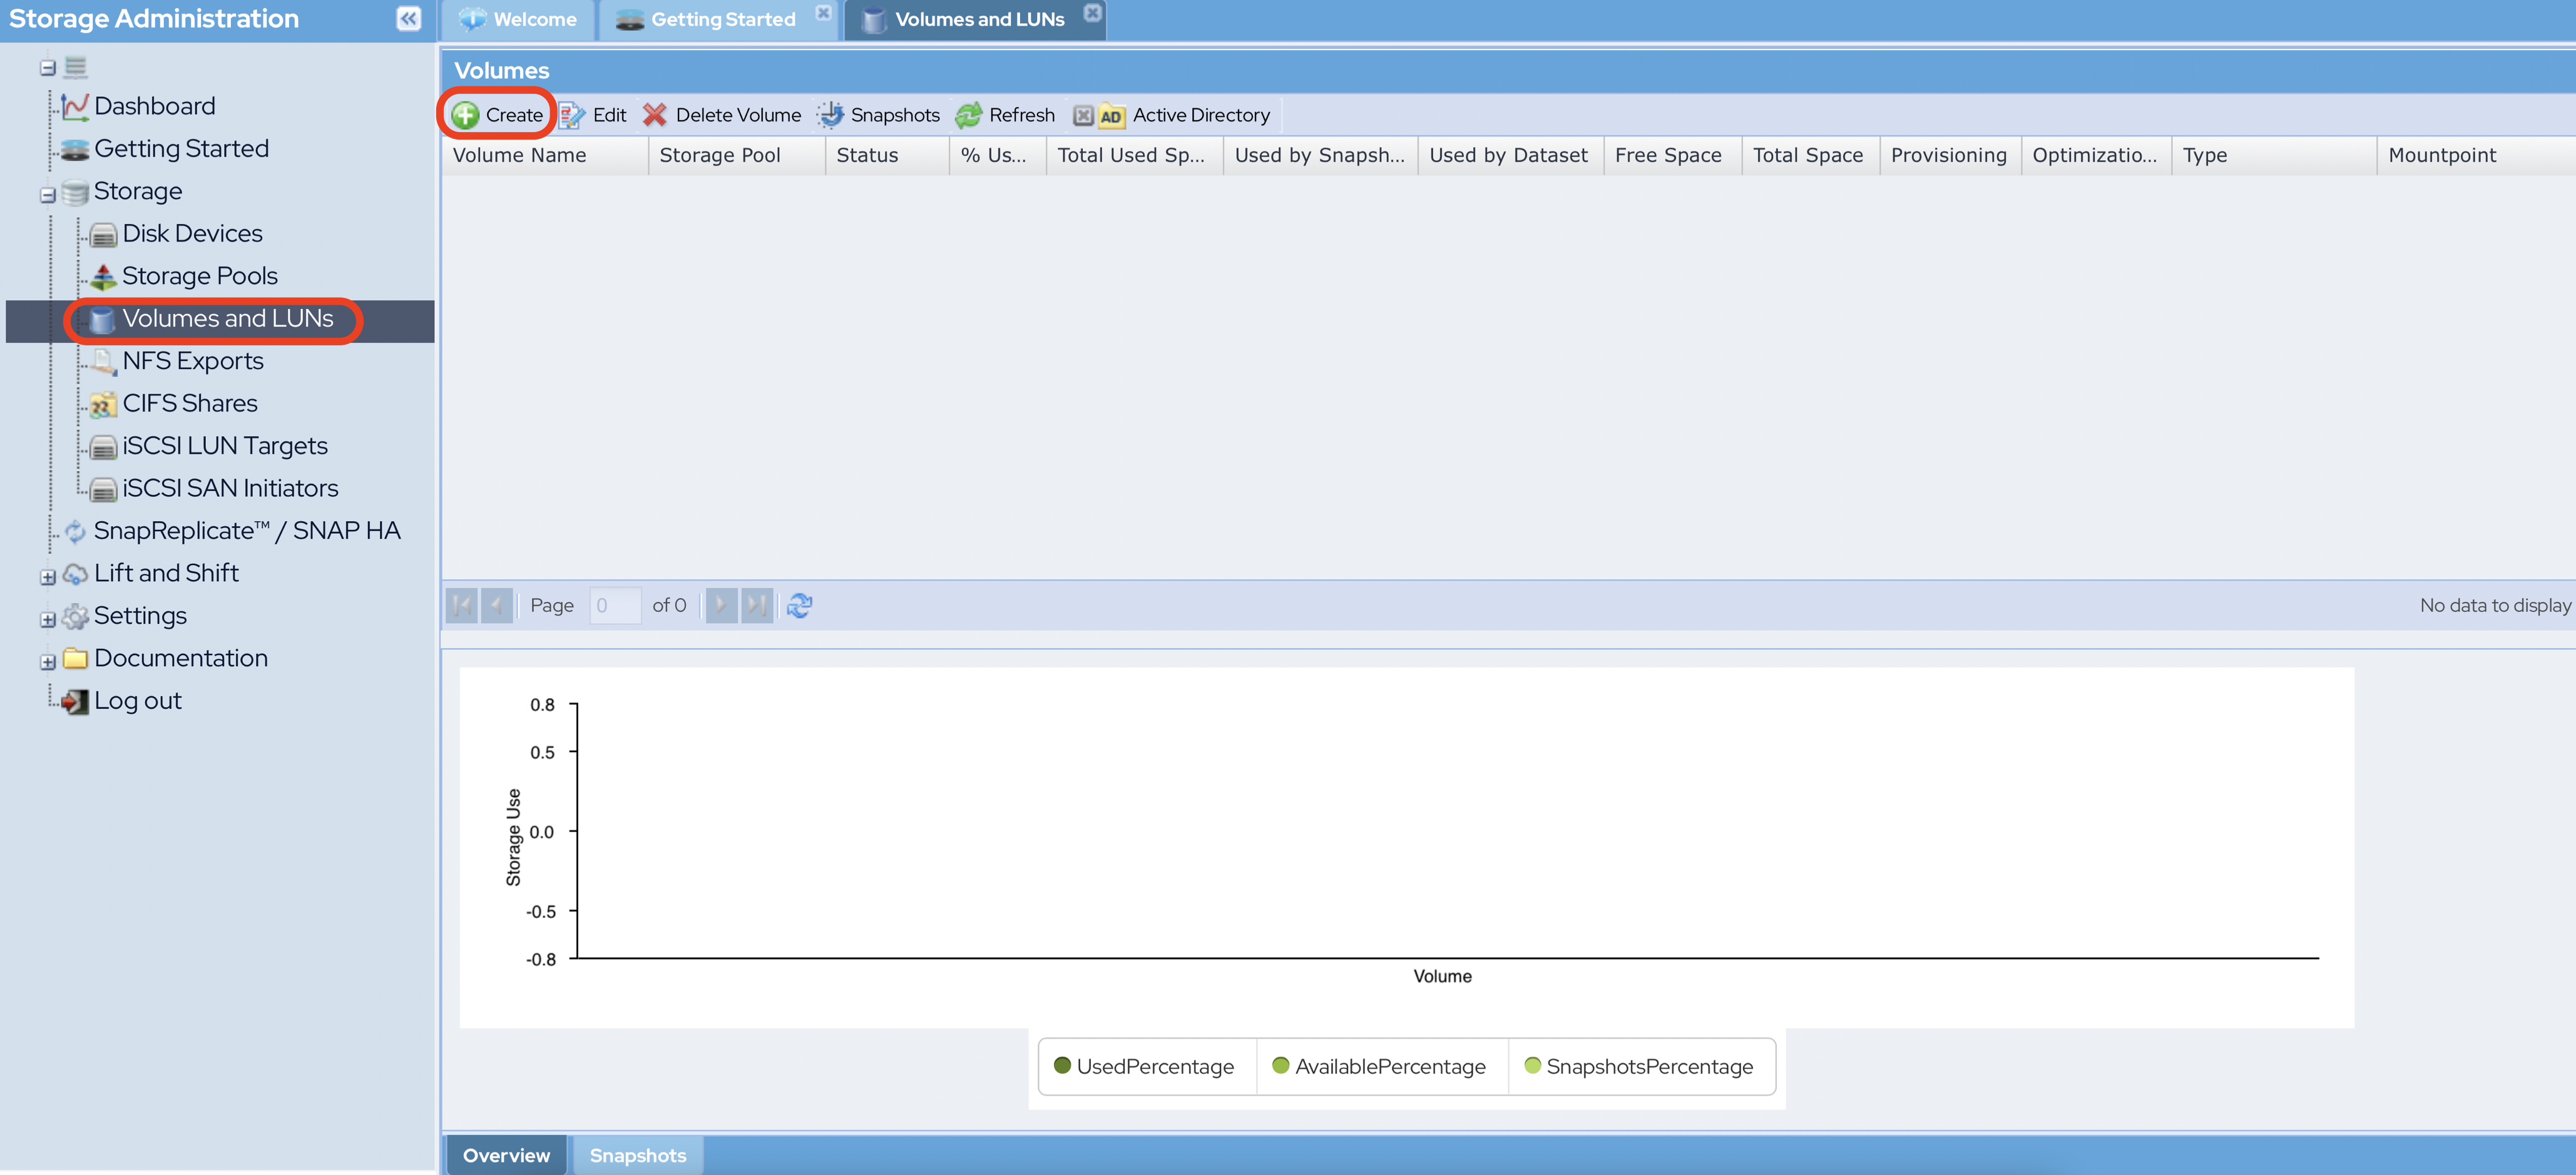
- Navigate to Storage > Volumes and LUNs
- Click Create.
- Provide a name for your volume in the Volume Name text box.
- Choose the storage pool you want to put the volume in by either typing the name of the pool into the Storage Pool text box or clicking the Storage Pool... button and selecting the pool.
- Choose the appropriate volume type. You can choose to share the volume via a variety of volume types which include NFS, CIFS, and iSCSI LUN.
Select the desired storage provisioning option. Buurst recommends Thin Provision for most standard use cases.
- Thin-provisioning allows a volume to acquire storage from its Storage Pool on an as-needed basis, as new data is written to the volume. Thin-provisioning enables many volumes to share a storage pool without an upper limit being placed on the volume itself (the only upper limit to the volume's size is available space in the pool).
- Thick-provisioning reduces the amount of space available in the Storage Pool by reserving this space for use by a specific volume. When a thick-provisioned volume reaches its maximum volume size, no more data can be written and a volume full error will be returned for writes to a full volume.
- Thin-provisioning allows a volume to acquire storage from its Storage Pool on an as-needed basis, as new data is written to the volume. Thin-provisioning enables many volumes to share a storage pool without an upper limit being placed on the volume itself (the only upper limit to the volume's size is available space in the pool).
Select any storage optimization options you wish to apply by clicking the appropriate checkbox.
This will affect the volume's performance characteristics!
- Once configuration is complete, click the Create button.
Snapshot Scheduling
Snapshot schedules for a volume can also be applied here. More information can be found at the following links:

Set up your Notification E-mail
To ensure that you and Buurst Support have adequate information to troubleshoot your instance should an issue arise, it is important that you provide a means of communication. An email address must be supplied in which support reports and logs can be sent at scheduled intervals or to notify of specific problems.
Navigate to Settings > Administrator from the Storage Administration pane.
- Select the Monitoring tab.
- Enter your email into the Notification Email text box.
- Providing a notification email is a requirement. If you do not provide one during instance configuration, you will be required to provide one prior to configuring SnapReplicate™.
- Support Reports and notifications will be sent to Buurst support automatically. The notification email is to ensure the administrator for the instance is kept apprised.
