Working with Storage Pools
- Former user (Deleted)
- Sean Hastert
- Tom Sheffield (Unlicensed)
Storage pools are used to aggregate disk storage into a large pool of storage that can be conveniently allocated and shared by volumes. The Storage Pools tab is where you view and manage all the storage pools.
A storage pool is an aggregated set of storage comprised of one or more underlying storage devices. It is comprised of devices (object and block storage, or VMDKs) created during the Add Disk Device process, or imported. The storage on these devices is aggregated into a unified pool of storage that can be managed and deployed as a single pool. Each pool provides storage which is then allocated for use into volumes.
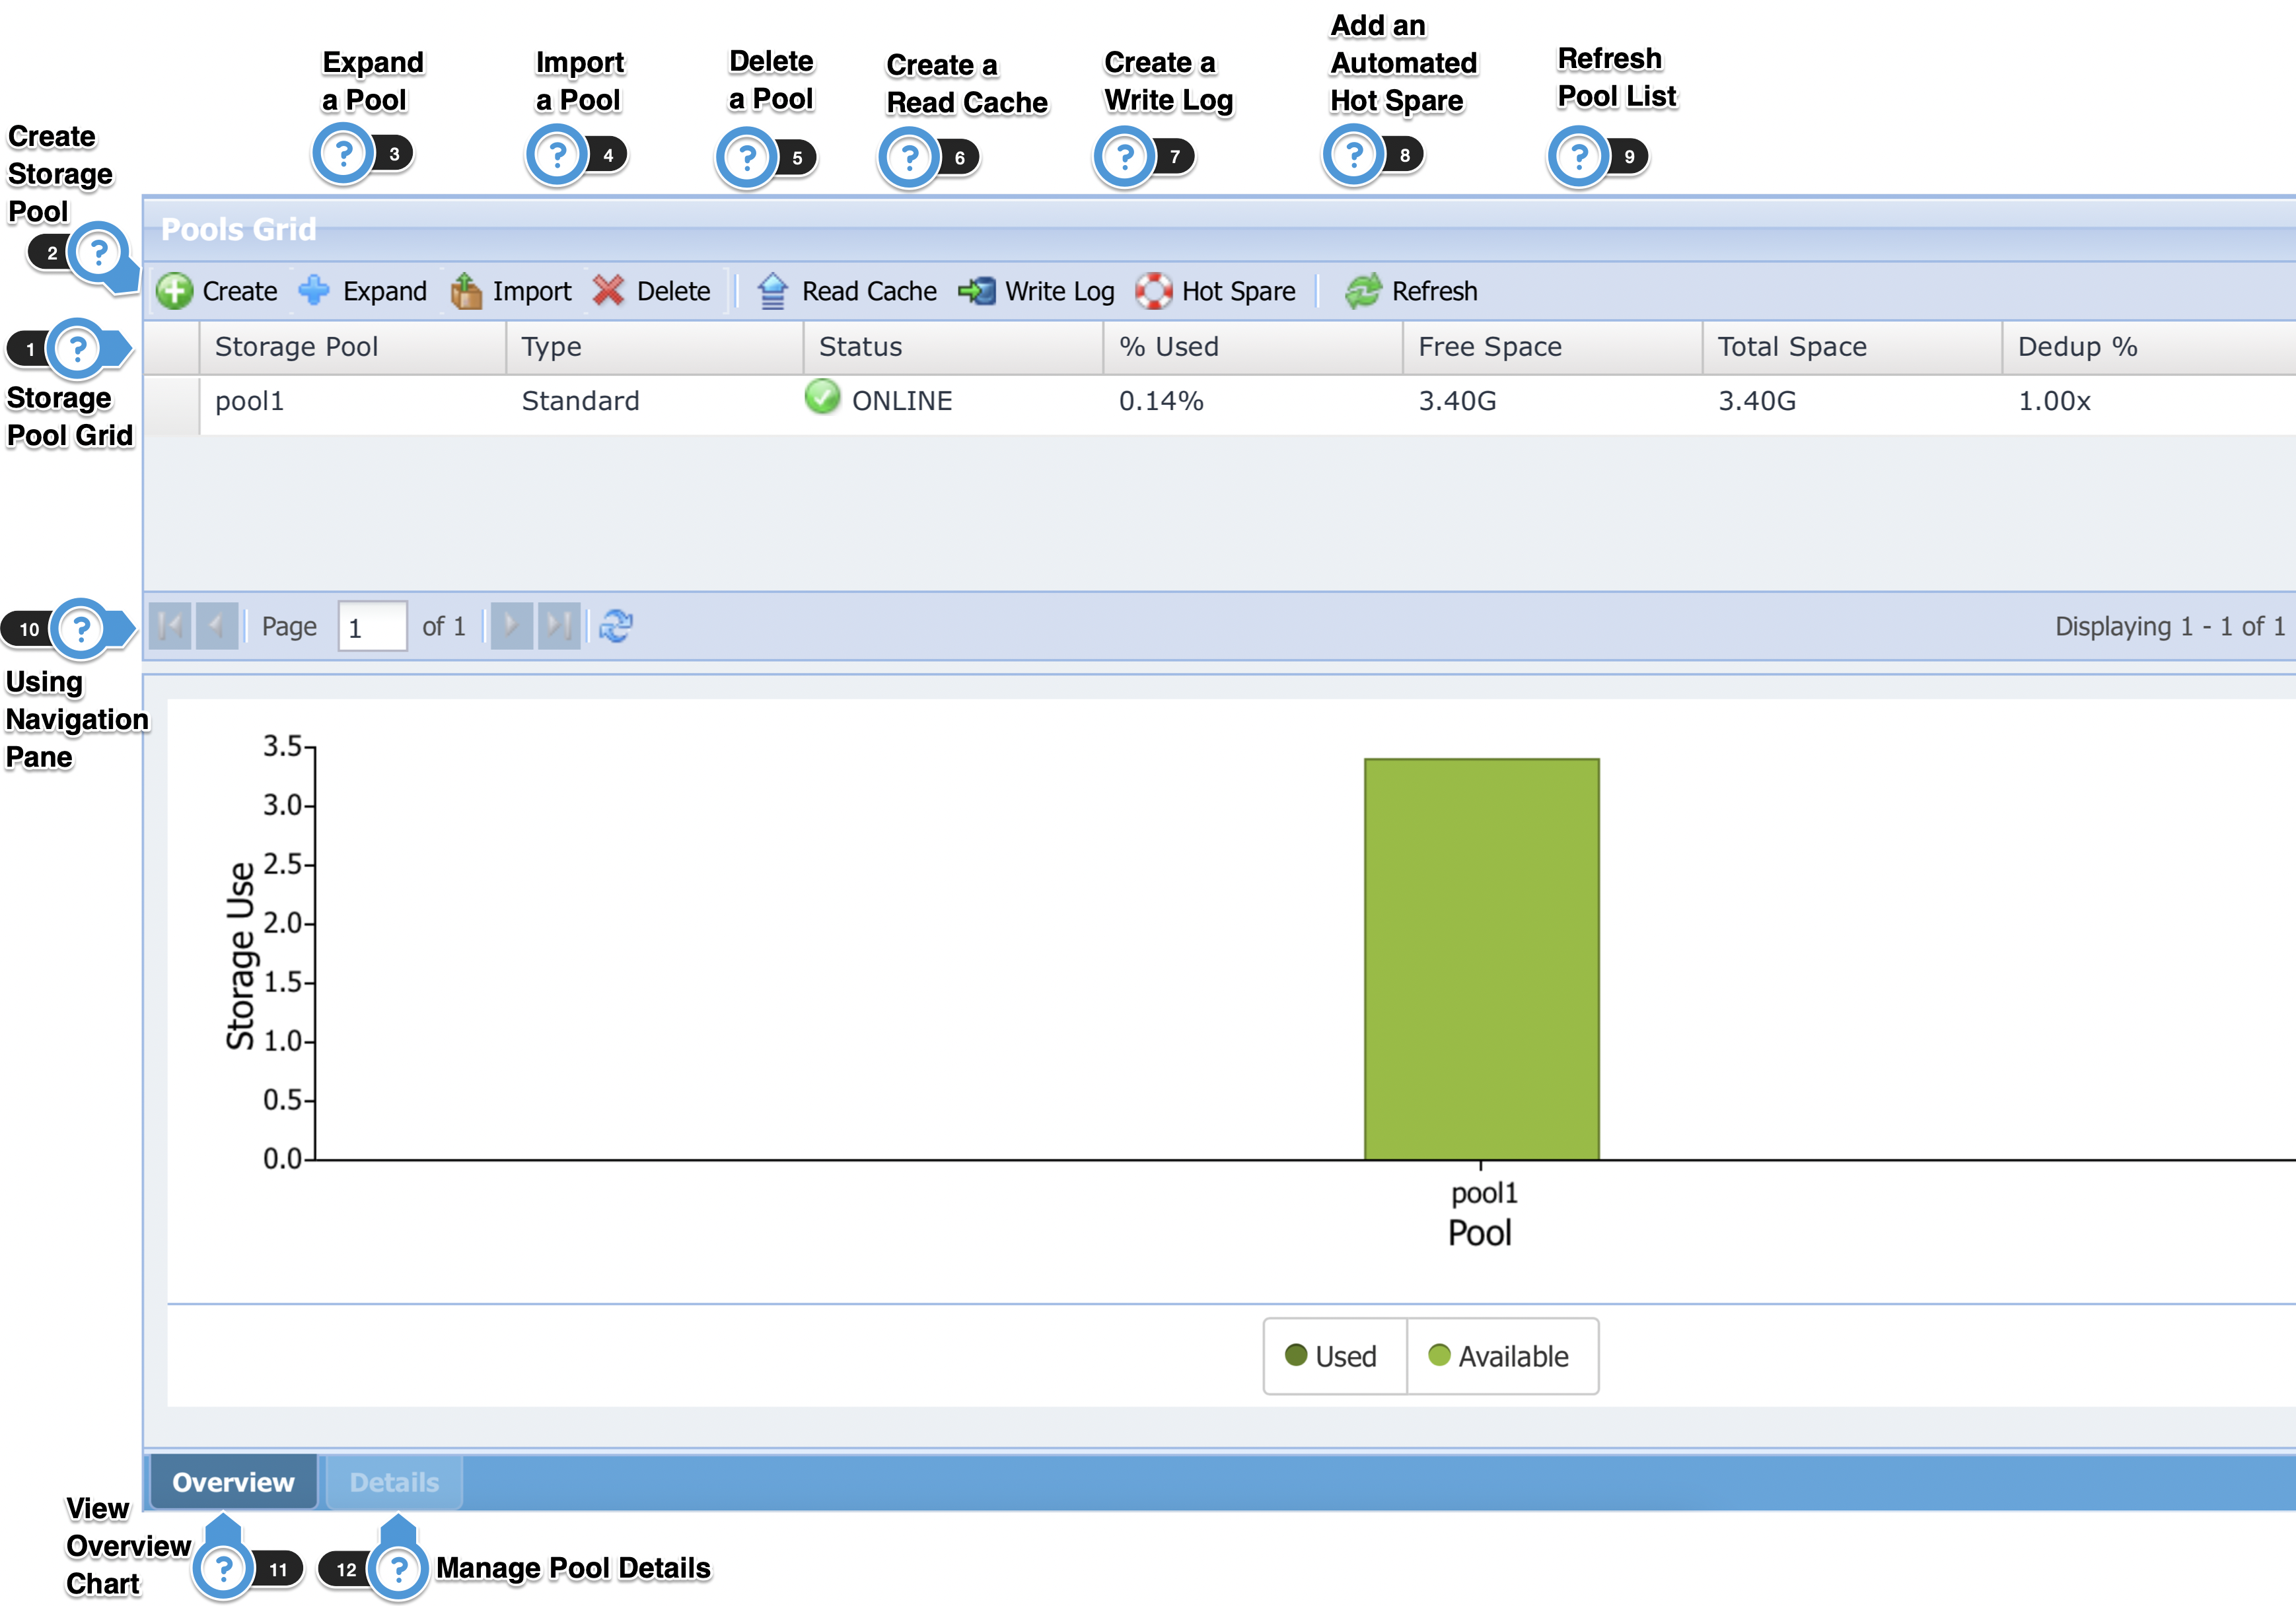
1. Storage Pool Grid

The Storage Pool Grid displays the list of storage pools in a tabular grid format. The volume table has the following fields.
Field | Description |
|---|---|
Storage Pool | It shows the name of the storage pool. |
Status | It shows the current status of the pool. Based on the status, it shows the following types of indicators:
|
% Used | It shows the percentage of available storage used. |
Free Space | It shows the amount of free space available for use in gigabytes. |
Total Space | It shows the total amount of space in the pool, in gigabytes. |
Dedup % | It shows the percentage of Deduplication |
2. Creating a Storage Pool
Before creating the Storage Pool, you will need to have created several EBS volumes for Amazon EC2 based SoftNAS instance and several VHDs for VMware based SoftNAS VM. These EBS volumes or VHDs provide the underlying storage for SoftNAS storage pools. Whenever a volume or VHD is added, it begins as a raw disk which means that the disk has no partitions.
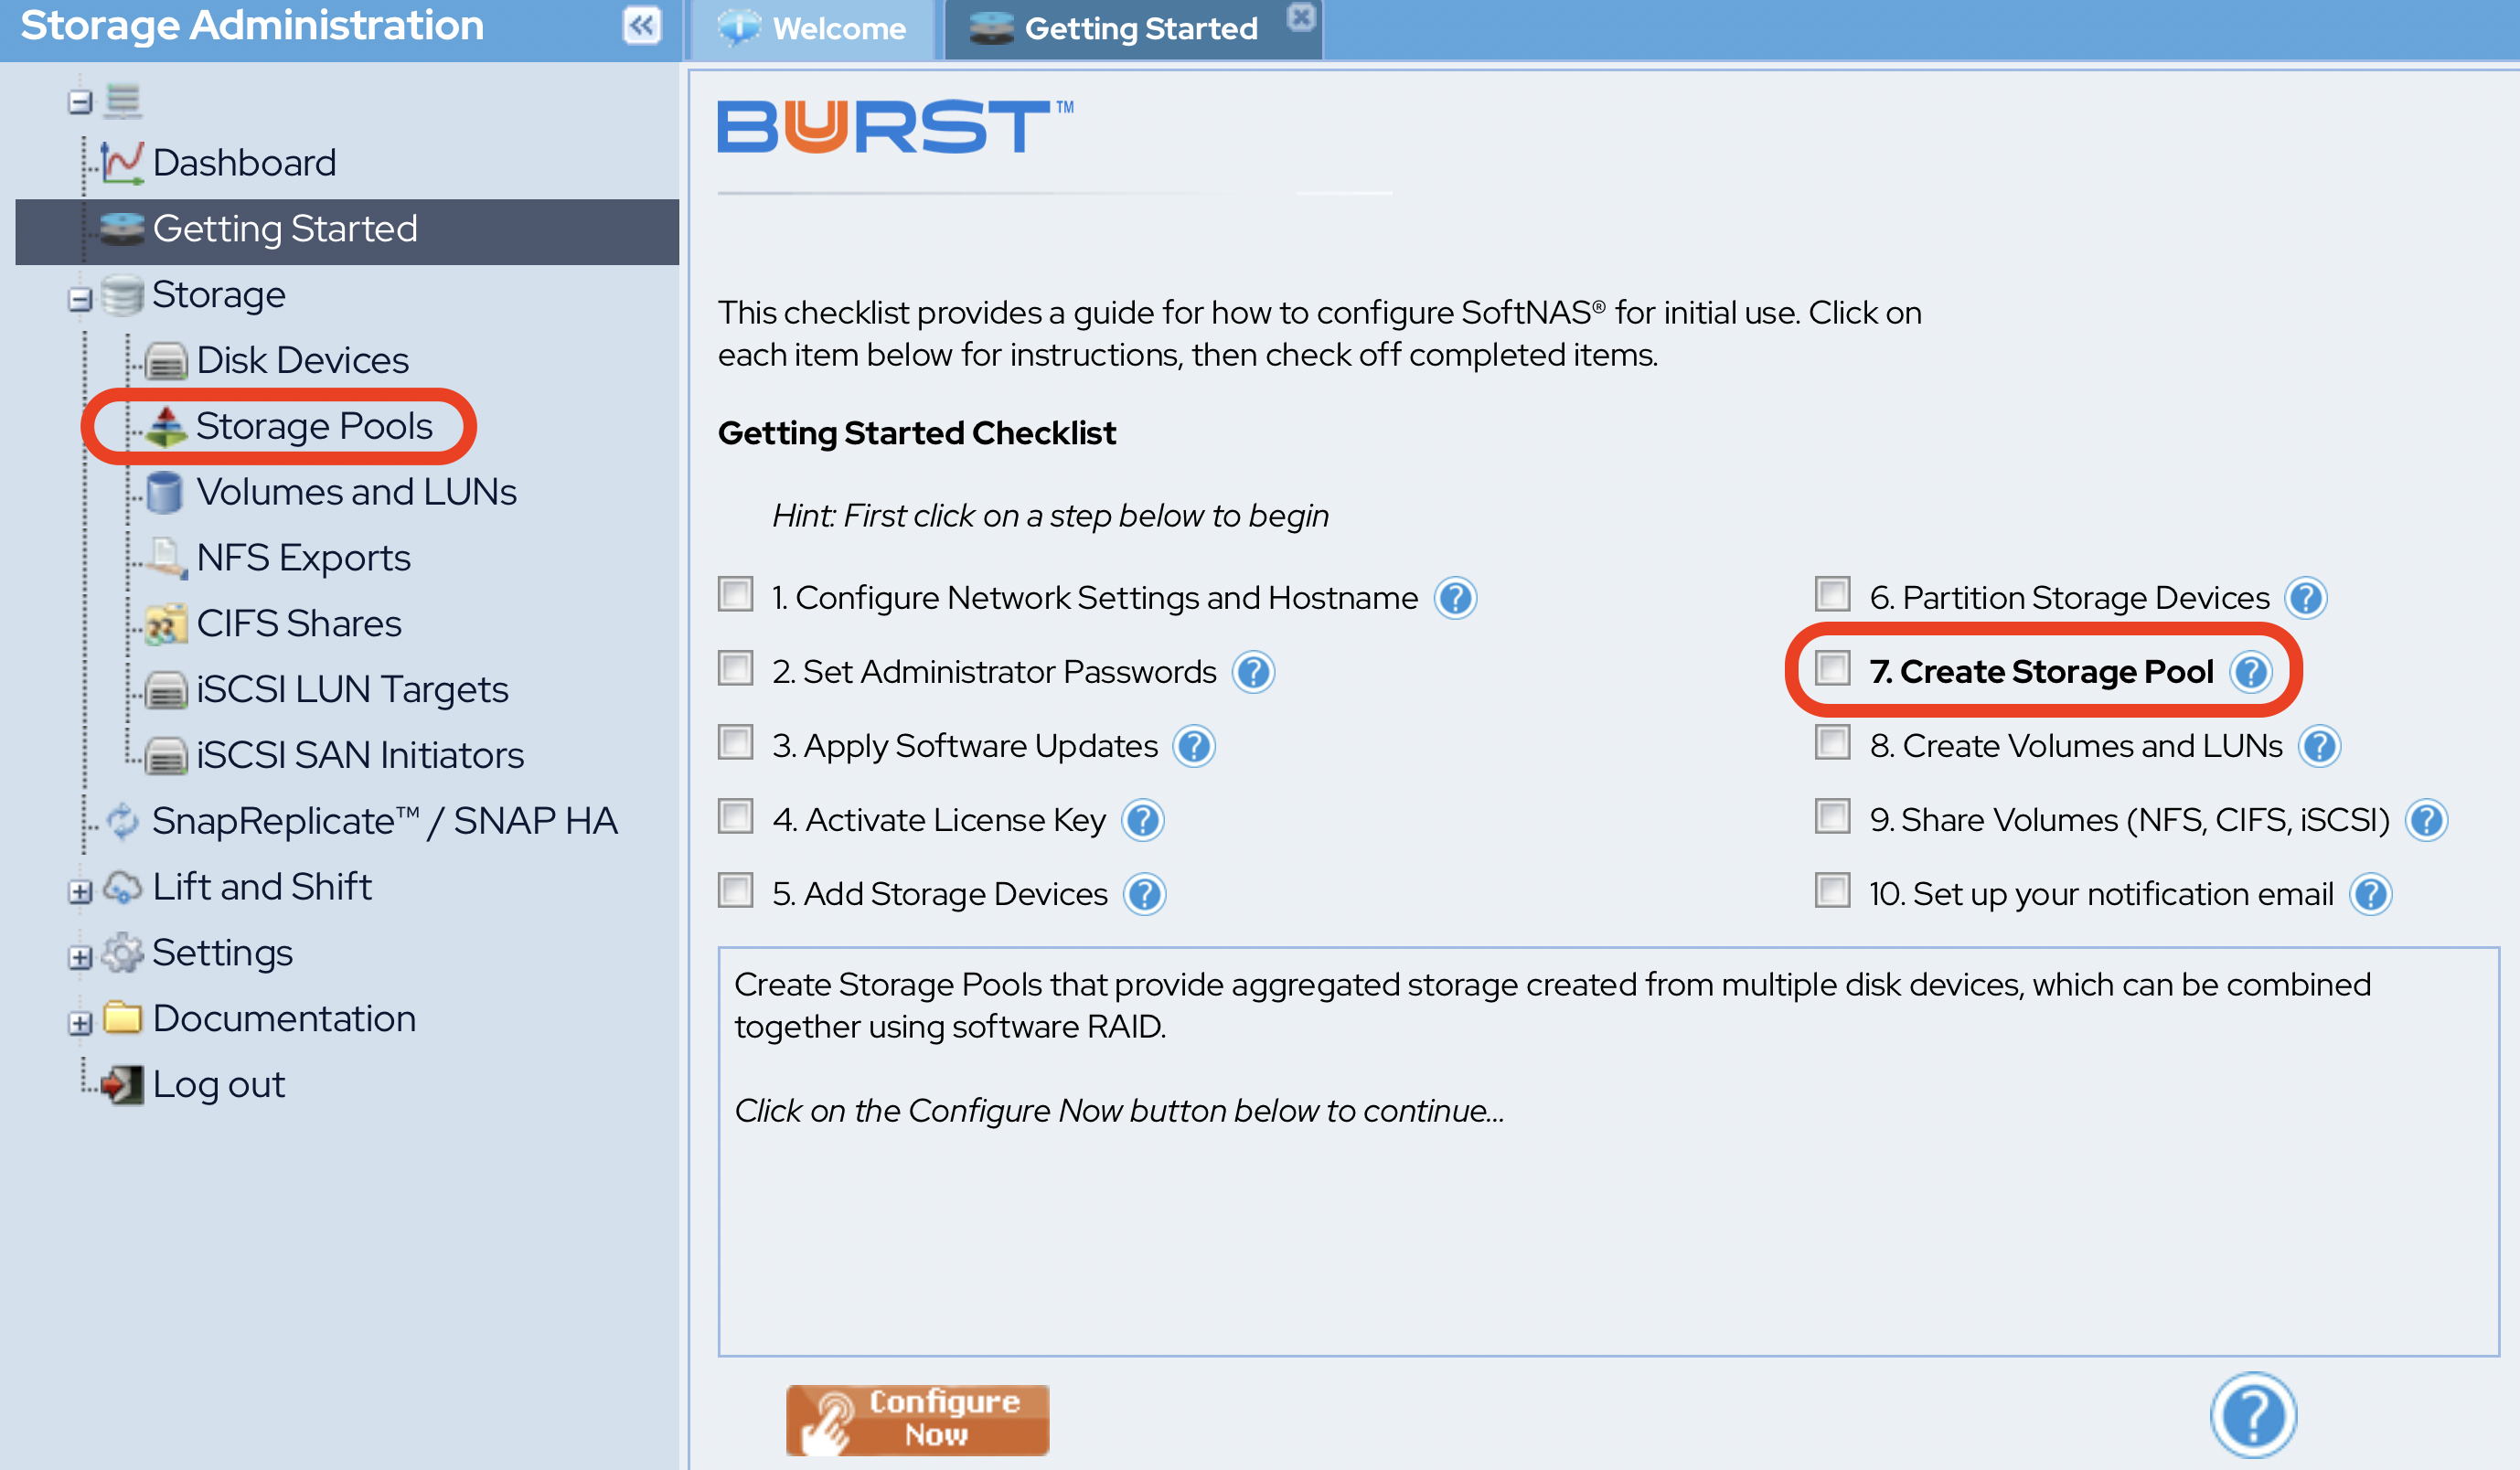
Click the Storage Pools option under the Storage section in the Left Navigation Pane.
OR
- Select option 7, Create Storage Pool, under the Getting Started checklist.
The Storage Pools panel will be displayed with the list of all the existing storage pools that are already allocated.
To create a new storage pool, click the Create button.
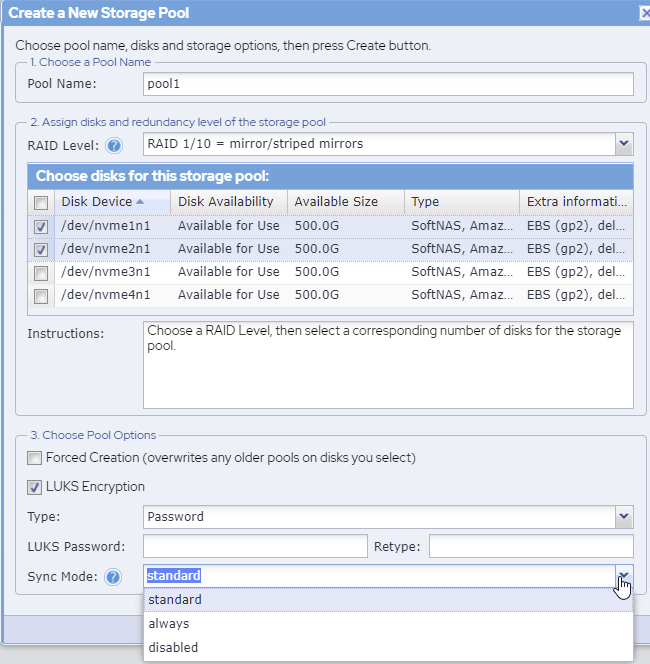
The Add Storage Pool dialog will be displayed. A standard pool is used by our patented original SNAP HA™ methodology will be implemented, replicating your block storage across two nodes, with minute by minute updates to ensure parity.

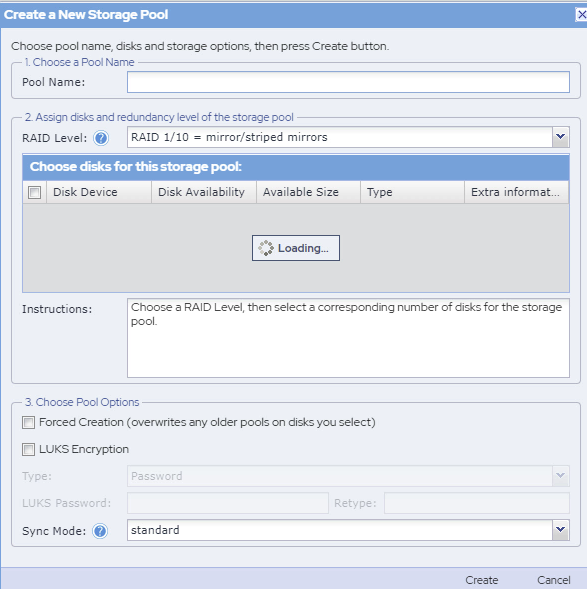
Enter the name for the storage pool that you wish to create in the Pool Name text entry box.
Some example storage pool naming schemes might include:
Generic naming: naspool1, naspool2, ...
Disk-type naming: SAS1, SAS2, SATA1, SATA2
Use-case naming: OS1, OS2, Exchange1, SQLData1, UserData1, Geology, Accounting, IT, R&D, QA, Corp01, etc.
Select the redundancy level from the RAID Level drop down list.
If you are using hardware RAID at the disk controller level and have a single data disk presented to SoftNAS for your storage pool, then you may not need software RAID - in such case, select No RAID/JBOD, as the RAID is implemented at a lower level and have no need for software RAID.Select the disks for which you wish to allocate to this storage pool.
Each of the devices show the Disk Availability status as Available for Use. This implies that these disks are already partitioned. New disk devices must be partitioned before use.In the Choose Pool Options step, check the box in the Forced Creation field if you wish to overwrite any older pools on the disks that you have selected.
If any of the disk devices you choose have been used as a part of another storage pool in the past (e.g., one that was deleted), you must use the Forced Creation option to overwrite the previous data in order to use the disk in a different pool (a precaution to prevent accidental data loss).Sync Mode is an important decision, directly affecting either performance or data integrity. Buurst's ZFS based solution provides a great deal of protection to ensure that your data is fully protected, but in a fail-over situation, default settings can potentially result in uncached write bursts not being committed to the target volumes. Sync Mode is one way to prevent this from occurring. Depending on your requirements, choose the required Sync Mode:
standard:
This is the default option. For use cases where performance and data integrity are of equal importance, this is the best option. Synchronous file system transactions (fsync, O_DSYNC, O_SYNC, etc) are written out (to the intent log) and then secondly all devices written are flushed to ensure the data is stable (not cached by device controllers).
always:
For the ultra-cautious, every file system transaction is written and flushed to stable storage by a system call return. This obviously has a big performance penalty. However, if data loss of any kind is unacceptable for your use case, this should be your choice.
disabled:
Synchronous requests are disabled. File system transactions only commit to stable storage on the next DMU transaction group commit which can be many seconds. This option gives the highest performance. However, it is very dangerous as ZFS is ignoring the synchronous transaction demands of applications such as databases or NFS. Setting sync=disabled on the currently active root or /var file system may result in out-of-spec behavior, application data loss and increased vulnerability to replay attacks. This option does NOT affect ZFS on-disk consistency. Administrators should only use this when these risks are understood.
Another way to safeguard against data loss without compromising performance is to create a write log, or ZIL. Buurst strongly recommends this option for improved performance and data integrity assurance. For in-depth instructions on how to configure a ZIL/write log, see Configuring Read Cache and Write Log. Creating a write log is also covered briefly in a section below.
Click the Create button at the end.
The new storage pool is created and is ready for use.
3. Expanding a Pool
To do so, simply follow the steps given below:
Select the pool that you wish to expand in the Pools list.
Click the Expand button in the toolbar.
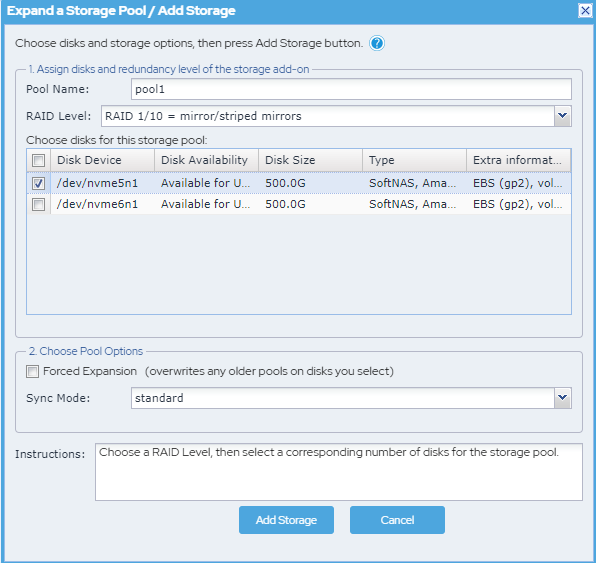
The Expand a Storage Pool/Add Storage dialog will be displayed.
Choose the disk for the storage pool.
In the Choose Pool Options section, check the box for Forced Expansion in order to overwrite any older pools on disks you select.
Select the Sync Mode: standard, always, disabled.
Click the Add Storage button.
The additional storage will be added to the selected pool.

4. Importing a Pool
Import pools that were previously deleted or created on a different system. For example, a foreign pool created on a different SoftNAS system can be imported into SoftNAS and used.
Click the Import option in the toolbar.
It has two sections such as Deleted Pools Available for Import and Foreign Pools Available for Import.
The Foreign Pools are the storage pools created on a different SoftNAS system.If the pools are ready to import, there will be a button labeled Import <poolname>, where poolname will be the pool that's available to import. Click that button.
You will need to select the Force Import checkbox, to force the system to import foreign pools from another system.
For each volume, configure the volume's Snapshots to use the desired schedule.
They are not imported automatically, but can be manually copied from the old system by copying the snapshots.ini and schedules.ini files in the /var/www/softnas/snserver folder.For each NFS and CIFS share you want, create the appropriate NFS exports and CIFS shares (they are not imported automatically).
For each iSCSI target (if any), define the appropriate iSCSI devices and targets.
They are not imported automatically, but can be manually copied from the old system by copying the file /etc/tgt/targets.conf to the new system, then restart the iSCSI Server.The data disks will now be ready for use.
Click the Refresh button on the Storage Pools panel.


5. Deleting a Pool
You can delete any selected pool. To do so, simply follow the steps given below.
Select the pool that you wish to delete from the Pools list.
Click the Delete button in the toolbar.

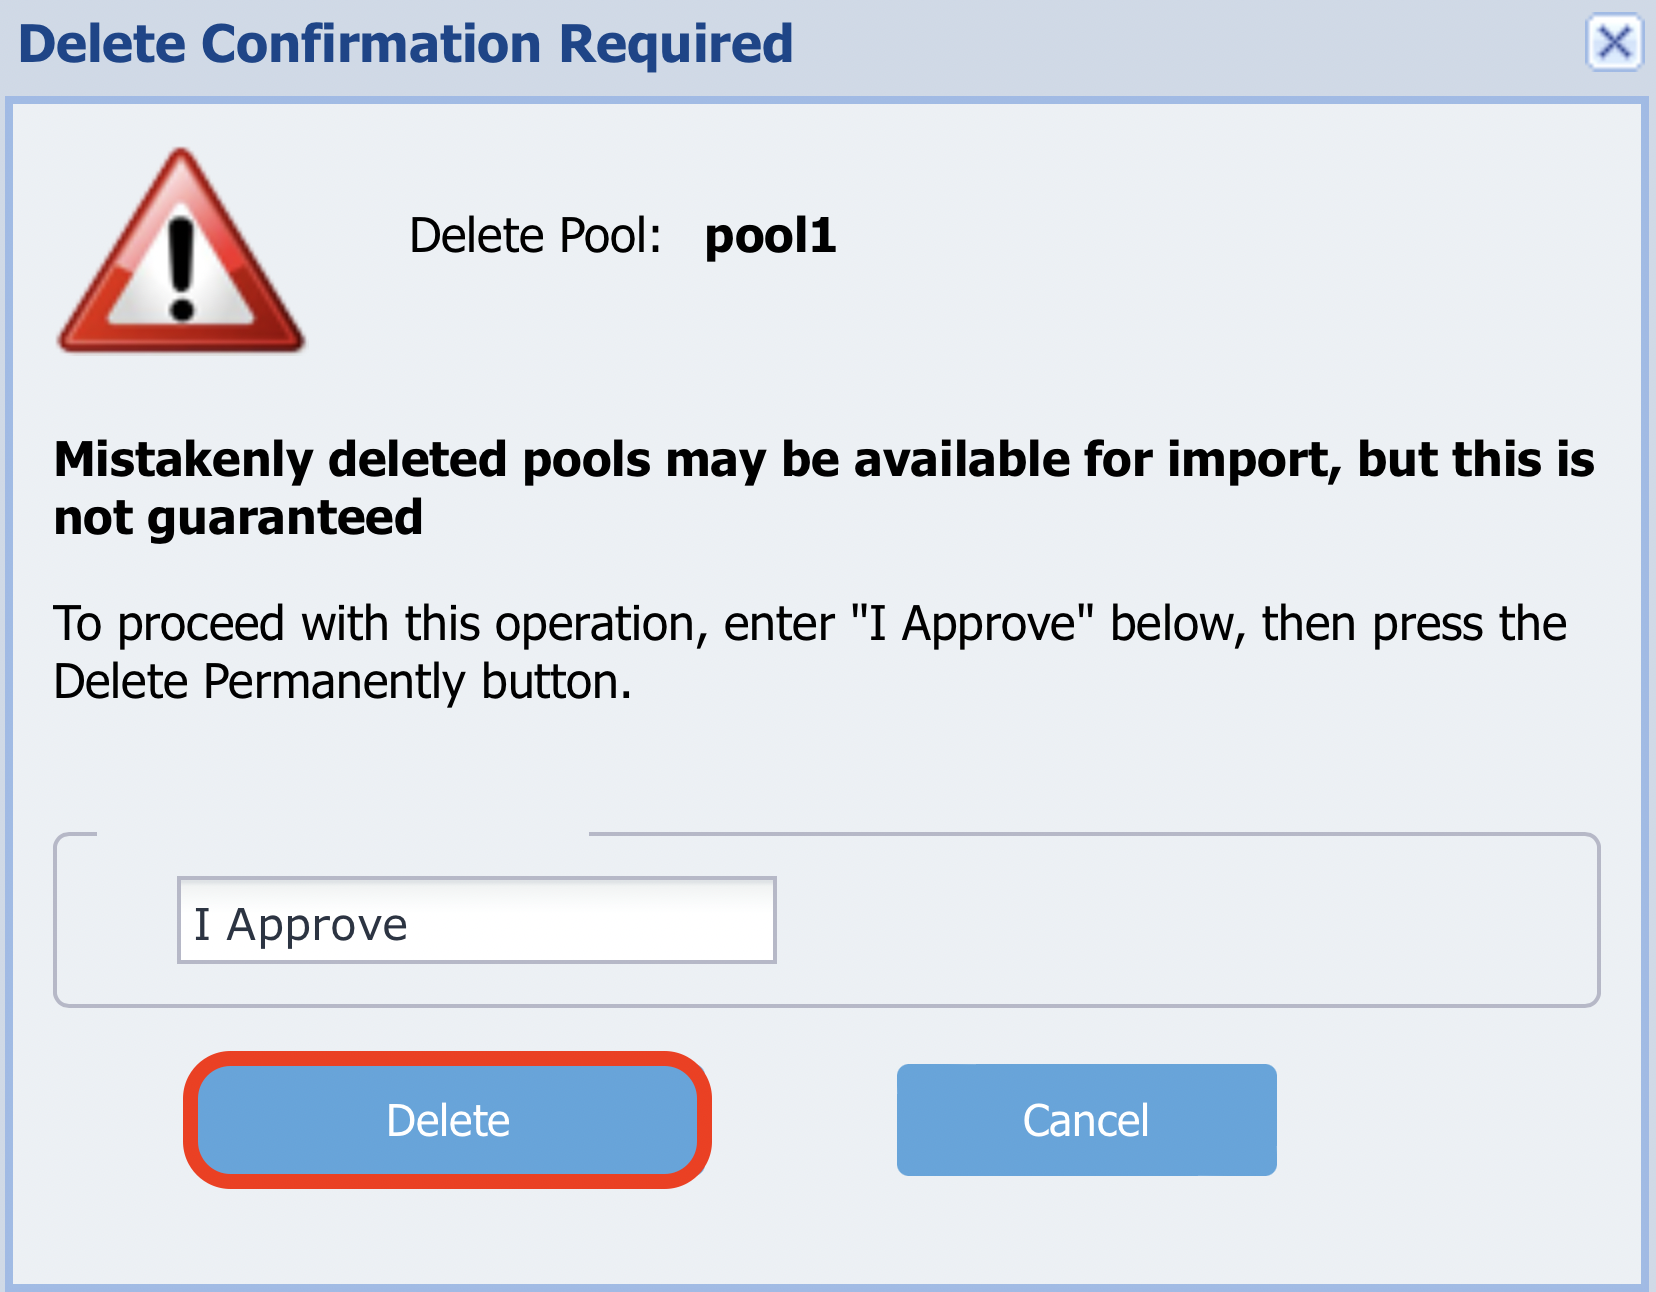
The Delete Confirmation Required dialog will be displayed.
Enter the text I Approve in the text entry box.
- Click the Delete Permanently button.
The selected pool will be removed.
6. Creating a Read Cache
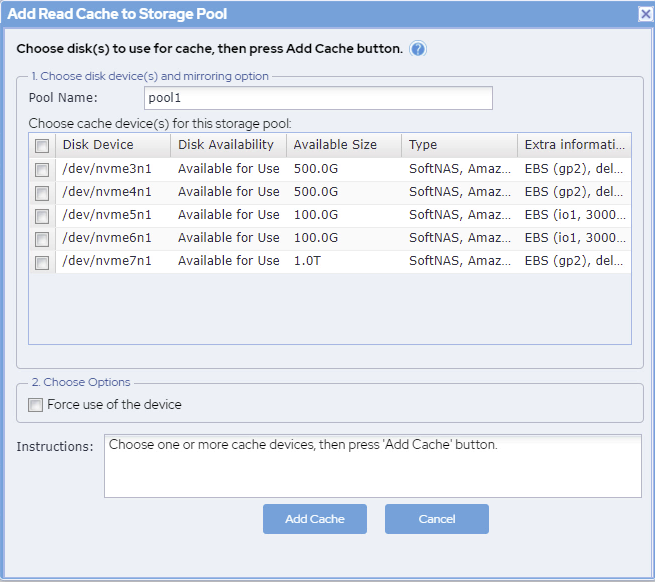
The Read Cache provides an additional layer of cache, in addition to RAM memory cache. SSD is recommended for Read Cache as it provides a large, fast read cache that is much larger than available cache memory.
Before you create a read cache, you need to verify that disk drives are available that have not been assigned to other storage pools.
Select the Storage Pool to which you wish to add Read Cache / Write Log.
Click the Read Cache option in the toolbar.
Choose the disk for the storage pool.
In the Choose Options section, check the box for Force use of the device to overwrite any older pools on the disks you select.
Click the Add Cache button.
The read cache will be added to the selected pool.

7. Creating a Write Log
The Write Log provides a cache for incoming writes to be written temporarily to high-speed storage, then later staged to lower-speed spindle-based storage. SSD is recommended for Write Log.
You can add a write log to any selected pool. To do so, simply follow the steps given below.
Select the pool to which you wish to add write log in the Pools list.
Click the Write Log button in the toolbar.
- The Add Write Log Devices to Storage Pool dialog will be displayed.
Choose the disk for the storage pool.
In the Choose Options section, check the box for Force use of the device to overwrite any older pools on the disks you select.
Click the Add Log button.


8. Adding an Automated Hot Spare
You can add a hot spare for any selected pool. In addition, sparing is automated, with failover to the spare occurring without the need for administrator intervention. To setup automated sparing, simply follow the steps given below.
Select the pool to which you wish to add hot spare in the Pools list.
Click the Hot Spare button in the toolbar.
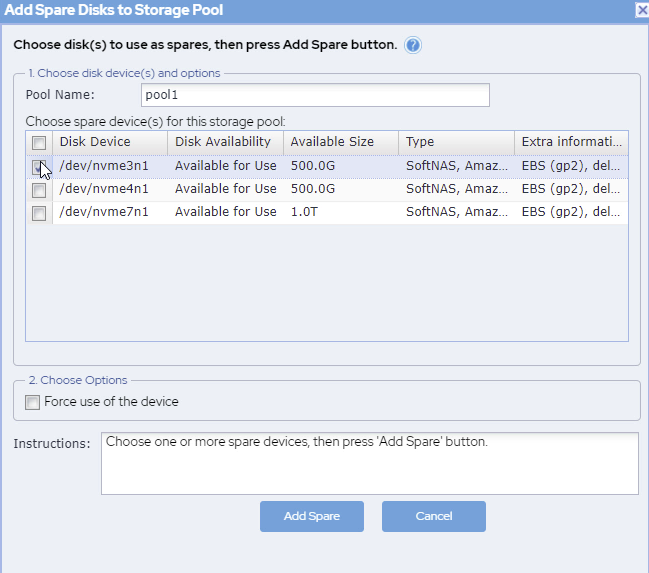
The Add Spare Disks to Storage Pool dialog will be displayed.
Choose the disk for the storage pool.
In the Choose Options section, check the box for Force use of the device to overwrite any older pools on the disks you select.
Click the Add Spare button.
The selected spare device will be added to the pool. Sparing is automated, meaning that upon creation of the hot spare, according to the above instructions, your data will fail over to the hot spare automatically, without requiring administrator approval. This feature does not require any additional configuration.

9. Refreshing Pool List
You can refresh the Pools list and update it with the latest information. To do so, simply click the Refresh button in the toolbar.
The Storage Pools list will be reloaded with the most current values.

10. Using Navigation Pane
You can use the Navigation Pane to navigate between storage pool records. It has the following set of buttons.
![]() First Page - Press to navigate to the First page of pools (when the number of pools exceeds the number that can be displayed on a single page).
First Page - Press to navigate to the First page of pools (when the number of pools exceeds the number that can be displayed on a single page).
![]() Previous Page - Press to navigate to the Previous page of pools (when the number of pools exceeds the number that can be displayed on a single page).
Previous Page - Press to navigate to the Previous page of pools (when the number of pools exceeds the number that can be displayed on a single page).
 Page Number - Displays the current page of pools (when the number of pools exceeds the number that can be displayed on a single page). You can also enter the page number in the box to navigate to that page.
![]() Next Page - Press to navigate to the Next page of pools (when the number of pools exceeds the number that can be displayed on a single page).
Next Page - Press to navigate to the Next page of pools (when the number of pools exceeds the number that can be displayed on a single page).
![]() Last Page - Press to navigate to the Last page of pools (when the number of pools exceeds the number that can be displayed on a single page).
Last Page - Press to navigate to the Last page of pools (when the number of pools exceeds the number that can be displayed on a single page).
![]() Refresh Page - Press to update the pools list with the latest information.
Refresh Page - Press to update the pools list with the latest information.

11. Viewing Overview Chart
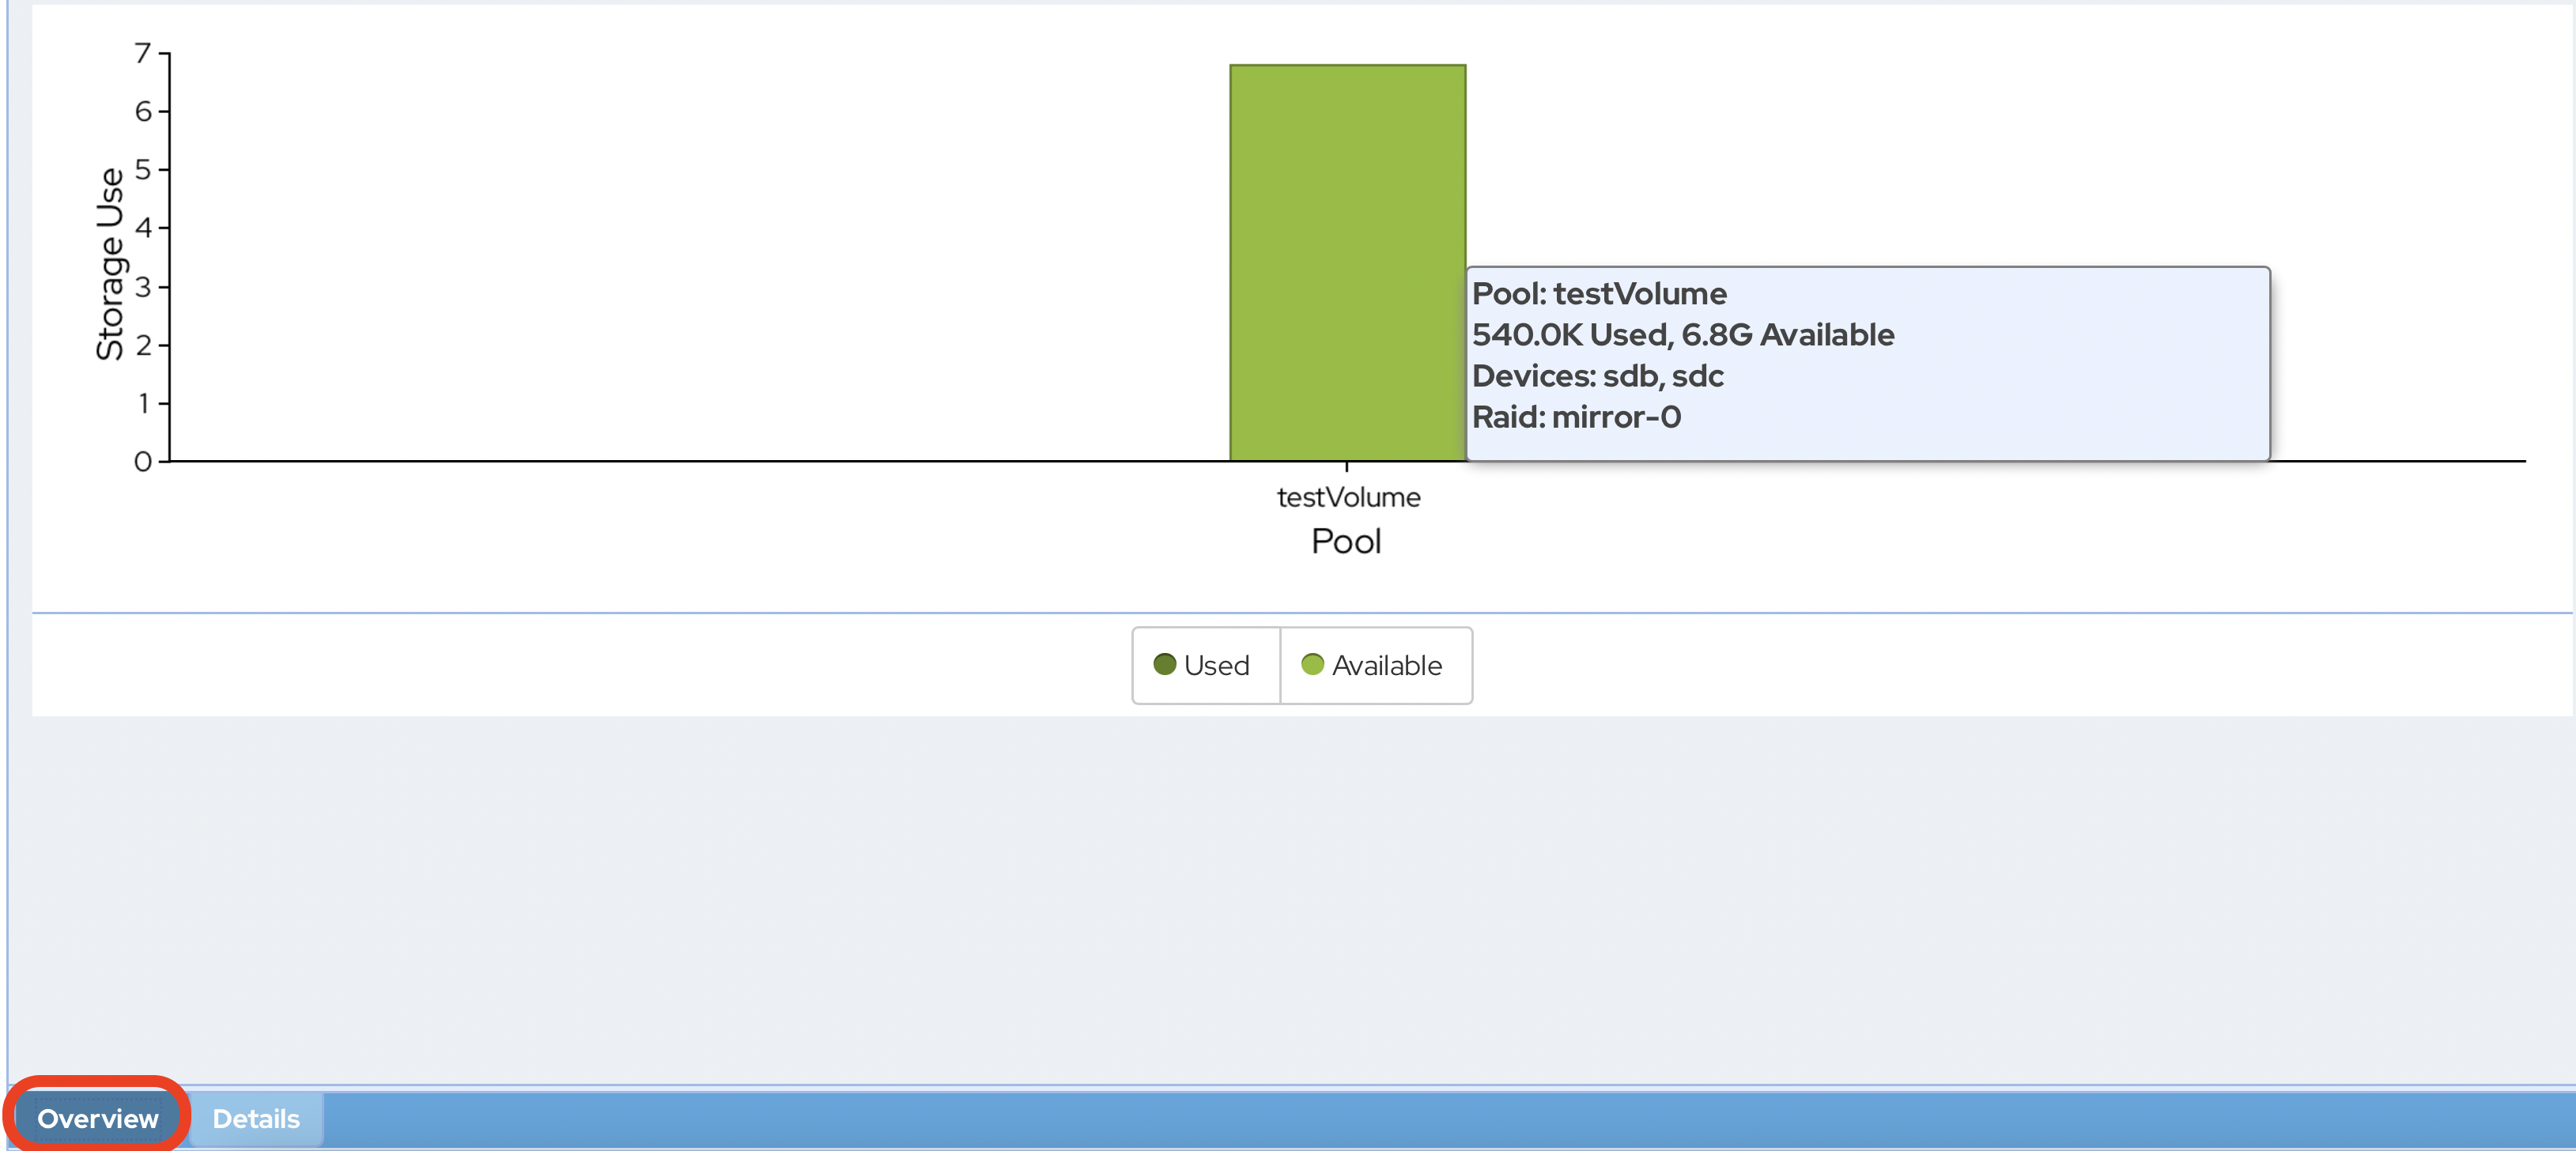
You can view the summarized details of storage pools in the Overview Chart.
To do so, simply navigate to the Overview tab in the left corner, at the end of the Storage Pool panel.
The Storage Usage Chart with a bar chart summarizing storage usage by pool will be displayed.
Move the mouse cursor over the top of a pool's bar. You can view the a summary of usage in a tooltip popup window.
To view the Overview Chart of a selected pool, click that pool to select it in the Storage Pools list.
The Overview Chart of the selected pool will be displayed.
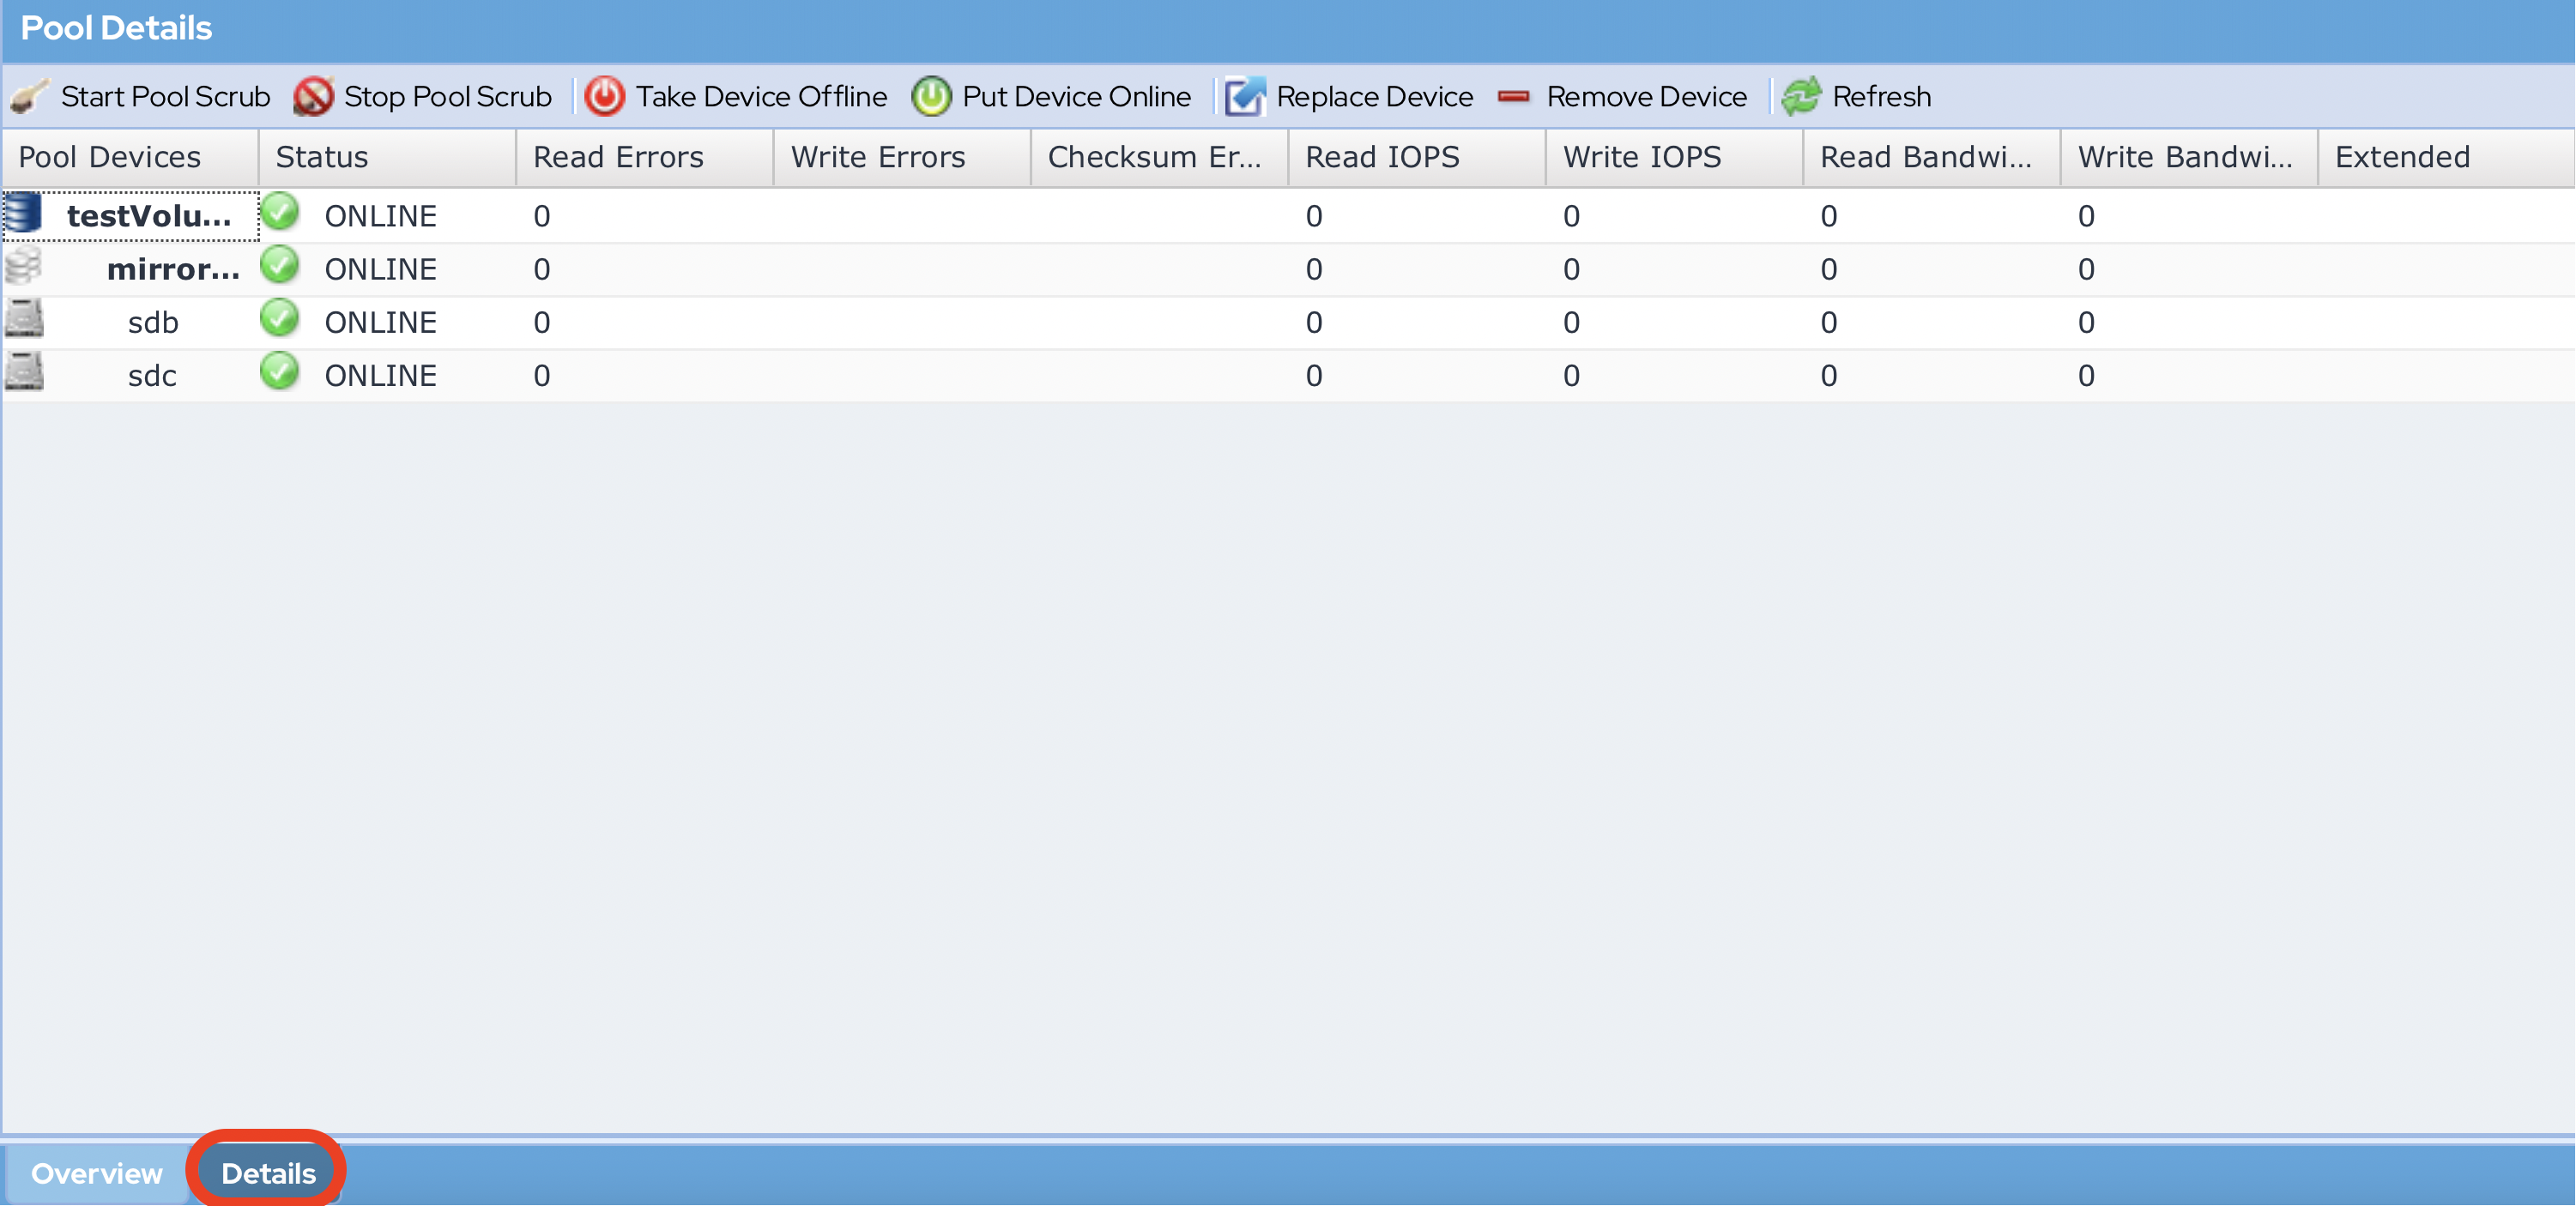
12. Managing Pool Details
You can manage Storage Pool details from the Details tab. There are a number of useful pool and device statistics available. It provides detailed information about the storage pool, along with buttons that can be used to control the pool and its devices. For more information, refer to Managing Pool Details.