SoftNAS Multi-Protocol Integration with AD using Kerberos Authentication for NFS/CIFS
- Admin
- Former user (Deleted)
Symptoms
Many Cloud environments today use a hybrid of Windows and Linux servers for their hosted applications. Keeping proper ownership between Windows Active Directory and Linux CIFS/NFS can be very challenging but is vital for various reasons:
- Security: The operation of applications that depend on proper file user and group ownership can easily authenticate to SoftNAS/AD and access their respective Files/Directories.
- Centralized Authentication System: As Cloud/On-premise environments becomes more complex and diverse, System Admins like you are often faced with the challenges of administering systems that access the same resources from different platforms ( Windows & Linux Systems ); using different protocols. With this guide, we hope to make system administration a breeze.
- Saves time and effort: All Domain Admins ( Windows ) or Privileged Users ( Linux ) can effortlessly add or remove ACLs as they deem necessary from any properly configured environment.
SoftNAS uses Sernet Samba to accomplish CIFS and Active Directory integration. SoftNAS can also sync these permissions and File Ownerships to NFSv4 Clients running Linux based Operating systems.
Purpose
In the following guide, we will provide step-by-step instructions on how to properly configure hybrid ( Windows and Linux ) systems to fully integrate with SoftNAS Samba CIFS/NFS shares. These permissions will also sync to CIFS/NFSv4 Linux clients that are also Joined to Active Directory. Let's get started!
- As the first prerequisite, SoftNAS needs to be joined to Active Directory. Before joining Active Directory with our simple wizard, make sure that the prerequisites listed in Configuring Network Settings are met. Then, simply follow the instructions provided by the wizard in the SoftNAS UI → Volumes and LUNs→ Active Directory Wizard using the instructions here: Active Directory Configuration.
- A properly configured DNS is another very important prerequisite to the implementation of a kerberos authentication back-end. On that note, before continuing with guide, please make sure that a properly configured DNS is in place.The example below will demonstrate how a properly configured DNS looks like. From SoftNAS, we used the 'nslookup' command:
#. nslookup <hostname>
#. nslookup <IP>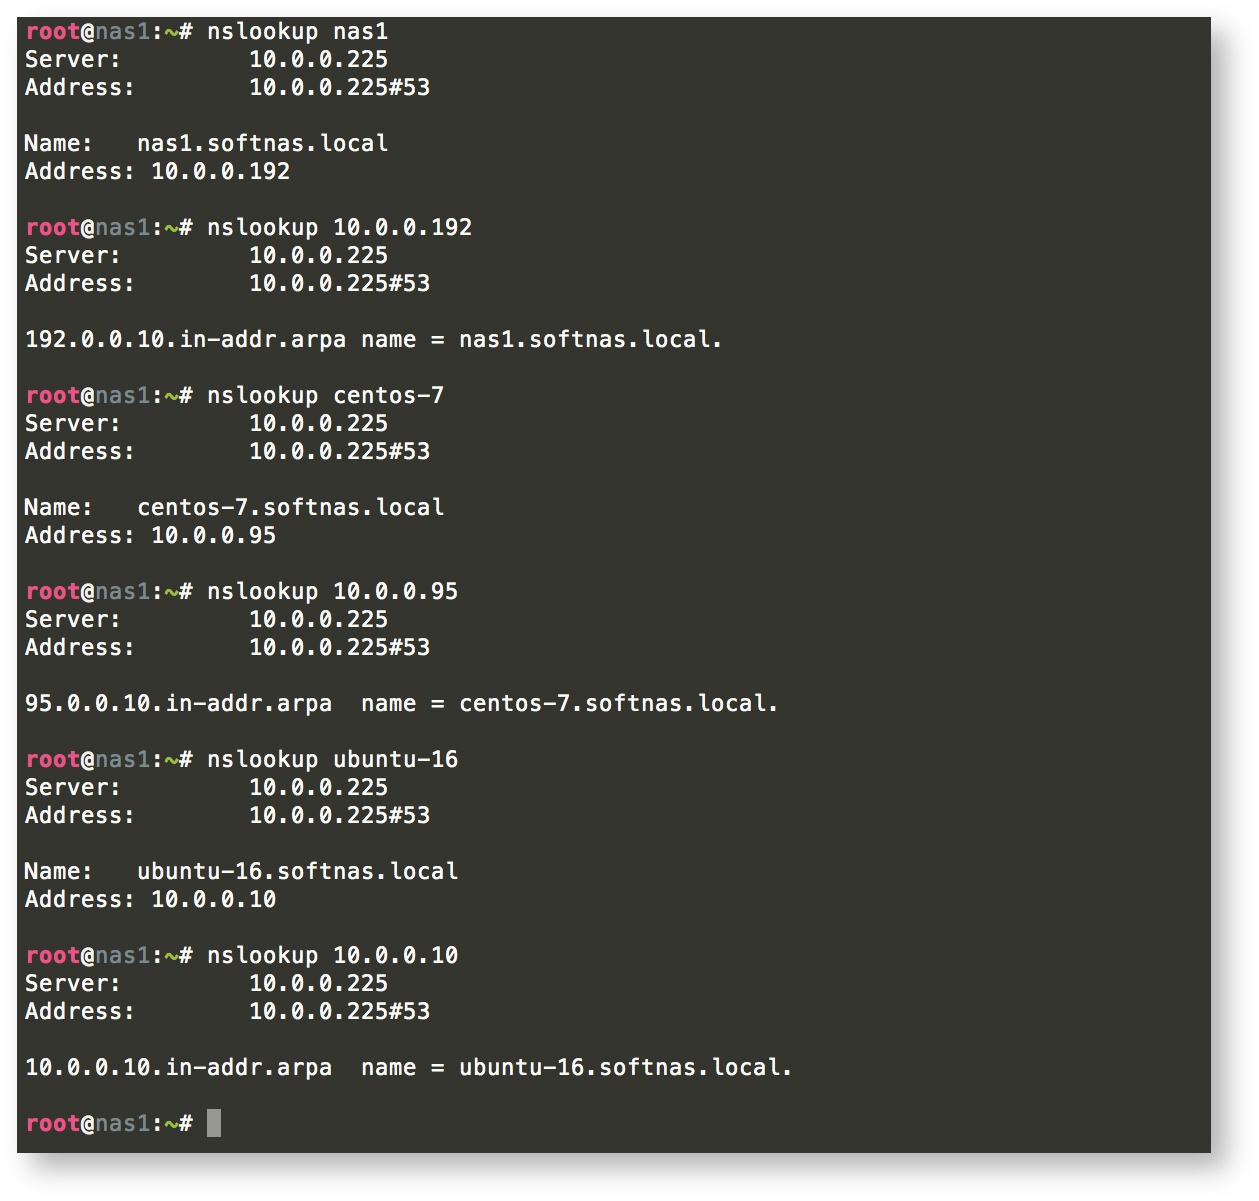
- Next, let's configure NTP to make sure that our time is in sync with SoftNAS/AD using the link here.
- Edit the SoftNAS smb.conf file to include the 2 lines below. The "SOFTNAS" portion must be changed to your workgroup name configured in your smb.conf file after joining AD.
- idmap config SOFTNAS:backend = rid
idmap config SOFTNAS:range = 10000-99999
b. Our example /etc/samba/smb.conf has added the two lines above:
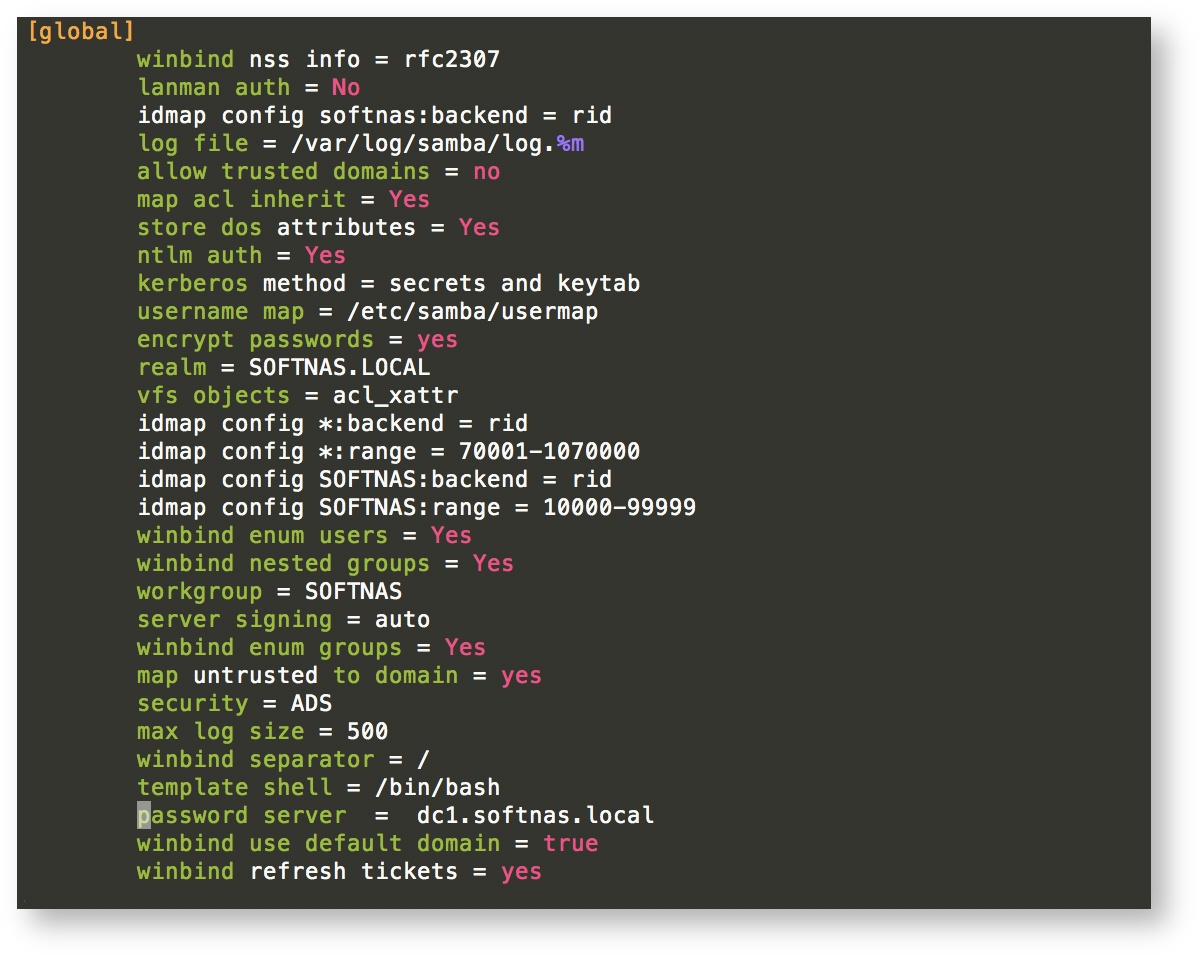

- idmap config SOFTNAS:backend = rid
- Restart the SoftNAS samba services and flush the cache for the changes to take effect:
#. service sernet-samba-winbindd restart
#. service sernet-samba-smbd restart
#. service sernet-samba-nmbd restart - The commands below will help to verify the RPC calls we make to AD moving forward.
# wbinfo -t
# wbinfo -m
#. wbinfo -u | tail
#. wbinfo -g | tail
#. getent passwd | tail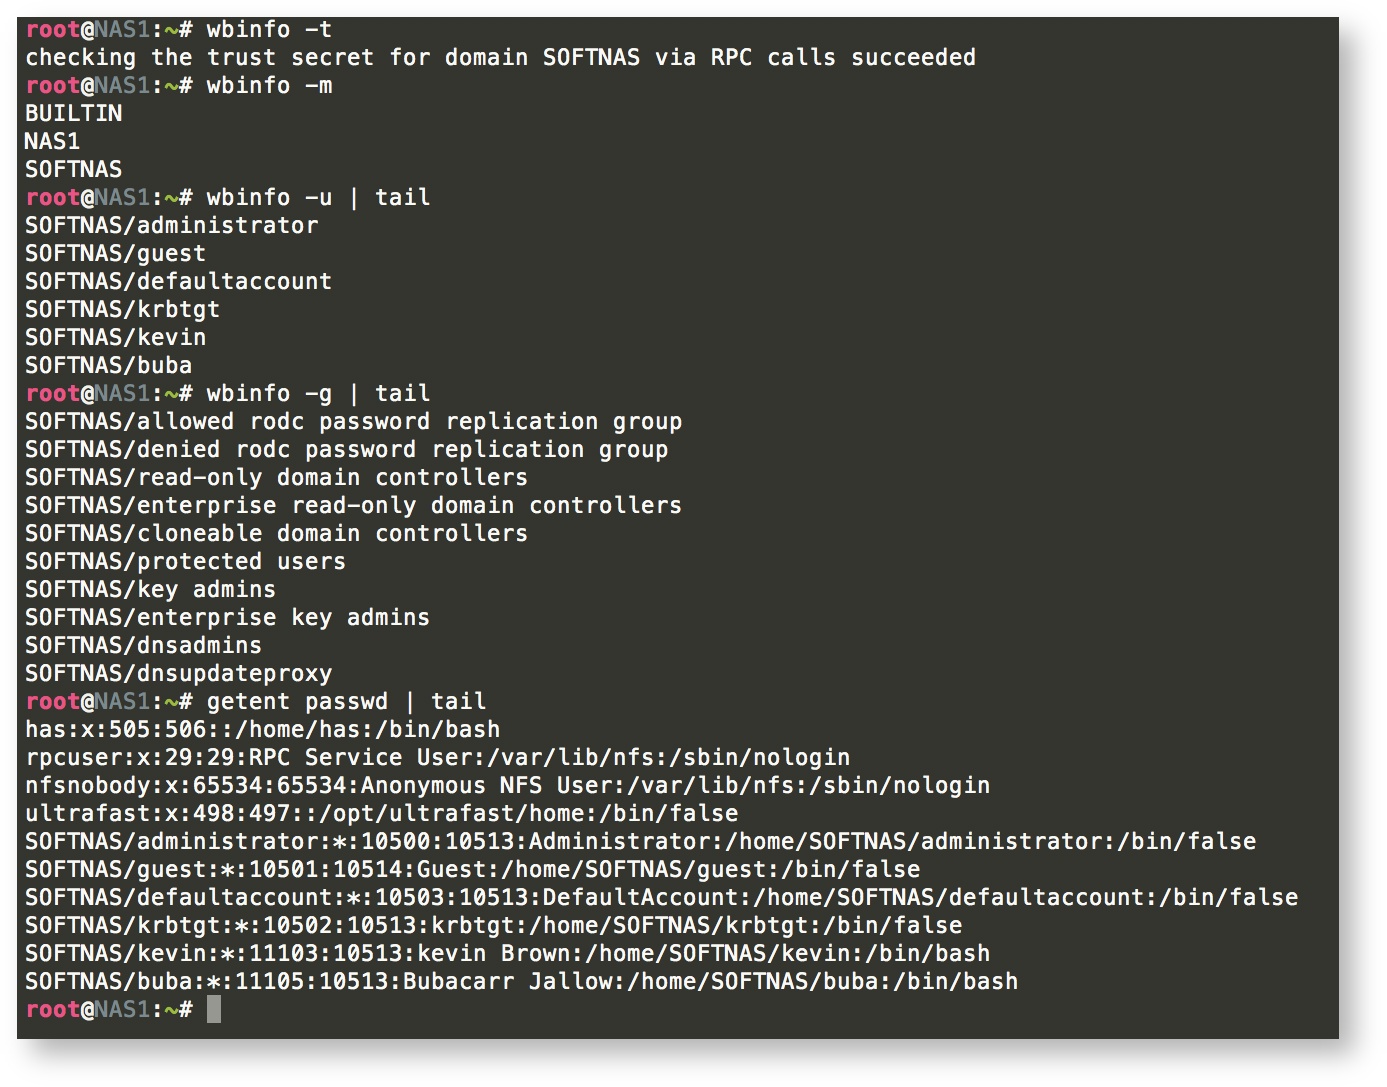
- In order to enable NFS kerberos authentication from AD we need to make some changes to the NFS /etc/export file to include the line below.
#. vim /etc/exports
#. copy and paste this line as shown below sec=sys:krb5:krb5i:krb5p
- By default, the NFS security feature is not enabled by SoftNAS, so we would have to switch it on manually, and the example below will show you exactly how.
#. vim /etc/sysconfig/nfs
#. Search for SECURE_NFS="yes" and uncomment it.
- In this step, we are going to add an NFS upn-principle to allow us to turn on the "rpcsvcgssd,rpcgssd"
# net ads join -U buba createupn=nfs/NAS1.softnas.local@SOFTNAS.LOCAL
- In order to enable NFS kerberos authentication from AD we need to make some changes to the NFS /etc/export file to include the line below.
Next, let's install the necessary packages if they are not already installed on our Linux clients:
RHEL 7/CENTOS 7: # yum -y samba-winbind-clients samba-winbind krb5-workstation krb5-libs cifs-utils nfs4-acl-tools
UBUNTU 16.04: # apt update && apt upgrade
Note: The steps above are important to avoid dependency conflicts, or obsolete packages which might hinder the installation of the new packages below.
#. apt install -y samba winbind krb5-user libpam-winbind libnss-winbind cifs-utils nfs4-acl-tools
In order to establish a communication relationship between AD and our Linux Client(s) a proper DNS record must be in place; and since we already have one on our SoftNAS system we can just copy it over using the command below:
#. vim /etc/resolv.conf

To have a unified GID/UID mappings with SoftNAS/AD for the interest of seamless integration; copy and paste the "[ global ]" section of the smb.conf file ONLY, from SoftNAS ( This step applies to all Linux Distributions ). The end result should look like the output of step #2. b
#. less /etc/samba/smb.conf
#. mv /etc/samba/smb.conf /etc/samba/smb.conf.BAK && vim /etc/samba/smb.conf- The /etc/krb5.conf file is responsible for controlling the SoftNAS/AD kerberos authentication backend in order to establish a secure trust relationship necessary to hand out kerberos ticket which will allow us to join AD in step #12. And since there is one readily available on SoftNAS; copy it over using the commands below:
#. cat /etc/krb5.conf from SoftNAS
#. mv /etc/krb5.conf /etc/krb5.conf.BAK & vim /etc/krb5.conf to your Linux Client(s).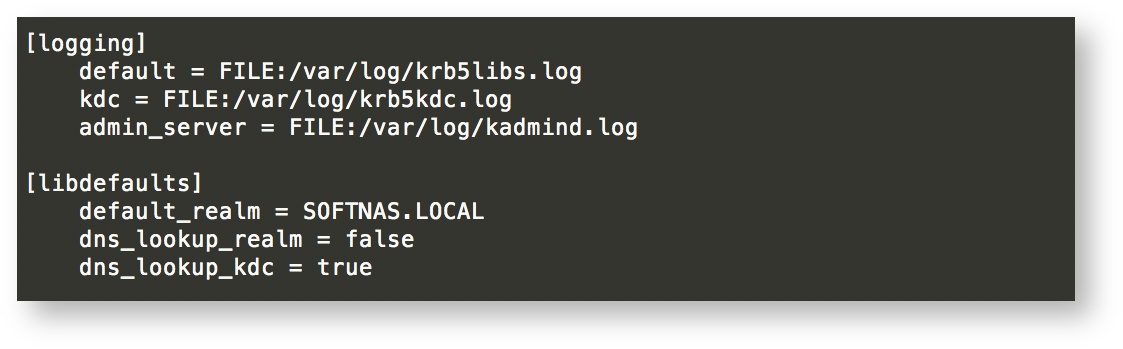
- Next, let's restart our samba winbind services , and flush the cache:
- RHEL 7/CENTOS 7: # service smb restart && service nmb restart && service winbind restart && net cache flush
- UBUNTU 16.04: # service smb restart && service nmb restart && service winbind restart && net cache flush
- RHEL 7/CENTOS 7: # service smb restart && service nmb restart && service winbind restart && net cache flush
- To ensure that our CIFS/NFS services would come back up on system reboot, lets enable the services involved, by running the commands below:
- RHEL 7/CENTOS 7: #. systemctl enable winbind smb nmb
- UBUNTU 16.04: #. systemctl enable winbind smbd nmbd winbind
Note: The commands above are the only commands we borrowed from RHEL 7/CENTOS 7 & UBUNTU 16.04 because they are native to those versions, therefore if you are on older versions use this command instead chkconfig <service> on
- RHEL 7/CENTOS 7: #. systemctl enable winbind smb nmb
- The Linux nsswitch.conf configuration file controls how name resolution works when looking up various types of objects, such as host addresses and passwords, and AD Users & Groups. Without this, we cannot be able to resolve our AD Users & Groups. Therefore, edit the config file and add 'winbind' like the example below:
#: vim /etc/nsswitch
- We are now ready to acquire our first Kerberos ticket to join AD by running the commands below on our systems.
#. kinit -p buba@SOFTNAS.LOCAL

- Next, Lets Join AD while also creating an nfs-upn on the fly by using the command below on RHEL 7/CENTOS 7 & UBUNTU 16.04 respectively:
- RHEL 7/CENTOS 7: # net ads join -U buba createupn=nfs/centos-7.softnas.local@SOFTNAS.LOCAL
- UBUNTU 16.04: #. net ads join -U buba createupn=nfs/ubuntu-16.softnas.local@SOFTNAS.LOCAL

- RHEL 7/CENTOS 7: # net ads join -U buba createupn=nfs/centos-7.softnas.local@SOFTNAS.LOCAL
- Please refer to step #4 of this guide to complete this step!
- Next, lets create mount-points to mount our CIFS/NFS shares and verify:
- RHEL/CentOS 7: #. mkdir /mnt/cifs /mnt/nfs-sec /mnt/nfs-krb5 /mnt/nfs-krb5p /mnt/nfs-krb5i
UBUNTU 16.04: #. mkdir /mnt/cifs /mnt/nfs-sys /mnt/nfs-krb5 /mnt/nfs-krb5p /mnt/nfs-krb5i - CIFS mounts: for all Linux Distributions:
#. mount -t cifs -o domain=SOFTNAS,username=buba,password=Thegladiator1 //na1/cifs1 /mnt/cifs - NFS mounts for all Linux Distributions :
#. mount -t nfs nas1:/pool1/cifs1 /mnt/nfs-syc -o sec=sys
#. mount -t nfs nas1:/pool1/cifs1 /mnt/krb5 -o sec=krb5
#. mount -t nfs nas1:/pool1/cifs1 /mnt/krb5i -o sec=krb5i
#.mount -t nfs nas1:/pool1/cifs1 /mnt/krb5p -o sec=krb5p
#. df -h


- RHEL/CentOS 7: #. mkdir /mnt/cifs /mnt/nfs-sec /mnt/nfs-krb5 /mnt/nfs-krb5p /mnt/nfs-krb5i
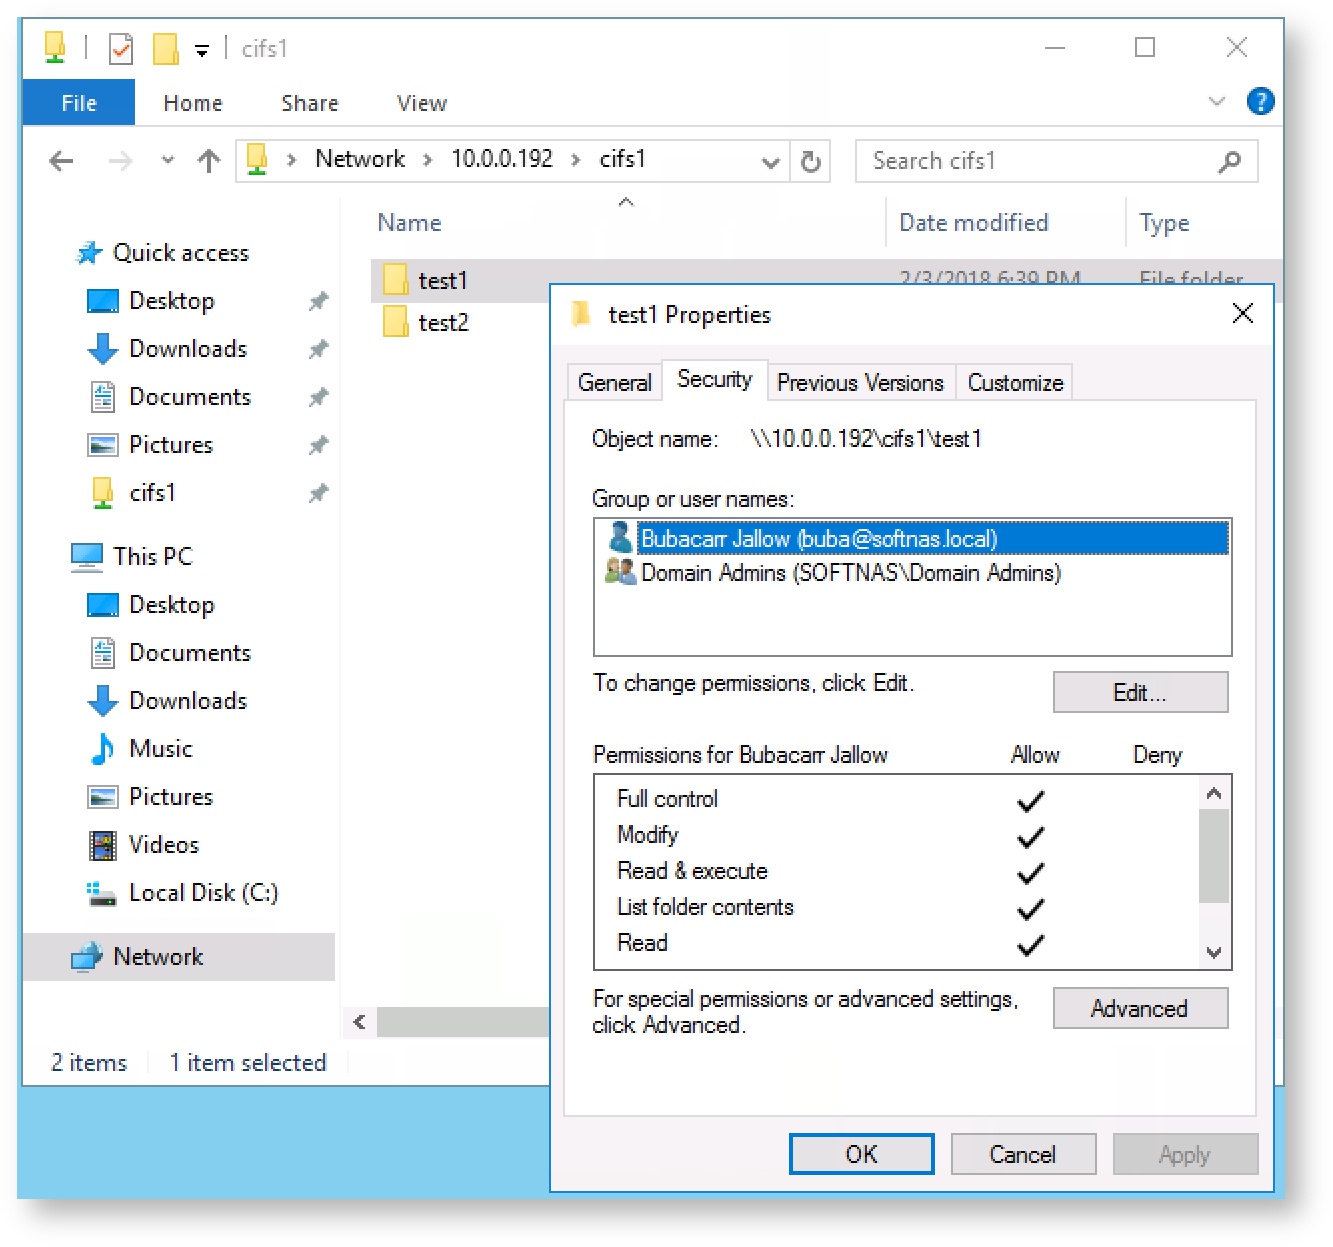
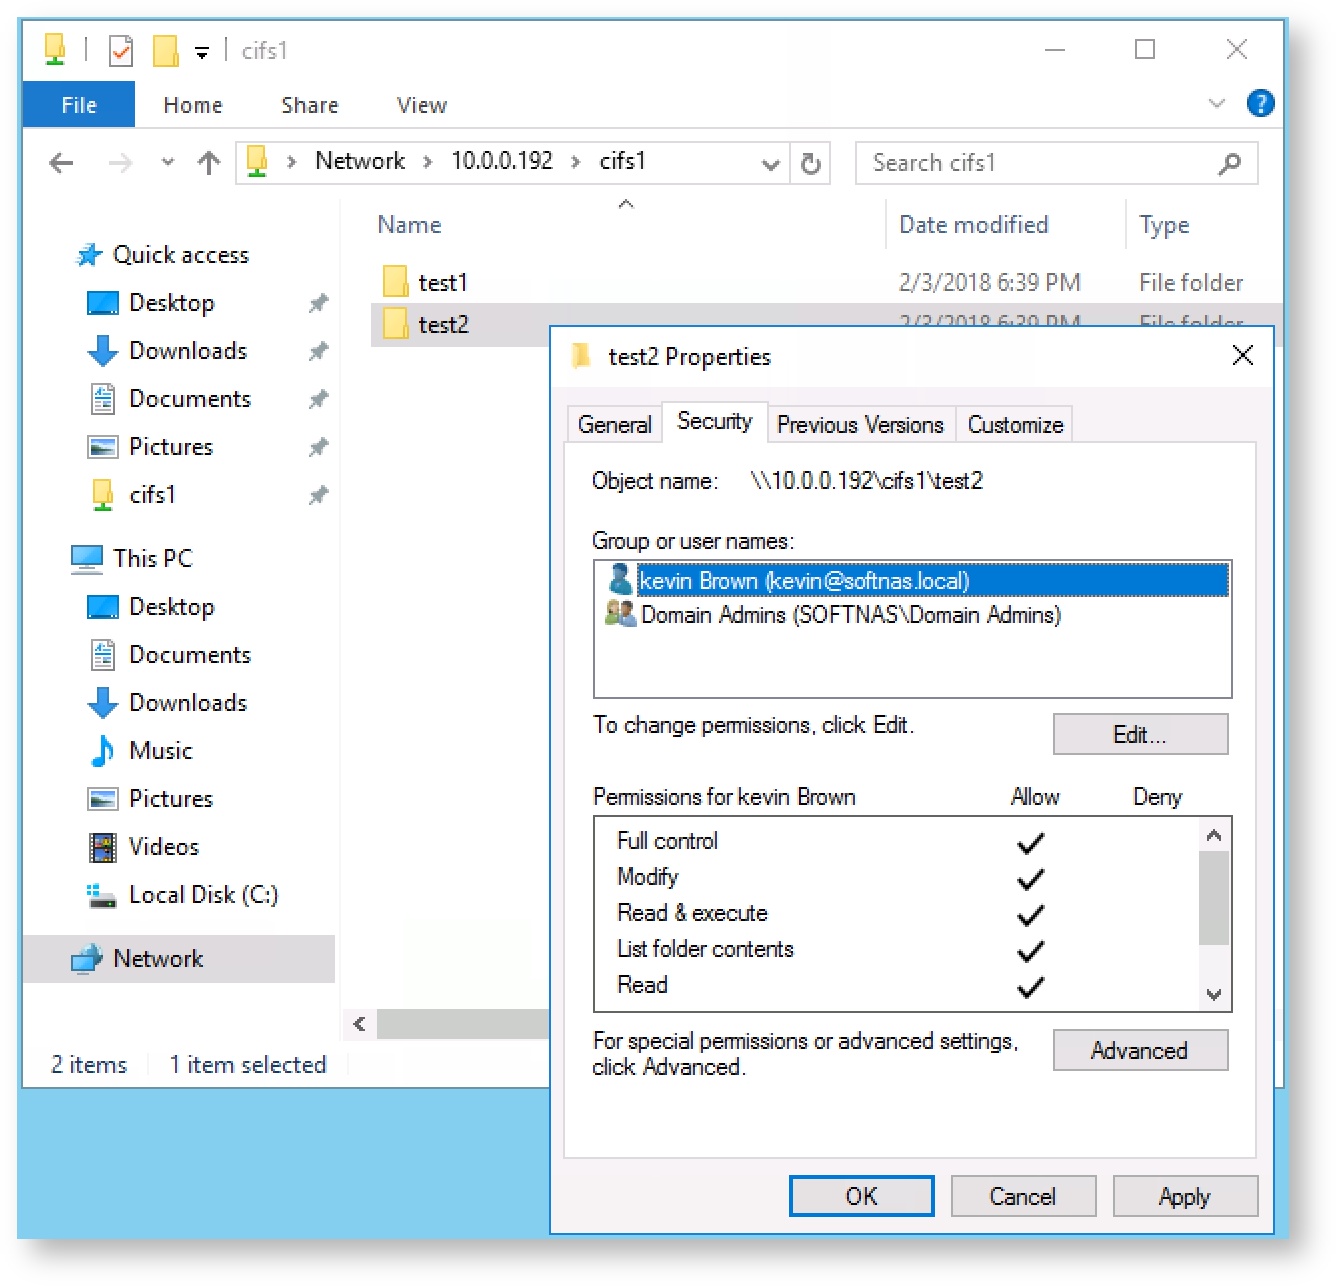
- Let's compare ACLs from AD,SoftNAS and Linux Clients:
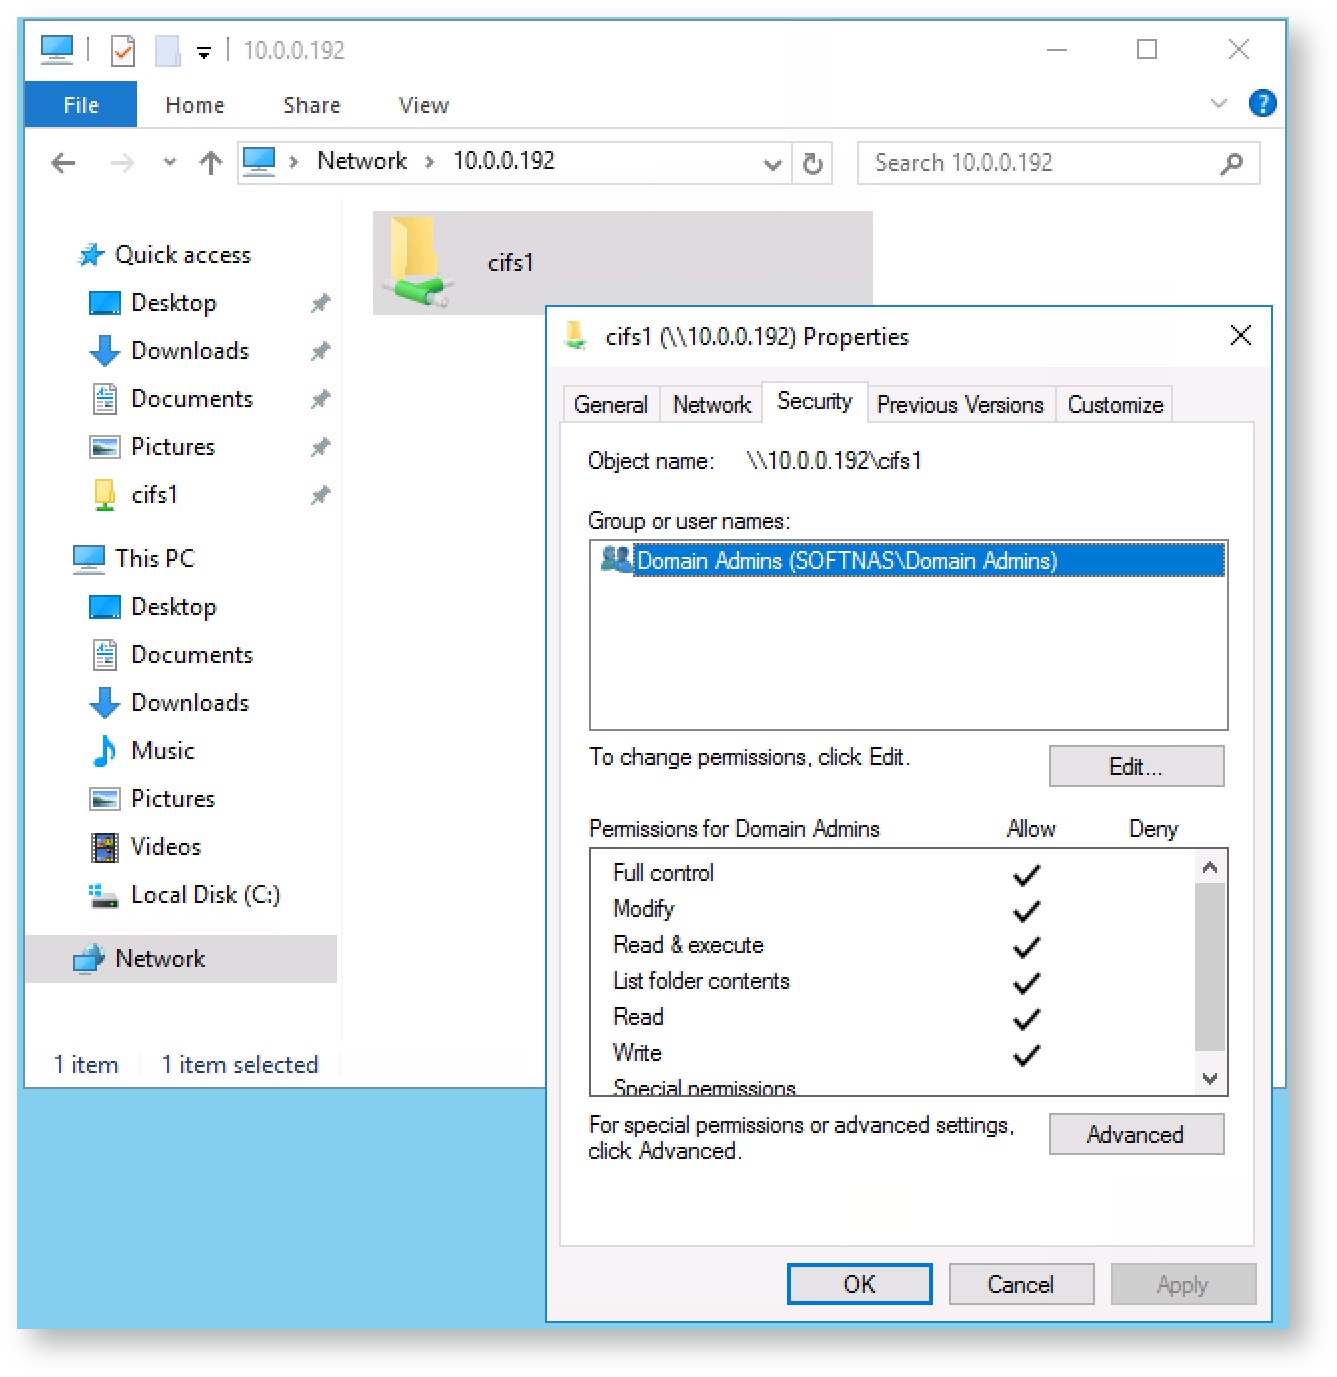
- From AD logged in as a "Domain Admin" User
- ACLs from SoftNAS:
#. cd /pool1/cifs1
#. getfacl *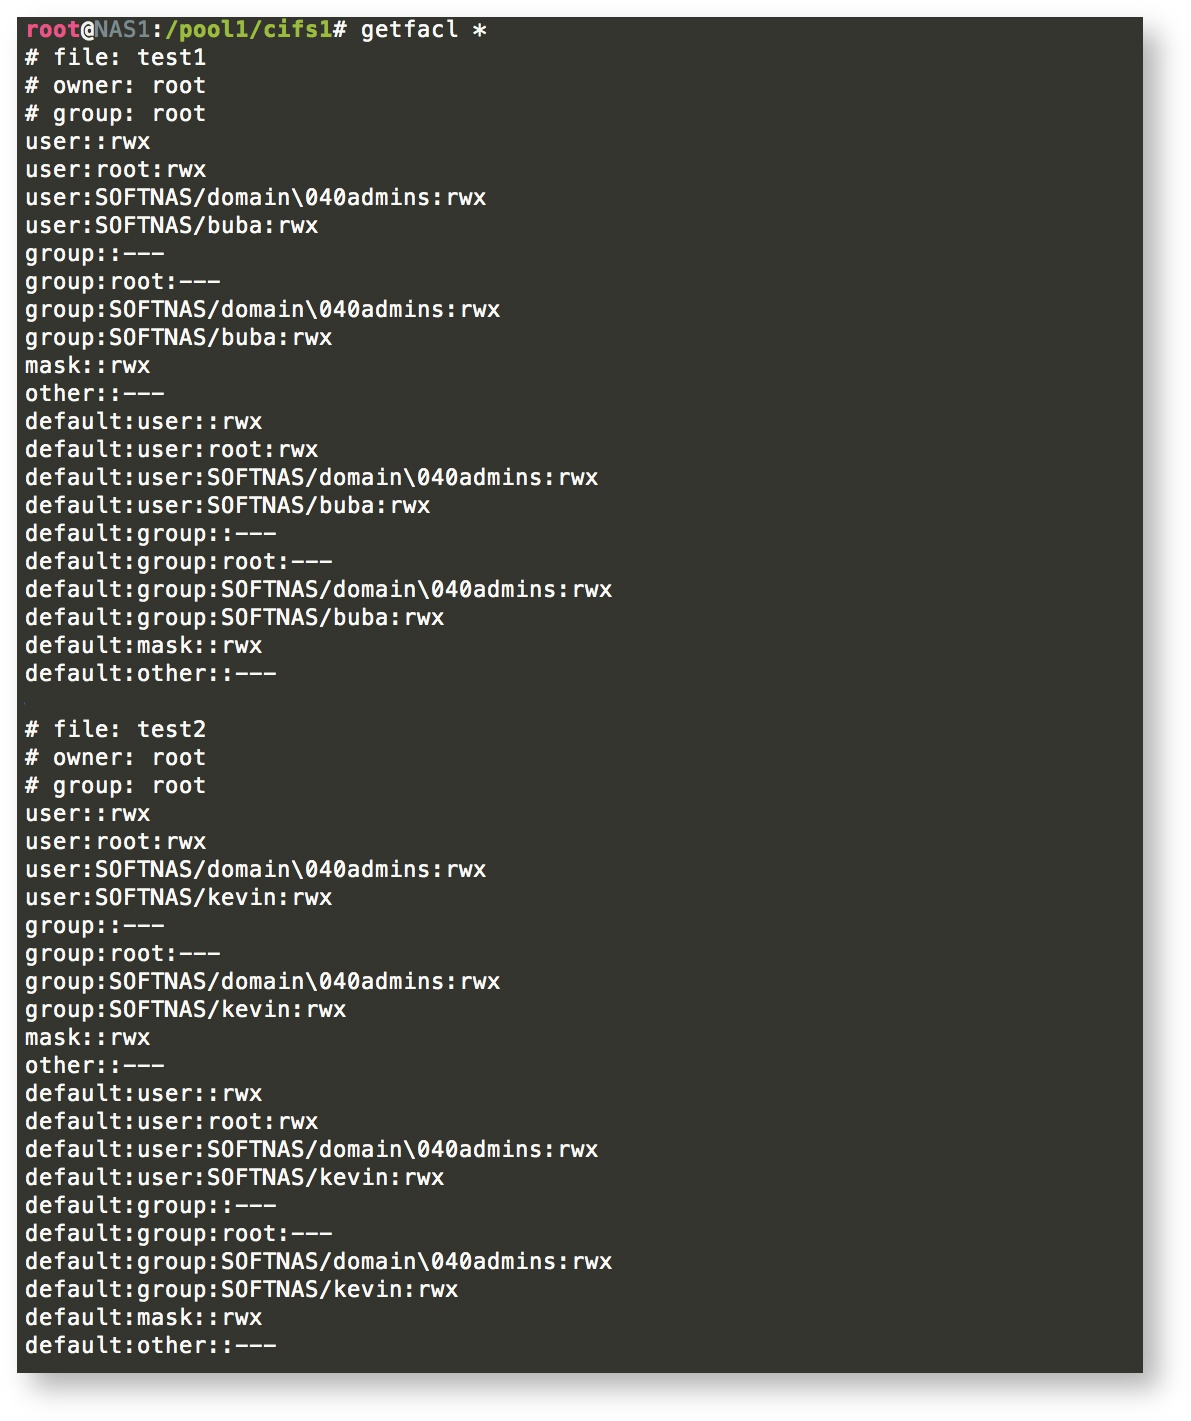
- ACLs from RHEL 7/CENTOS 7 "Client1"
#. cd /mnt/cifs && ls -ltr && getfacl *
#. cd /mnt/nfs && ls -ltr && getfacl *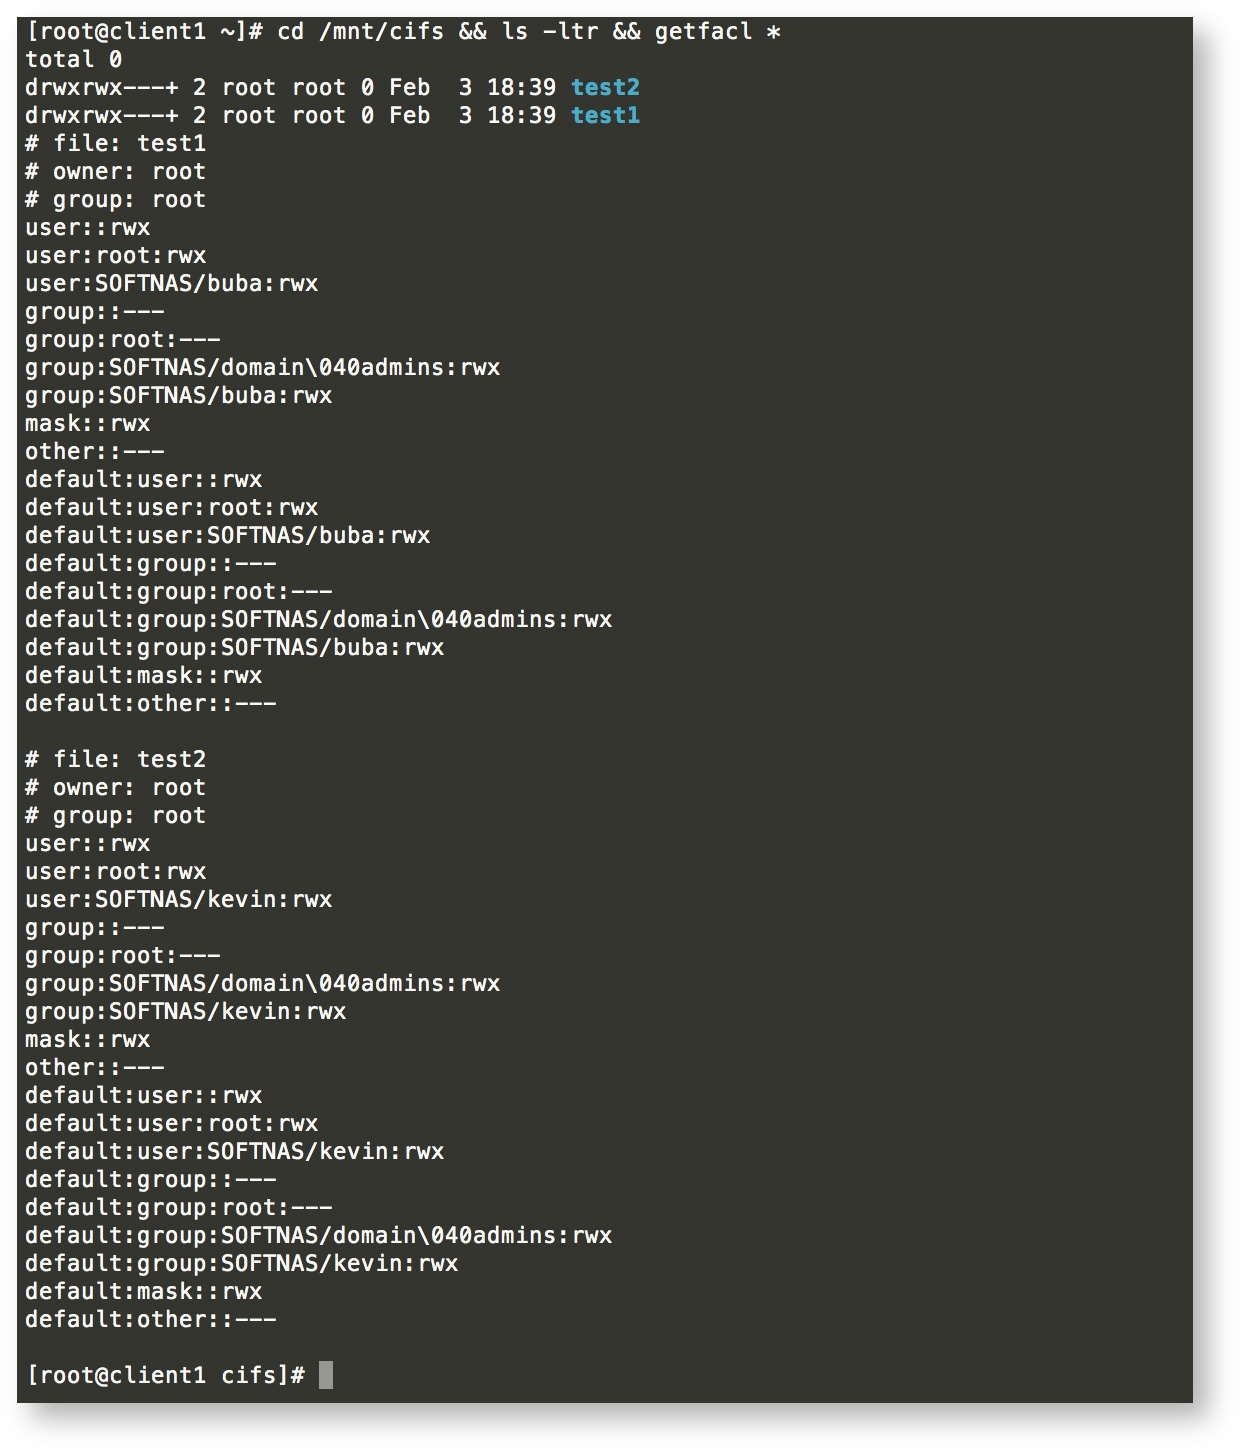
- ACLS from UBUNTU 16.04 Client "ubuntu1"
cd /mnt/cifs && ls -ltr && getfacl *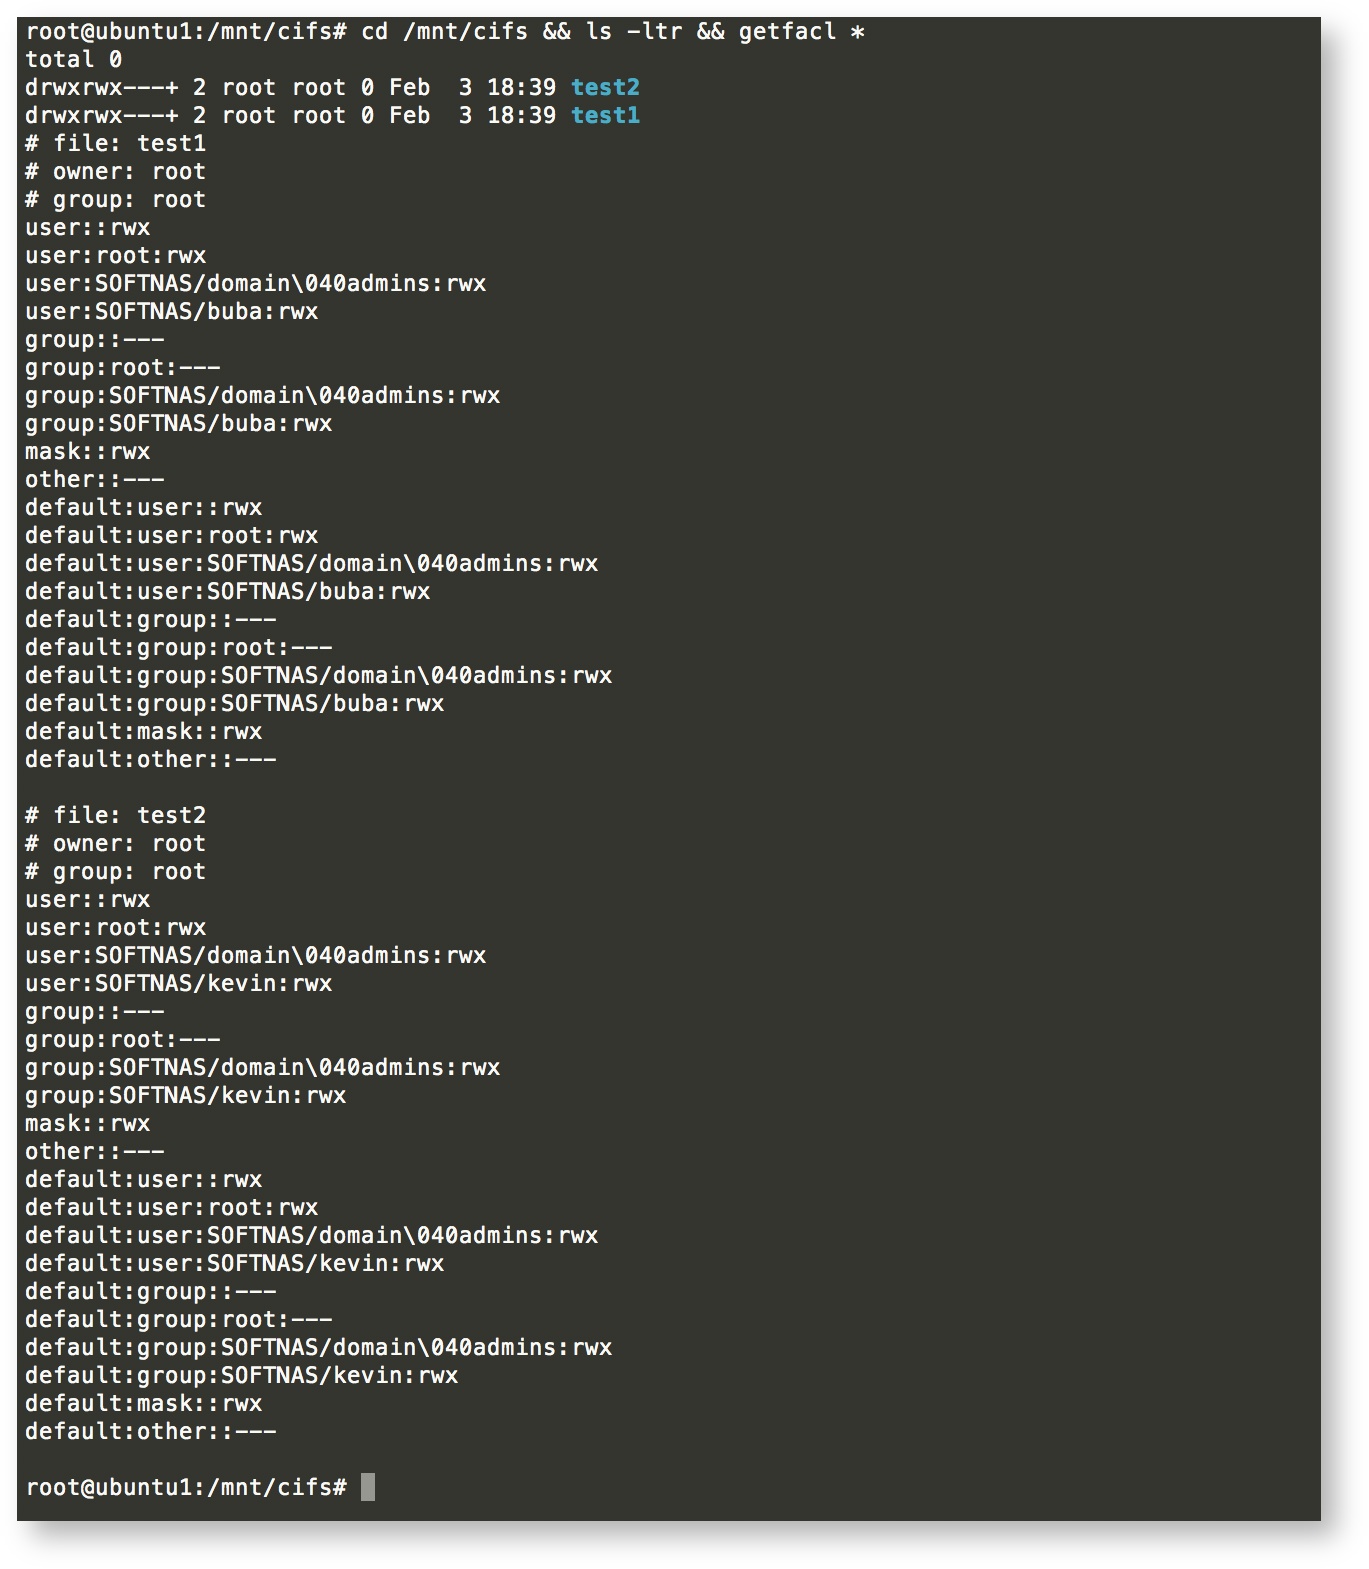
- From AD logged in as a "Domain Admin" User
- Our final step is to automate the mounting process on system reboot by utilizing the /etc/fstab file:
- CIFS fstab mount Options: For security reasons, we can create a secure CIFS credentials file call 'creds' to hold our 'Domain Admin user' credentials for auto-mounting, instead of exposing it in plain text in /etc/fstab:
- Create the secure file for the /etc/fstab file:
#. vim ~/.creds && chmod 600 .creds - Paste the following:
+domain=SOFTNAS
username=buba
password=Thegladiator1
#. echo '//10.0.0.192/cifs1 /mnt/cifs cifs domain=SOFTNAS,credentials=/root/.creds 0 0' >> /etc/fstab
- Create the secure file for the /etc/fstab file:
- NFS fstab mount Options:
#. echo 'nas1:/pool1/cifs1 /mnt/nfs nfs4 rsize=8192,wsize=8192,intr 0 0' >> /etc/fstab - NFS with Krb Authentication:
#. vim /etc/idmap.conf
domain = softnas.local
#. vim /etc/sysconfig/nfs
#. net ads join -U buba createupn=nfs/client1.softnas.local@SOFTNAS.LOCAL
#net ads join -U buba createupn=nfs/ubuntu1.softnas.local@SOFTNAS.LOCAL
net ads keytab add nfs -U buba
nfs, rpcbind, rpcgssd, rpcidmapd, or rpcsvcgssd
- CIFS fstab mount Options: For security reasons, we can create a secure CIFS credentials file call 'creds' to hold our 'Domain Admin user' credentials for auto-mounting, instead of exposing it in plain text in /etc/fstab:
- Congratulations! With the right credentials, you can now administer all your SoftNAS shares on different protocols (CIFS/NFS ) from a single location, using multiple platforms.
Stay tuned for our Advanced CIFS/AD ACLs administration Guide.
Related articles