SoftNAS DR Solutions
- Admin
Symptoms
As the need to have backups on production data becomes more and more relevant, SoftNAS customers are often tasked with having an exact replica of their production data to a second environment for DR purposes. This will ensure business continuity in-terms of unforeseen circumstances.
Purpose
This KB will explore the different DR setups available to configure on SoftNAS without hurting overall system performance. There are currently 2 short term DR solutions (that we will explore shortly in great detail). However, SoftNAS is also committed to integrate a long term solution that will be part of the product in a future release.
Resolution
Zfs Send/Recv Solution:
Script located HERE(and linked again in below sections)
This Solution uses the native ZFS send and receive method that replication uses to send data over to a DR environment. It can be run as a stand alone command, scheduled as a cron job, or run as a NiFi processor to replicate a volume to another softnas which is faster than rsync and consumes less resources.
NOTE: The Script needs to be run from Source
This script takes two arguments; -v <volname> -r <remote_ip>
If you run the script without any arguments, it will print out the help file like below:
-v VOL_NAME required [-v pool0/vol0]-r REMOTE_IP required [-r 10.100.1.5]
Examples:'./dr_copy.sh -v pool0/vol0 -r 10.100.1.5'
ENCRYPTING THE REPLICATION STREAM
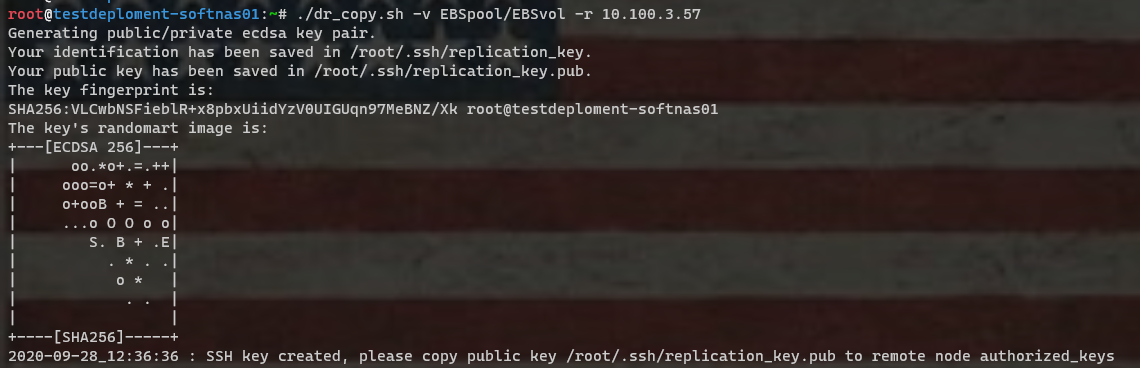
This script uses an SSH key to encrypt the data in transit.
The first run of the script will create the ssh key for you at '/root/.ssh/replication_key' and the public key will be '/root/.ssh/replication_key.pub'
Add the contents of the public key ('/root/.ssh/replication_key.pub') to the remote node you are replicating to. It goes inside the file '/root/.ssh/authorized_keys' on the remote node.
You can either manually paste the contents into authorized keys or use the command 'ssh-copy-id' to copy the public key over. We will show both methods.
Example below of manual steps:
- When the script is first ran it looks for the key and creates one if it does not exist:
2. To add the public key to the remote node, append the contents of the public key into ~/.ssh/authorized_keys on the remote node: ( I used 'echo' in this case)

To use 'ssh-copy-id', follow the below procedure:
On The Primary node of DR, From UI, go to Settings --> General System Settings --> Servers --> SSH Server --> Authentication --> and change Allow authentication by password? to "YES" and Allow login by root? to "YES"
Restart the ssh sever
NOTE: Please take note of these changes as you will need to revert them back to their defaults for security reasons.
NOTE: Permissions for the private key should be 0600Copy the public key to the DR node using the ssh-copy-id command:
# ssh-copy-id root@10.0.2.97
NOTE: Please replace the IP with yours before running the command.
Now we are ready to connect to the DR node with the user root without a password.
NOW RUN THE COMMAND OR SET IT TO RUN ON A SCHEDULE
Next, please ensure that a pool of the same name exist at the DR node, (volume not required).
- Next, download a copy of the dr_copy.sh script from HERE if you have not done so yet.
- Once the script in step #2 above has been downloaded, there are many ways in which you can be able to transfer it to SoftNAS. For the purpose of this KB, an SFTP client (Filza) was used.
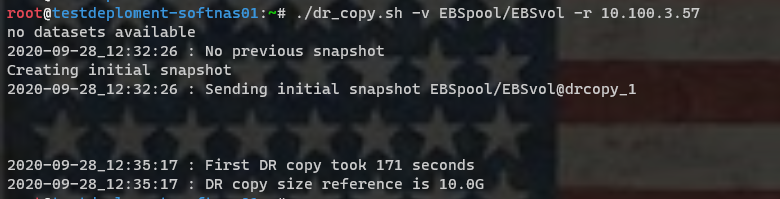
- Now we are ready to run the script that was downloaded on step #2 either as a standalone, via cron or NiFi processor if you have Platinum License. The script requires to be run with Volume name as first argument and remote IP as second argument.
# Example'./dr_copy.sh -v pool0/vol0 -r 10.100.1.5' - If the keys are added, then you should get output like below when you run your command:
6. This can be scheduled as a cron job with the command below for a start. Schedule times can be adjusted accordingly.
*/30 * * * * /bin/bash ~/dr_copy.sh -v pool1/vol1 -r 10.10.1.199
Controlled Rsync Solution:
As the heading implies, This type of rsync setup will ensure that once an rsync job is kicked off the process must run completely before another process is spawned. Since rsync is a resource intensive service, this approach will minimize the performance impact it usually poses on production systems during heavy read/write operations by minimizing multiple rync processes of the same job while still ensuring DR compliance.
To get started, please follow the steps below:
- On the Target node, From UI, go to Settings --> General System Settings --> Servers --> SSH Server --> Authentication --> and change Allow authentication by password? to "YES" and Allow login by root? to "YES"
Restart the ssh sever
NOTE: Please take note of these changes as you will need to revert them back to their defaults for security reasons
From the Target node let's setup SSH keys to push to the DR to get it ready for the rsync script: Please run the command below to create the RSA Key Pair:
# ssh-keygen -t rsa -b 2048
Use default location /root/.ssh/id_rsa and setup passphrase if required.
The public key is now located in /root/.ssh/id_rsa.pub
The private key (identification) is now located in /root/.ssh/id_rsa
NOTE: Permissions for the private key should be 0600Copy the public key to the DR node using the ssh-copy-id command:
# ssh-copy-id root@10.0.2.97
NOTE: Please replace the IP with yours before running the command.
Alternatively, you can copy the content of /root/.ssh/id_rsa.pub to /root/.ssh/authorized_keys on the DR node.
NOTE: On a security perspective the permissions for the authorized_keys file should be set to 0600
Now we are ready to connect to the DR node with the user root without a password.
- Next, on the DR node, please create a pool and a volume of the same name if it doesn't already exist
NOTE: If you are joined to AD please ensure that permissions has been properly set on your volume(s) first before you proceed with the next steps - Next, download the Rsync-2.0.zip file from Here
NOTE: Once the .zip file is extracted you will be present with two files called ( execu.sh mkcrc32.php). - Once the script in step #6 has been downloaded, there are many ways in which you can be able to transfer it to SoftNAS. For the purpose of this KB an SFTP client (Filza) was used
- Next, extract it using the command below
#. unzip Rsync-2.0.zip
NOTE: Once the .zip file is extracted you will be present with two files called ( execu.sh mkcrc32.php). - The files on Step #8 can be moved to any desired location but for the sake of demonstration, both scripts are placed on /root
NOTE: These scripts needs to be in the same directory at all times! and should have the execute bits which can be added with the command below
# chmod +x execu.sh mkcrc32.php - Now we are ready to test the scripts by running the command below. Be sure to change your IP and Path to suit your environment
# ./execu.sh rsync -ravz --omit-dir-times /pool1/vol1/ root@10.10.1.199:/pool1/vol1 - When the script is ran twice simultaneously the output of the screenshot below is to be expected if not then please take look at your command syntax, especially the path and possibly your ssh keys. Also, please note that the script only executes when there are new files to be copied over to the destination folder if not, nothing will happened. However, you will still get the "Launcing Unique" message on each iteration of the command in step #10

- To automate this process, you can schedule it as a cron job by running the commands below:
#. crontab -e
#. */30 * * * * ~/execu.sh rsync -ravz --omit-dir-times /pool1/vol1/ root@10.10.1.199:/pool1/vol1 - We can check the progress by running the command below:
#. tail -f /tmp/execu-XXXX.tmp (Replace the XXX with the exact number provided)