High Availability: Amazon Web Services
This section details tasks, processes or workspaces specific to SoftNAS® instances running on Amazon Web Services.
About Virtual IP Addresses
SoftNAS® storage is normally not accessible from the public Internet. With a Virtual IP setup, none of your IP addresses is public facing, increasing the security of the deployment. A Virtual IP address is configured with a security group setting that restricts its access to only the internally-routable, private IPs assigned to the VPC; e.g., in this example, only EC2 instances within the VPCs internal 10.0.0./16 private network are routable to the Virtual IP.
Why use a Virtual IP?
Configuring high availability in SoftNAS® on AWS is a simple process. It involves two nodes with defined IP addresses, and a third human-configured virtual IP to establish a heartbeat between the two instances. We will cover this and more in the sections to follow.
AWS VPC Architecture: Virtual IP
On AWS, SoftNAS SNAP HA™ is designed to operate within the Virtual Private Cloud (VPC). VPCs can be as simple as a single subnet, with or without a VPN security gateway, or as complex as public/private compartmentalized subnets, as depicted in the figures herein.
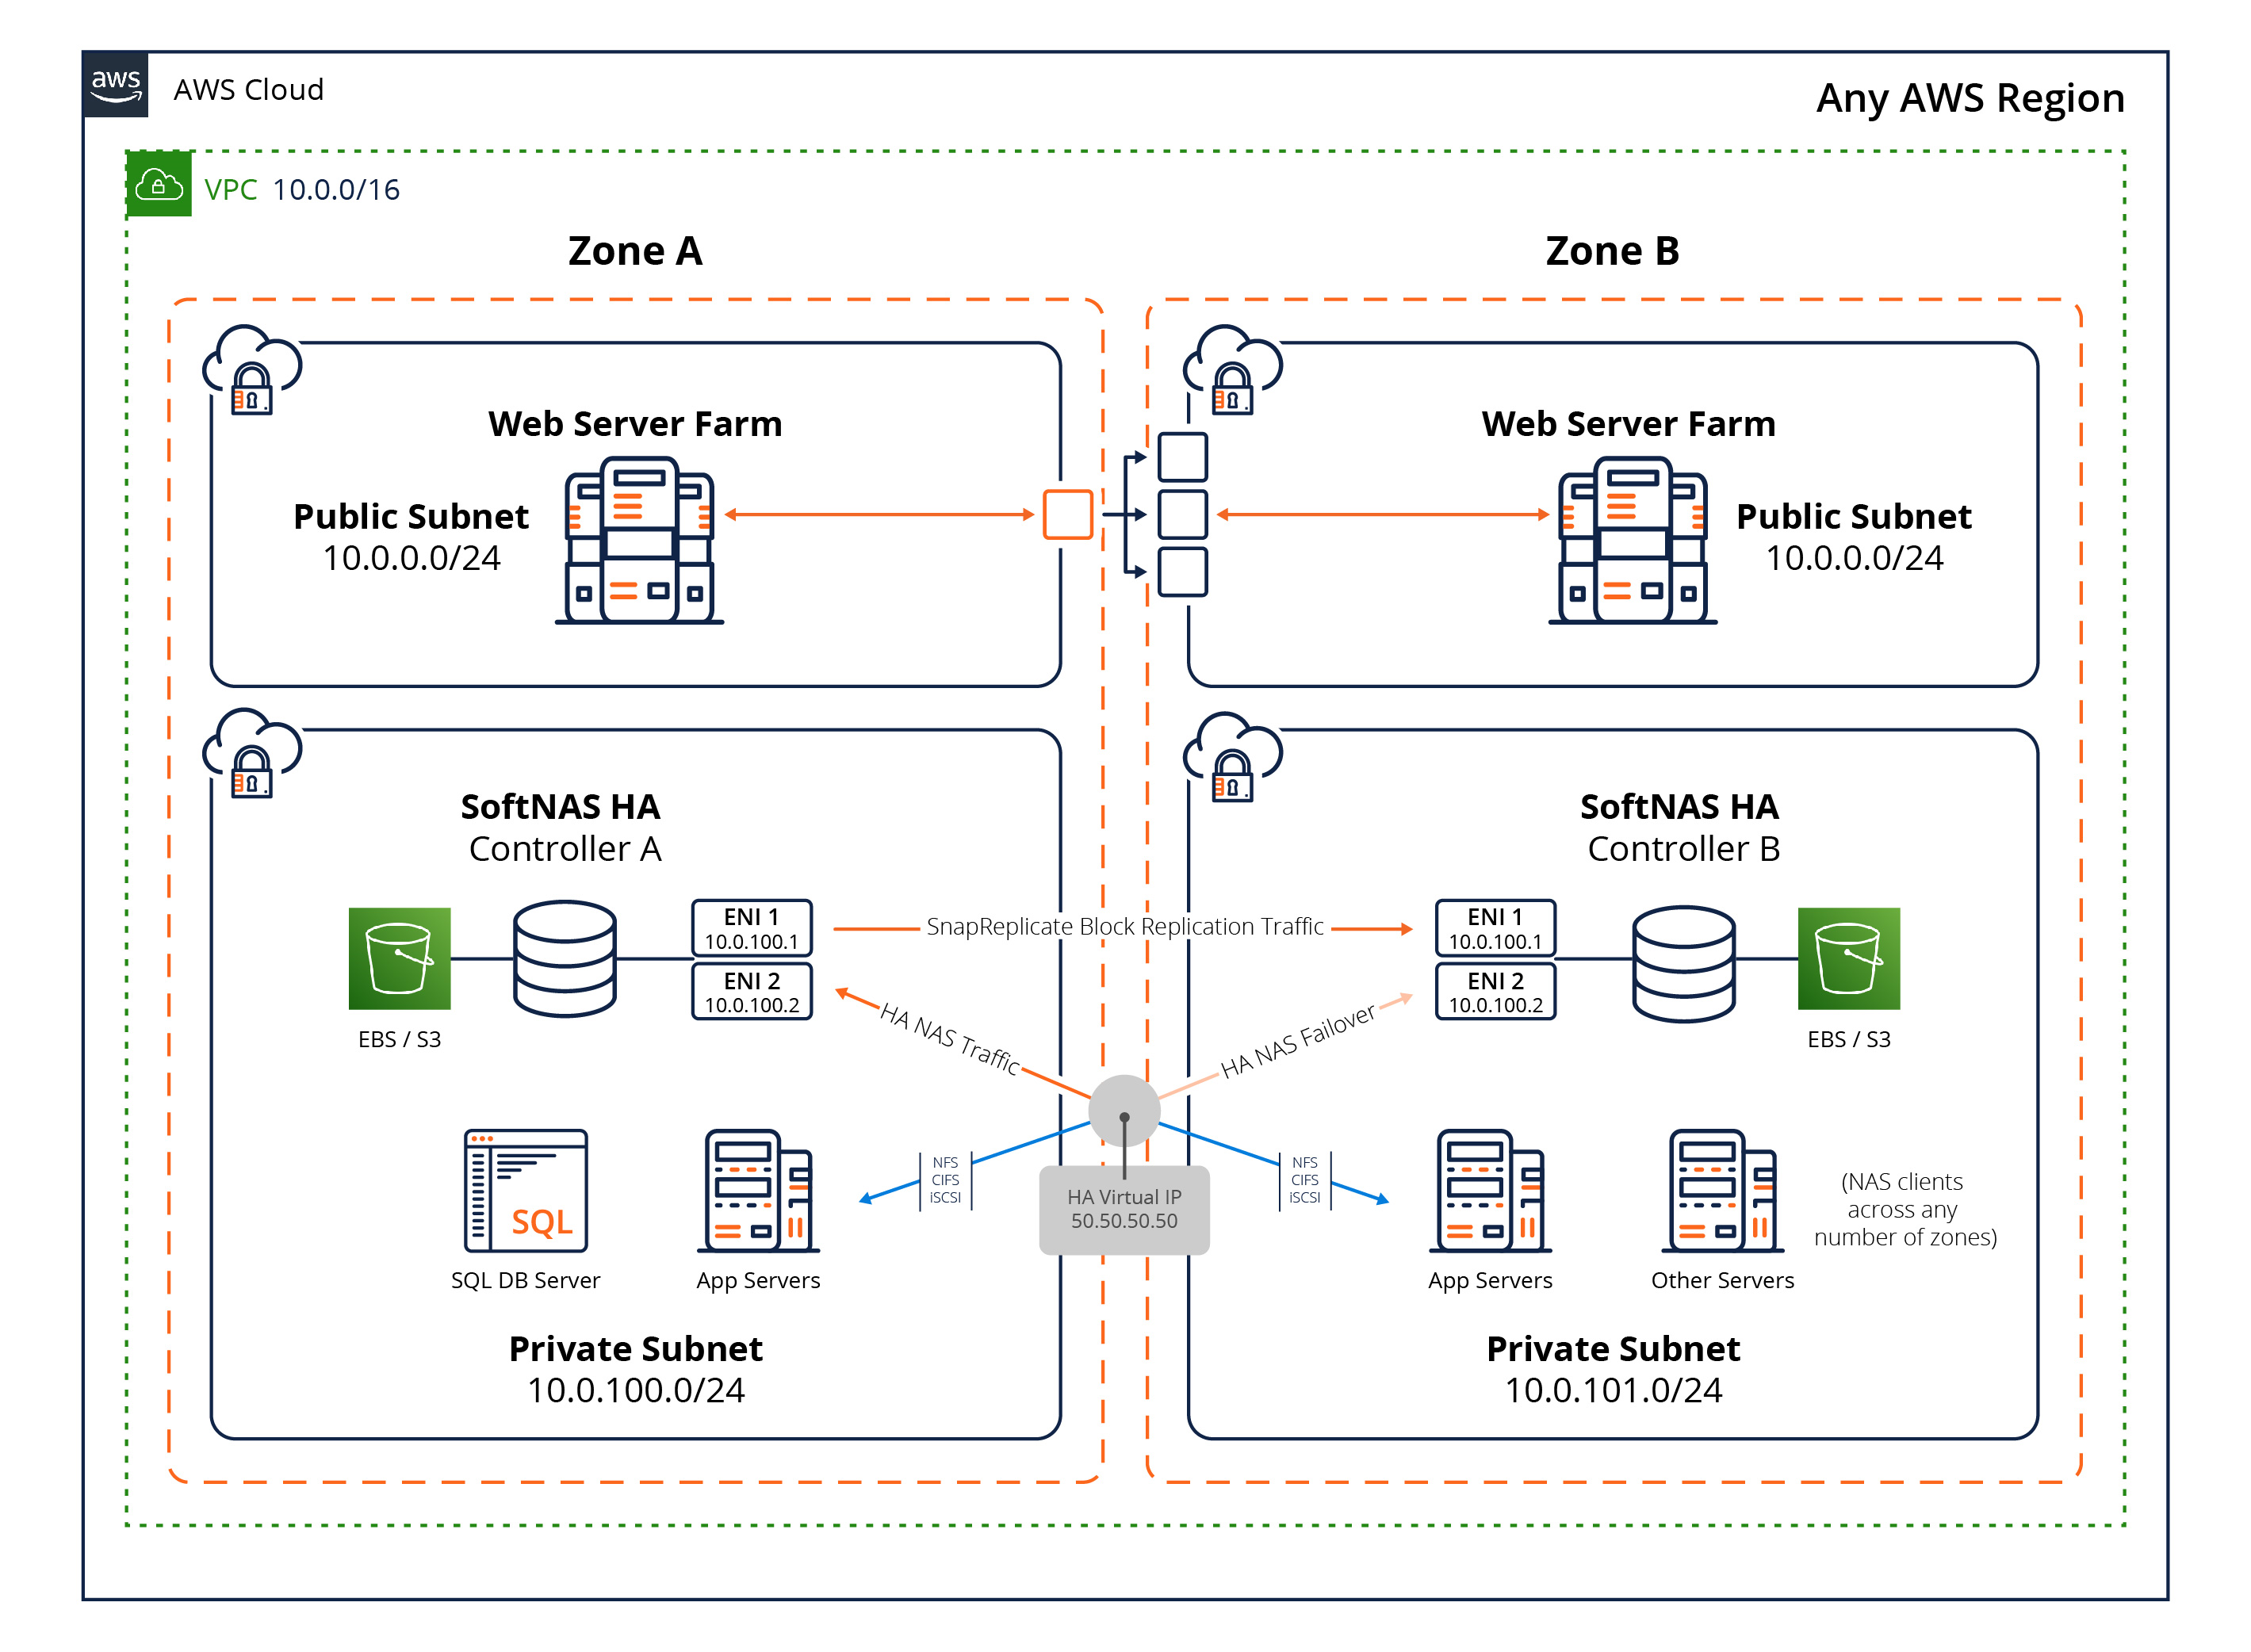
In the first image below, we see a VPC configured to operate across two availability zones (AZ), with separate private subnets. SoftNAS® controllers are placed into the private subnet for Virtual IP address routing purposes.
AWS Virtual IP Cross-Availability Zone Architecture Overview
This diagram depicts a typical HA deployment but is not the only possible design. In fact, SoftNAS SNAP HA™ can be deployed with dual controllers located within a single AZ on a VPC (there is no requirement to split controllers across AZs, but it is a recommended best practice for maximum availability).
We see a VPC created in a /16 network in AWS US East (Virginia) data center, with subnets allocated in Zone A and Zone B. This topology provides the best overall redundancy and availability within the AWS AZ architecture.
Two SoftNAS® controller EC2 instances are deployed - one per AZ. If optional private subnets are configured in one or more AZs, they will also have access to the Virtual IP(VIP) for NFS client storage access via NFS, CIFS and iSCSI protocols.
The drawing shows SNAP HA™ replication traffic flowing from Controller A to Controller B. This traffic is allocated to interface 0. Interface 0 is also used for administration using the SoftNAS StorageCenter™ Administrative Interface. Block replication keeps a warm copy of the data from node A on node B, in case a failover is necessary.
The drawing shows two orange arrows emanating from an orange and white circle, which represents the Virtual IP. The black lock symbol represents the EC2 Security Group associated with the Virtual IP. The shadowed orange arrow represents re-routed storage requests flowing to Controller B after an automatic failover or manual takeover. This Virtual IP must be in a completely separate CIDR block from the two instance IPs.
When an automatic failover or manual takeover occurs, NAS traffic is re-routed via the Virtual IP from Controller A to Controller B, as indicated by in the diagram above. When a Virtual IP switches over from one controller to another, NAS client traffic is rapidly re-routed to the new controller, typically in just a few seconds. NAS clients typically experience a brief switch-over delay of up to 20 seconds or so, and automatically reconnect after the switch-over event takes place.

AWS VIP Cross-Availability Zone Network Design
Each SoftNAS® controller has two NICs assigned - interface 0 (default) and one additional interface 1 (added during EC2 instance configuration).
- Admin and Replication, Interface 0 - the first (default) NIC is used for SoftNAS StorageCenter™ access and SnapReplicate™ data replication across controllers.
- SoftNAS® Storage, Interface 1 - the second NIC is dedicated to NAS storage traffic and is used for Virtual IP routing of storage-related traffic (NFS, CIFS, iSCSI).
Note in the following diagrams the IP addresses shown are for illustration purposes only, and actual IP addresses will be assigned by AWS.
The remaining EC2 instances constitute NAS clients; that is, EC2 instances that connect using NFS, CIFS or iSCSI protocols to access NAS services across the private network. Although only two AZs are shown in these diagrams, NAS clients can access HA NAS services from any zone within the region allowed access to the Virtual IP.

Secure Administrative Access in VPC
Without a public facing IP, the only way to access a Virtual IP VPC is by connecting to the private subnet upon which it is based. There are multiple ways to configure secure administrative access to the SoftNAS SNAP HA™ storage controllers:
- VPN - this is the most secure stand-alone solution, and a recommended minimum best practice for limiting access to the private IPs of each SoftNAS® controller. In this case, use DNS to assign a common name to each controller (e.g., "nas01.localdomain.com", "nas02.localdomain.com"), making routing to each SoftNAS® controller convenient for administrators
- Admin Desktop - an even more secure approach is to combine VPN access with an Administrator's desktop, sometimes referred to as a jumpbox, typically running Windows and accessed via RDP. This secure admin desktop adds another layer of authentication, namely Active Directory (or local account) authentication. Once an administrator has gained secure, encrypted access to the Admin Desktop, they open up a web browser to connect to the SoftNAS StorageCenter™ controller.
Virtual IP Setup
SoftNAS now supports the set up of highly available VPCs with private subnets using virtual IPs. Elastic IP setup is still supported for legacy purposes. However, Virtual IP setup, more secure because it does not require a public facing IP, is our recommended best practice.
Amazon Private IP AWS Installation Overview
This section describes how to set up an Amazon AWS Virtual Private Cloud (VPC) in high availability (HA) mode to work with SoftNAS SNAP HA™.
The following is required:
- Create the VPC in AWS.
- Specify the IAM User for SoftNAS®
- Configure the routing tables.
- Launch an Instance of SoftNAS® into the VPC.
- Create and Associate the Required Virtual IPs.
- Set up ICMP echo/reply to use "ALL TRAFFIC" for the VIP (for example, 40.40.40.40 will need ICMP entries)
- ALL TRAFFIC needs to be added specifically to the Security Group used for the SoftNAS nodes.
- Set up SoftNAS® for HA.
SoftNAS Setup for Virtual IPs
If setting up SoftNAS SNAP HA with virtual IPs, there is no need to create Elastic IPs. A total of 3 IP addresses will be required. The two IPs statically assigned or assigned via DHCP to your VPCs at instance creation time can be retained. Each VPC instance must have an IP in the same CIDR block. A third, human-configured (chosen by you) IP starting with a different octet will be selected during the HA wizard setup. This 3rd IP address will be used to access the share. Staring with a different octet means that if your VPC range is 172.16.0.0/16, the VIP you select must not start with 172, it must start with something else, for example: 10 or 12 or 175.
Setting Up for SNAP HA™
- To set up SoftNAS for SNAP HA™, log into the SoftNAS® instances and access storage via the SoftNAS StorageCenter™ interface.
Via the SoftNAS StorageCenter™ interface, set up SoftNAS® with the required Disk Devices, Storage Pools, and Volumes.
When setting up storage pools for replication, they must have the same name or replication will not work properly.
Also, a volume must be created on the source side node ONLY.
For more information, see the document SoftNAS Installation Guide.
Once this is complete for both instances, set up replication and SoftNAS SNAP HA™.
Setting Up SoftNAS®
After accessing the SoftNAS StorageCenter™ interface, set up the Disk Devices, Storage Pools, and Volumes that will ultimately be required for SNAP HA™.
For more information, see the document SoftNAS Installation Guide.
Setting Up Replication and SNAP HA™
Set up Replication
- Log into your SoftNAS® instance and select the SnapReplicate / SNAP HA™ menu from the Storage Administration panel.
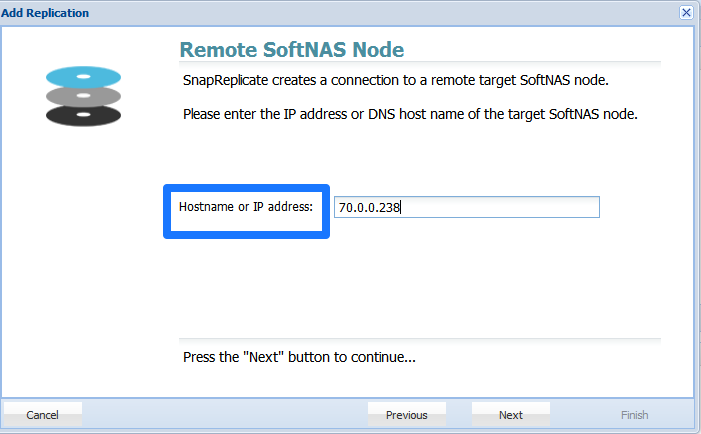
- Click Add Replication.
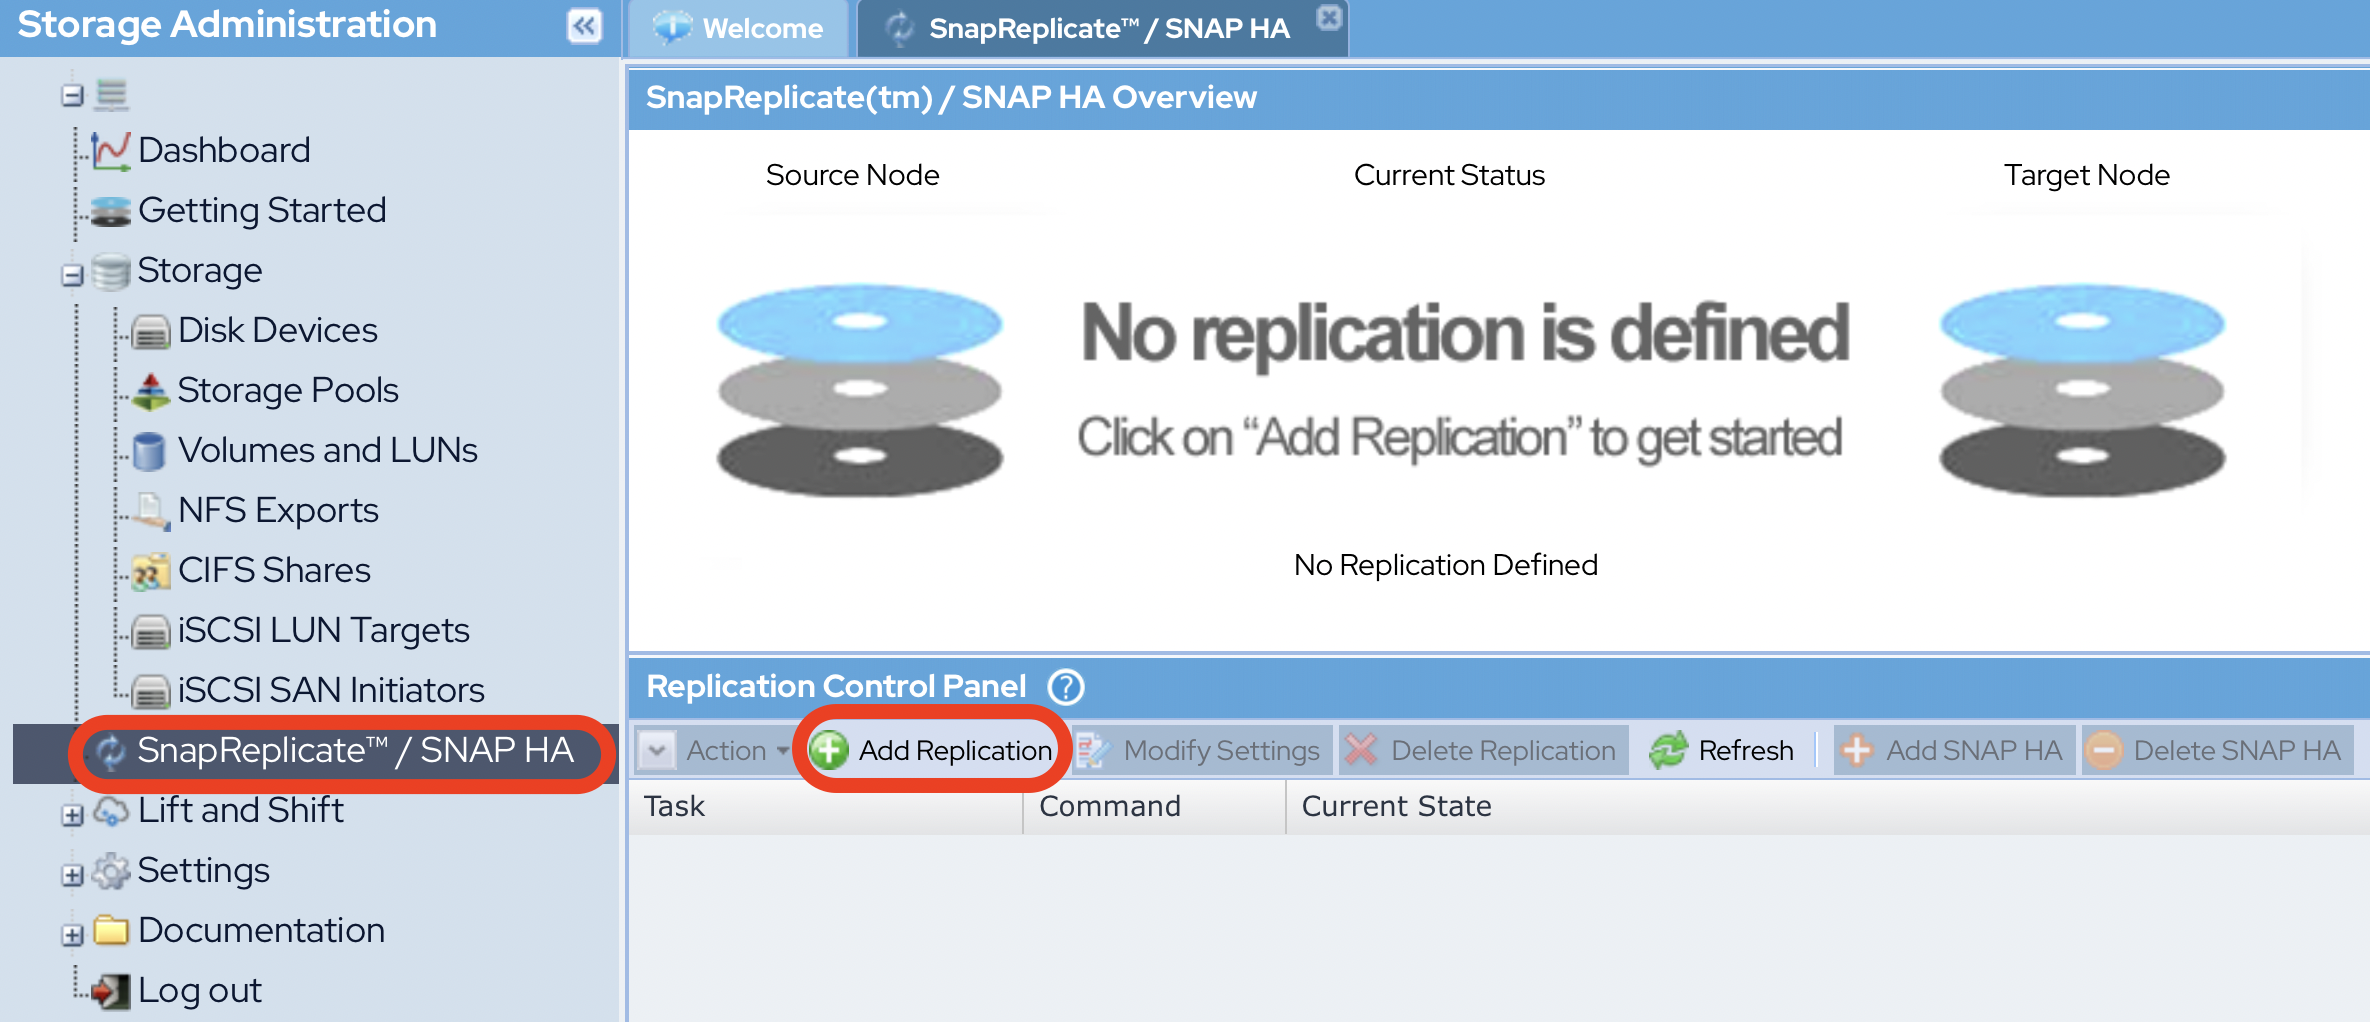
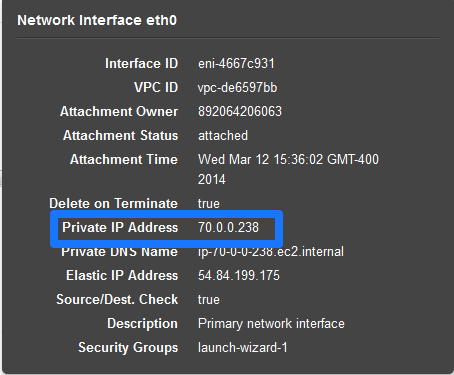
- Enter the private IP for Ethernet 0 of the secondary node to be replicated to from AWS setup.
- Provide this private IP address when prompted by the SoftNAS StorageCenter wizard, as seen here on the right.
- Provide the SoftNAS® instance credentials.
- Click Finish.
Set Up HA
- From the SoftNAS SnapReplicate™ panel, click on Add SNAP HA and click Next.
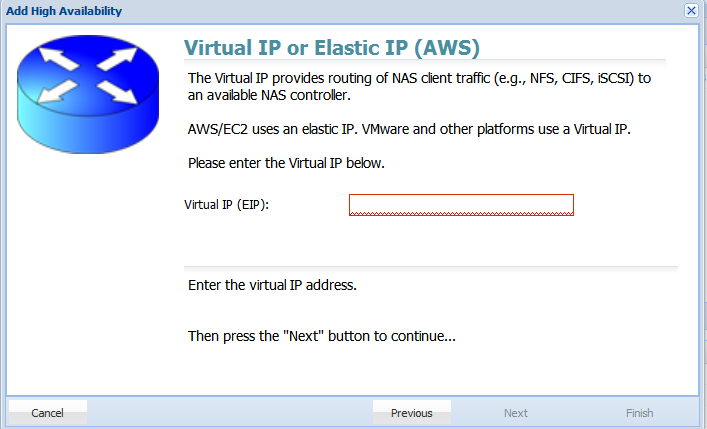
- Select the type of HA you want to use. In this case we are creating a Virtual IP set up. Select Virtual IP.
- Add the remaining Virtual IP which was previously configured in AWS. This is the 3rd Virtual IP that we previously selected/created that is outside the CIDR block of the two instances. This IP is chosen by you, and requires no configuration. Select any IP address that is outside the CIDR block of the IPs selected for each SoftNAS instance.
- Provide the Amazon IAM User credentials that will be used with SoftNAS®. Click Next.
- Click Finish.