Amazon Web Services VPC: Virtual IP Setup
SoftNAS now supports the set up of highly available VPCs with private subnets using virtual IPs. Elastic IP setup is still supported for legacy purposes. However, Virtual IP setup, more secure because it does not require a public facing IP, is our recommended best practice.
Secure Administrative Access in VPC
Without a public facing IP, the only way to access a Virtual IP VPC is by connecting to the private subnet upon which it is based. There are multiple ways to configure secure administrative access to the SoftNAS SNAP HA™ storage controllers:
- VPN - this is the most secure stand-alone solution, and a recommended minimum best practice for limiting access to the private IPs of each SoftNAS® controller. In this case, use DNS to assign a common name to each controller (e.g., "nas01.localdomain.com", "nas02.localdomain.com"), making routing to each SoftNAS® controller convenient for administrators
- Admin Desktop - an even more secure approach is to combine VPN access with an Administrator's desktop, (sometimes referred to as a jumpbox) typically running Windows and accessed via RDP. This secure admin desktop adds another layer of authentication, namely Active Directory (or local account) authentication. Once an administrator has gained secure, encrypted access to the Admin Desktop, she opens up a web browser to connect to the SoftNAS StorageCenter™ controller.
Amazon Private IP AWS Installation Overview
This section describes how to set up an Amazon AWS Virtual Private Cloud (VPC) in high availability (HA) mode to work with SoftNAS SNAP HA™.
The following is required:
- Create the VPC in AWS.
- Specify the IAM User for SoftNAS®
- Configure the routing tables.
- Launch an Instance of SoftNAS® into the VPC.
- Create and Associate the Required Virtual IPs.
- Set up ICMP echo/reply to use "ALL TRAFFIC" for the VIP (for example, 40.40.40.40 will need ICMP entries)
- ALL TRAFFIC needs to be added specifically to the Security Group used for the SoftNAS nodes.
- Set up SoftNAS® for HA.
See Amazon Web Services VPC for detailed setup of the VPC, if you have not already done so.
The HA IAM Role is caps sensitive, and must be named SoftNAS_HA_IAM.
SoftNAS Setup for Virtual IPs
If setting up SoftNAS SNAP HA with virtual IPs, there is no need to create Elastic IPs. A total of 3 IP addresses will be required. The two IPs statically assigned or assigned via DHCP to your VPCs at instance creation time can be retained. Each VPC instance must have an IP in the same CIDR block. A third, human-configured (chosen by you) IP starting with a different octet will be selected during the HA wizard setup. This 3rd IP address will be used to access the share. Staring with a different octet means that if your VPC range is 172.16.0.0/16, the VIP you select must not start with 172, it must start with something else, for example: 10 or 12 or 175.
This 3rd IP address will be used to access the share. More information on adding IP addresses to your AWS/SoftNAS VPC can be found in IP Addressing in your VPC.
Setting Up for SNAP HA™
To set up SoftNAS for SNAP HA™, log into the SoftNAS® instances and access storage via the SoftNAS StorageCenter™ interface. Via the SoftNAS StorageCenter™ interface, set up SoftNAS® with the required Disk Devices, Storage Pools, and Volumes. Once this is complete for both instances, set up replication and SoftNAS SNAP HA™.
Log In to SoftNAS StorageCenter™
Logging in to SoftNAS StorageCenter™ requires the public IP of the SoftNAS® instance, as well as the Instance ID (default password).
- Obtain the virtual private IP of the SoftNAS® instance, as listed on the Instances screen. (the one outside the CIDR block of the VPC instances)
- Select the desired SoftNAS® instance.
- Copy the Instance ID.
- Navigate a local web browser to https://[Virtual Private IP of the instance]. (the one outside the CIDR block of the VPC instances)
- When prompted, use "softnas" as the username and the Instance ID (e.g., "i-99abc991") as the password. Change the password when convenient as dictated by security best practices.
The SoftNAS StorageCenter™ interface will load.
Setting Up SoftNAS®
After accessing the SoftNAS StorageCenter™ interface, set up the Disk Devices, Storage Pools, and Volumes that will ultimately be required for SNAP HA™.
For more information, see the document SoftNAS Installation Guide.
Note: When setting up storage pools for replication, they must have the same name or replication will not work properly. Also, a volume must be created on the source side node.
Setting Up Replication and SNAP HA™
Set up Replication
1. Log into your SoftNAS® instance and select the SnapReplicate / SNAP HA™ menu from the Storage Administration panel.
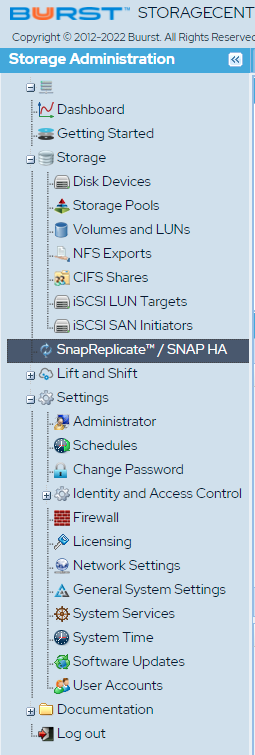
2. Click Add Replication.
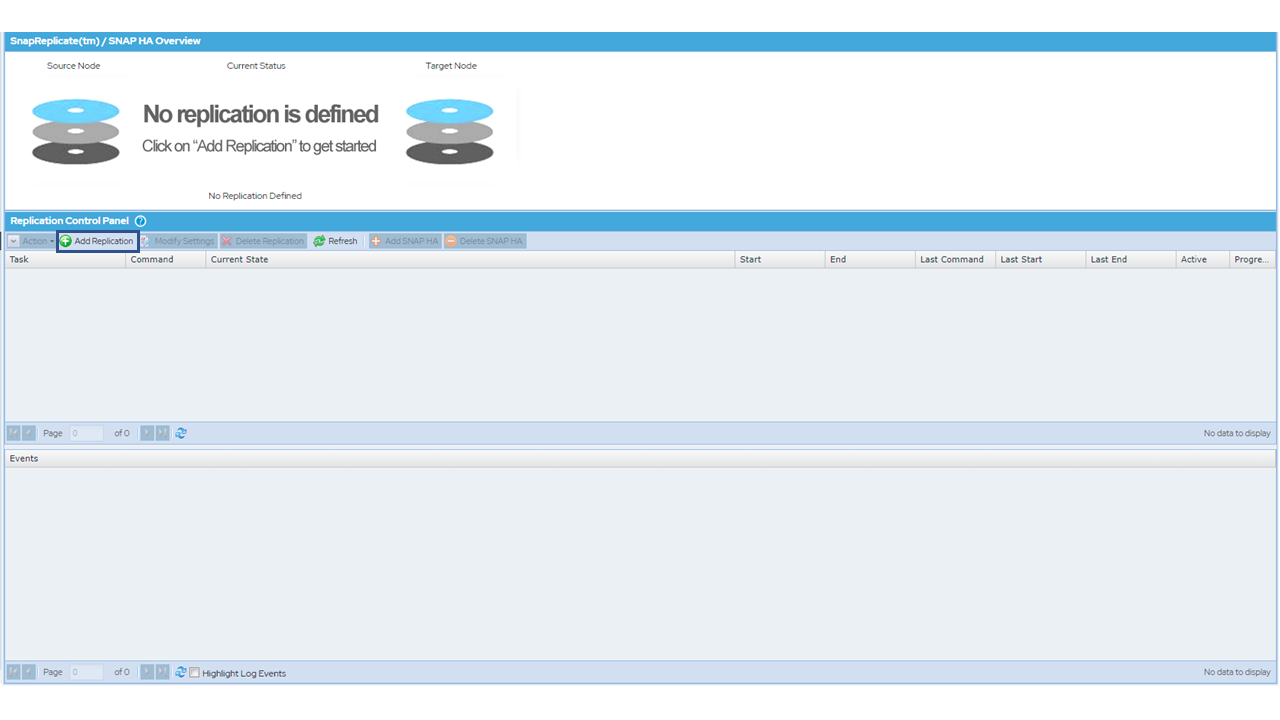
3. Enter the private IP for Ethernet 0 of the secondary node to be replicated to from AWS setup.
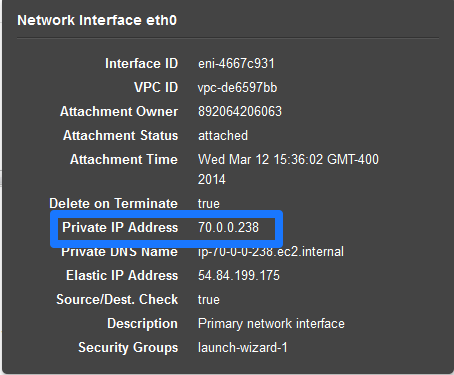
4. Provide this private IP address when prompted by the SoftNAS StorageCenter wizard, as seen here on the right.
5.Provide the SoftNAS® instance credentials.
6. Click Finish.
This will establish replication.

Set Up HA
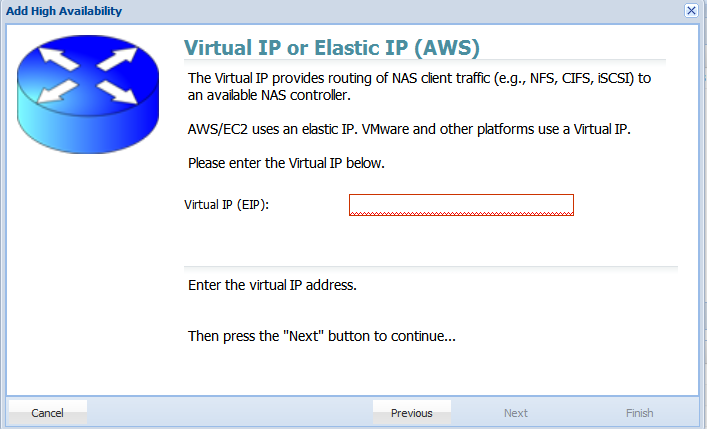
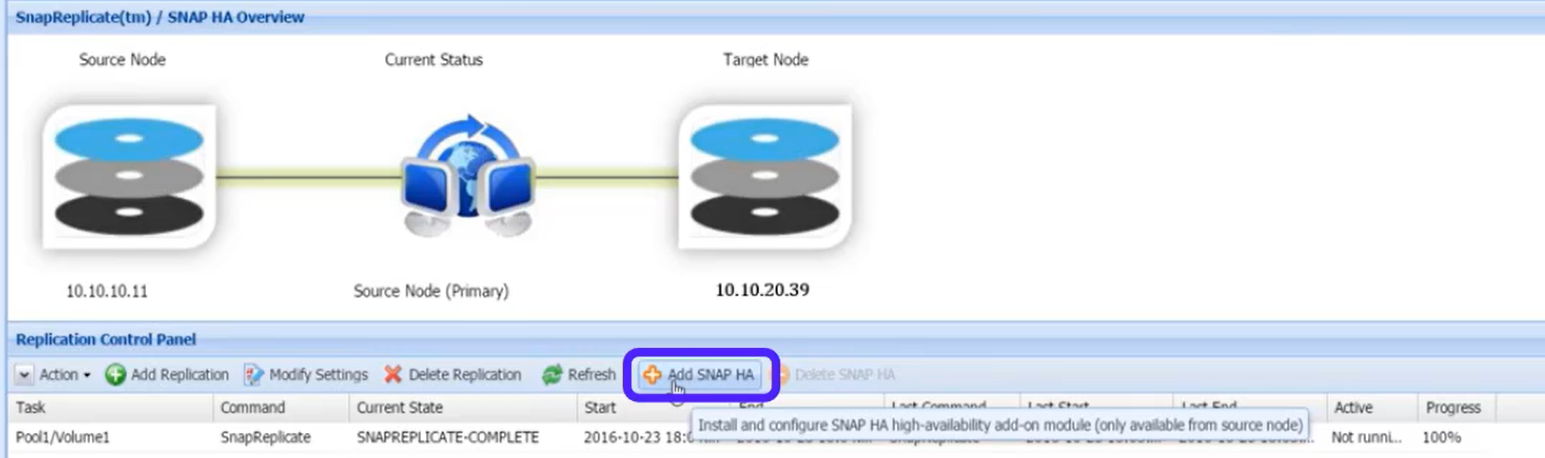
1. From the SoftNAS SnapReplicate™ panel, click on Add SNAP HA and click Next.
2. Select the type of HA you want to use. In this case we are creating a Virtual IP set up. Select Virtual IP.
3. Add the remaining Virtual IP which was previously configured in AWS. This is the 3rd Virtual IP that we previously selected/created that is outside the CIDR block of the two instances. This IP is chosen by you, and requires no configuration. Select any IP address that is outside the CIDR block of the IPs selected for each SoftNAS instance.
4. Provide the Amazon IAM User credentials that will be used with SoftNAS®. Click Next.
Click Finish.
At this point, SoftNAS® will do the heavy lifting required to establish HA without the need for any user intervention. This process may take several minutes. After completion, a high availability SoftNAS® pair has been successfully set up across availability zones in AWS.